Featured on TheNextWeb & Lifehacker

Something really cool happened this week. I will let the tweets to take over.

… and that’s how I made it to the homepage of TheNextWeb.

… and Lifehacker

Source code of the extension: https://github.com/tecoholic/Just-Arrived

For Chrome: Chrome Webstore

For Firefox: https://addons.mozilla.org/en-GB/firefox/addon/just-arrived-ff/

What did I learn from this?

The most important thing I learnt while doing this is probably the fact that the extension architecture is standardised across Chrome and Firefox. Thanks to Shrinivasan for asking me to port it to Firefox.

But, I think the relationship is one sided. Firefox can work with extensions written for Chrome, but Chrome won’t work with extensions written for Firefox. This is due to the nature of Firefox’s API and the fallback it offers.

For example, the storage api on Firefox is storage.* whereas on Chrome it is chrome.storage.*. Since Firefox has fallbacks for all the chrome.* API, the code primarily written for Chrome works without modifications on Firefox. But if a developer writes the plugin first for Firefox, it would lose the namespacing and therefore won’t work.

More technical details here at MDN web docs: Building a cross-browser extension

Special thanks @tshrinivasan for pushing me to build it for Firefox to @SuryaCEG for the UX advised and @IndianIdle for writing the article.

Strapi – Optimizing REST API responses by preventing auto-population of relations

Strapi is an Open Source headless CMS based on NodeJS. It provides the backend admin tools to quickly create an API – both REST and GraphQL.

This is a mini series which outlines:

  1. Setting up Strapi and creating an API
  2. Adding ownership control to the API endpoints
  3. Optimising REST API responses – (you are here)

So far …

We have created a REST API for an expense management application with category support. We have JWT token based auth which came with Strapi to authenticate users. We have implemented the IsOwner policy in the controllers to restrict data access.

Optimizing the Responses while

The API by default automatically populates relationships and sends in all the related data. It is very useful for some cases and completely a overkill for others. Take the following for example.

I have setup 5 Expense Items in the Admin dashboard for our test_user. 4 of them are under the category ‘Travel’ and one of them is under the category ‘Food’. Now when we fetch the categories, let us see what we get.

When making a GET request to /categories, we are not only getting the categories but also all the expense items which are under every category. When a user has thousands of expense items, we cannot be querying the DB for all of them whenever a GET request is made to categories. That would cause serious performance issues.

Preventing auto-population of relations

We can turn this off by setting the autoPopulate flag to false in the model.

  • Open the file /api/category/models/category.settings.json
  • Add the line "autoPopulate": false in the the expense-items block as shown below
  • Let us also disable auto-population of the user. We have already implemented the IsOwner policy for all requests, so only the owner is going to be requesting their own categories and the user field is redundant data.
{
  "kind": "collectionType",
  "collectionName": "categories",
  "info": {
    "name": "Category"
  },
  "options": {
    "increments": true,
    "timestamps": true
  },
  "attributes": {
    "name": {
      "type": "string",
      "required": true,
      "minLength": 2
    },
    "color": {
      "type": "string"
    },
    "user": {
      "plugin": "users-permissions",
      "model": "user",
      "via": "categories",
      "autoPopulate": false
    },
    "expense_items": {
      "via": "category",
      "collection": "expense-item",
      "autoPopulate": false
    }
  }
}

Now as soon as we save the file, the Strapi dev server should restart. Now we can run the same GET /categories request to verify the results.

There is no expense items in the response. Just the categories.

We can use this method to turn of auto population of any relation in any of the Content Types we have created. This way the API returns only what we intend it to return.

Optimising the Login response

Let us take a look at the login response.

We can see that it contains all the categories and expense items of the user. This would put disastrous load on the system as the data size grows. So, let us turn off auto-populate for the users as well.

  • Open /extensions/user-permissions/models/User.settings.json
  • Scroll to the bottom and add "autoPopulate": false to the entries categories and expense_items

Now, let us login again and check the response.

No categories or expense items in the response, just the JWT token user object and the roles. Now every time a user logs in Strapi won’t be querying the database for everything related to the user.

Conclusion

This concludes this mini series. By applying the changes presented in this series, Strapi can be used a REST API backend not just for CMS purposes with strong public frontend, but also as a good backend for User focused web applications.

In my journey as a web developer, Strapi blew my mind the same way Django did almost a decade back with its built-in Admin UI. The amount of power Strapi packs right off the box is amazing.

Strapi – Adding IsOwner Policy to the API

Strapi is an Open Source headless CMS based on NodeJS. It provides the backend admin tools to quickly create an API – both REST and GraphQL.

This is a mini series which outlines:

  1. Setting up Strapi and creating an API
  2. Adding ownership control to the API endpoints – (you are here)
  3. Optimising REST API responses

So far…

We have created models for the app and have an API setup which works with JWT Authentication without a single line of code. But we have an issue, any authenticated user can read every other user’s data.

This can be rectified using setting up an access policy in the Model’s controller file.

Side Note: Strapi’s Policies section explains how to implement them and configure them for routes here. But that doesn’t work for IsOwner policy because ownership is object specific and thus has to be implemented in the controller instead of policy configuration.

Writing the Is Owner Policy

We will be using the Create is owner policy document as our reference material to update our API. I will be repeating all of it here with a little more information.

We have two models defined so far – Category & ExpenseItem. I am going to implement the IsOwner policy for Category and leave ExpenseItem as an exercise. Now, let’s go write some code.

  • Let us open our text editor and open the api/category/controllers/category.js file
  • It should have the following content
'use strict';

/**
* Read the documentation (https://strapi.io/documentation/v3.x/concepts/controllers.html#core-controllers)
* to customize this controller
*/

module.exports = {};

All of our code will go into the braces. We will be adding 6 functions:

  1. create – the function executed when a new category is created. Here we will make sure that any newly created category is automatically assigned to the user creating the category.
  2. find – the function execute when all the objects are listed. For eg., /categories. When a user requests categories, we will filter the results such that the user receives only their’s and not others’.
  3. findOne – Same as the one above when a single object is accessed with id like /categories/1
  4. count – the count of objects in a model. We will be counting only the objects created by a particular user
  5. update – update a specific object. Only the owner should be able to do it
  6. delete – delete a specific object. Only the owner should be able to delete an object.

The above will cover the 4 CRUD operations and the 2 extra ones (listing and counting).

Create function

const { parseMultipartData, sanitizeEntity } = require("strapi-utils");

module.exports = {
/**
* Create a new Category
*
* @param {*} ctx The Request Context
*/
async create(ctx) {
let entity;

if (ctx.is('multipart')) {
const { data, files } = parseMultipartData(ctx);
data.user = ctx.state.user.id;
entity = await strapi.services.category.create(data, { files });
} else {
ctx.request.body.user = ctx.state.user.id;
entity = await strapi.services.category.create(ctx.request.body);
}
return sanitizeEntity(entity, { model: strapi.models.category });
},
};

Strapi is built on Koa.js and thus uses async await instead of callbacks. Let us break down the logic of the function and see what’s happening.

  • the function is passed in the Request context which has the all the request related information like the form data, the user identified in the request (from our JWT token)..etc.,
  • we check if it is a multipart form which would mean we have uploaded files to deal with.
  • we parse the form for data and files, set the user as the user executing the request and use the Strapi service for our model to create a new entity.
  • if it is not a multipart form, then we just set the user of the request as an extra field into the request data and create the category using the Strapi service
  • finally we need to return the new category as a response – We use strapi’s function sanitizeEntity to pass in the newly created entity and the model.

Side Note: I know the Category model doesn’t have any files attached to it and the IF block with ‘multipart’ check is not necessary in this situation. But I am leaving it here for two reasons:

  1. If in the future, we want to support logos or some form of header image for the Category model, we don’t have to come back and update the code again.
  2. This might act as a reference implementation for someone reading the blog and might use it on a model with files and don’t want them to wonder files are not getting saved.

If you really want to have a lean code base then the just 3 lines would be sufficient

module.exports = {
/**
* Create a new Category
*
* @param {*} ctx The Request Context
*/
async create(ctx) {
ctx.request.body.user = ctx.state.user.id;
let entity = await strapi.services.category.create(ctx.request.body);
return sanitizeEntity(entity, { model: strapi.models.category });
},
};

Testing the create logic

Now we can re-run the POST request to create a new category in POST and verify that the user is automatically set for the category.

strapi_new_category_with_user

Update function

Now that we have the create function auto assigning the user for the categories, let us implement restrictions for updates.

/**
* Update a category
*
* @param {*} ctx the request context
*/

async update(ctx) {
const { id } = ctx.params;

let entity;

// Find the category matching the ID and the user
const [category] = await strapi.services.category.find({
id: ctx.params.id,
'user.id': ctx.state.user.id,
});

if (!category) {
return ctx.unauthorized(`You can't update this entry`);
}

// Update the category
if (ctx.is('multipart')) {
const { data, files } = parseMultipartData(ctx);
entity = await strapi.services.category.update({ id }, data, {
files,
});
} else {
entity = await strapi.services.category.update({ id }, ctx.request.body);
}

return sanitizeEntity(entity, { model: strapi.models.category });
},

The update function adds an extra step of fetching the category and making sure that the category with that ID and userID exists before reading the request data. If the category doesn’t exist, then it returns a Unauthorized error. If it exists, then it updates the category and returns the updated information.

We can verify it with a PUT request to http://localhost:1337/categories/

strapi_update_category

Notice that the Food category has now been updated to Food & Drinks. Not just that, using the JWT token of the intruder user wouldn’t work either.

strapi_update_unauthorized

Find function

/**
* List all the categories beloinging to the requesting user
*
* @param {*} ctx the request context
*/

async find(ctx) {
let entities;

if (ctx.query._q) {
entities = await strapi.services.category.search({
...ctx.query,
'user.id': ctx.state.user.id
});
} else {
entities = await strapi.services.category.find({
...ctx.query,
'user.id': ctx.state.user.id
});
}

return entities.map(entity => sanitizeEntity(entity, { model: strapi.models.category }));

}

The find function checks if the query is a search query or a filter and calls the corresponding function. We also pass the 'user.id' of the requesting user along with other query params from the request to filter the search results. Now when we request the url http://localhost:1337/categories, the response contains only the objects of the requesting user.

strapi_get_categories_test_user

Now let us see what we get when we request as a different user

strapi_get_categories_intruder

FindOne function

/**
* Get the category with a specific ID
*
* @param {*} ctx the request context
*/
async findOne(ctx) {
const { id } = ctx.params;

const entity = await strapi.services.category.findOne({ id, 'user.id': ctx.state.user.id });

if (!entity) {
return ctx.unauthorized(`You can't view this entry`);
}

return sanitizeEntity(entity, { model: strapi.models.category });
},

Fetching the category with id=3 as the owner (test_user)

strapi_get_one_category_test_user

Trying to get test_user’s category as the intruder

strapi_get_one_category_intruder

Count function

/**
* Count of the categories of the requesting user
*
* @param {*} ctx the request context
*/

count(ctx) {
if (ctx.query._q) {
return strapi.services.category.countSearch({
...ctx.query,
"user.id": ctx.state.user.id,
});
}
return strapi.services.category.count({
...ctx.query,
"user.id": ctx.state.user.id,
});
},

Count of test user

strapi_category_count

Delete function

/**
* Delete a record
*
* @param {*} ctx the request context
*/
async delete(ctx) {
const [category] = await strapi.services.category.find({
id: ctx.params.id,
"user.id": ctx.state.user.id,
});

if (!category) {
return ctx.unauthorized(`You can't delete this entry`);
}

let entity = await strapi.services.category.delete({ id: ctx.params.id });
return sanitizeEntity(entity, { model: strapi.models.category });
},

Delete as a intruder – Unauthorized

strapi_delete_intruder

Delete as the owner – test_user

strapi_delete_test_user

Final code for the controller

Here is the complete controller code with all the functions.

'use strict';
const { parseMultipartData, sanitizeEntity } = require("strapi-utils");
/**
* Read the documentation (https://strapi.io/documentation/v3.x/concepts/controllers.html#core-controllers)
* to customize this controller
*/
module.exports = {
/**
* Create a new Category
*
* @param {*} ctx The Strapi Context
*/
async create(ctx) {
let entity;
if (ctx.is("multipart")) {
const { data, files } = parseMultipartData(ctx);
data.user = ctx.state.user.id;
entity = await strapi.services.category.create(data, { files });
} else {
ctx.request.body.user = ctx.state.user.id;
entity = await strapi.services.category.create(ctx.request.body);
}
return sanitizeEntity(entity, { model: strapi.models.category });
},
/**
* Update a category
*
* @param {*} ctx the request context
*/
async update(ctx) {
const { id } = ctx.params;
let entity;
// Find the category matching the ID and the user
const [category] = await strapi.services.category.find({
id: ctx.params.id,
"user.id": ctx.state.user.id,
});
if (!category) {
return ctx.unauthorized(`You can't update this entry`);
}
// Update the category
if (ctx.is("multipart")) {
const { data, files } = parseMultipartData(ctx);
entity = await strapi.services.category.update({ id }, data, {
files,
});
} else {
entity = await strapi.services.category.update({ id }, ctx.request.body);
}
return sanitizeEntity(entity, { model: strapi.models.category });
},
/**
* List all the categories beloinging to the requesting user
*
* @param {*} ctx the request context
*/
async find(ctx) {
let entities;
if (ctx.query._q) {
entities = await strapi.services.category.search({
...ctx.query,
"user.id": ctx.state.user.id,
});
} else {
entities = await strapi.services.category.find({
...ctx.query,
"user.id": ctx.state.user.id,
});
}
return entities.map((entity) =>
sanitizeEntity(entity, { model: strapi.models.category })
);
},
/**
* Get the category with a specific ID
*
* @param {*} ctx the request context
*/
async findOne(ctx) {
const { id } = ctx.params;
const entity = await strapi.services.category.findOne({
id,
"user.id": ctx.state.user.id,
});
if (!entity) {
return ctx.unauthorized(`You can't view this entry`);
}
return sanitizeEntity(entity, { model: strapi.models.category });
},
/**
* Count of the categories of the requesting user
*
* @param {*} ctx the request context
*/
count(ctx) {
if (ctx.query._q) {
return strapi.services.category.countSearch({
...ctx.query,
"user.id": ctx.state.user.id,
});
}
return strapi.services.category.count({
...ctx.query,
"user.id": ctx.state.user.id,
});
},
/**
* Delete a record
*
* @param {*} ctx the request context
*/
async delete(ctx) {
const [category] = await strapi.services.category.find({
id: ctx.params.id,
"user.id": ctx.state.user.id,
});
if (!category) {
return ctx.unauthorized(`You can't delete this entry`);
}
let entity = await strapi.services.category.delete({ id: ctx.params.id });
return sanitizeEntity(entity, { model: strapi.models.category });
},
};
view raw category.js hosted with ❤ by GitHub

So far …

  • Created a project
  • Added the models
  • Setup the API
  • Added the IsOwner policy to the controller

Next

Let’s do a little bit of optimisation of the API responses. If we notice the GET request responses, the relations are always fully populated. For example, if we do a GET /categories each of these categories will have the user object in it. And if you add some expense items to a category, then all of those will be returned in the GET response as well. We will try to reduce this a bit and make it more streamlined in the next part.

Strapi – Creating an API without a single line of code

Strapi is an Open Source headless CMS based on NodeJS. It provides the backend admin tools to quickly create an API – both REST and GraphQL. I picked this up for a quick project in place of my regular Python frameworks like Flask or Django, because I can have an API up and running without writing a single line of code.

This is a mini series which outlines:

  1. Setting up Strapi and creating an API – (you are here)
  2. Adding ownership control to the API endpoints
  3. Optimising REST API responses

Why this series?

There is already wealth of blog posts on using Strapi for creating a variety of websites and apps. But most of them tend to focus on capabilities of vanilla Strapi. I want to focus on a couple of customisations that I made when using it to build a web application.

Our example app

Our example API is for an expense management system. Users can do the following things via the API:

  1. CRUD operations on Expense items
  2. CRUD operations on Categories which will be used to group the expense items

Note: I am not going to get into building frontend in this series, we will just focus on Strapi and the API

Installing Strapi

The Strapi Documentation is probably the best source for this based on your method of choice. You can install it on local machine, just pull a docker container or use a cloud provider like Digital Ocean or Platform.sh.

I will refrain from posting the instructions here to avoid duplication.

Creating the Admin Account

Once you have created a new project, start the application in development mode.

yarn develop

Side note: This is very important, I once started it using the yarn start command and spent a solid 5 minutes searching why all the edit functionalities have disappeared.

You will be greeted with a admin registration screen like this one.

strapi-register-admin

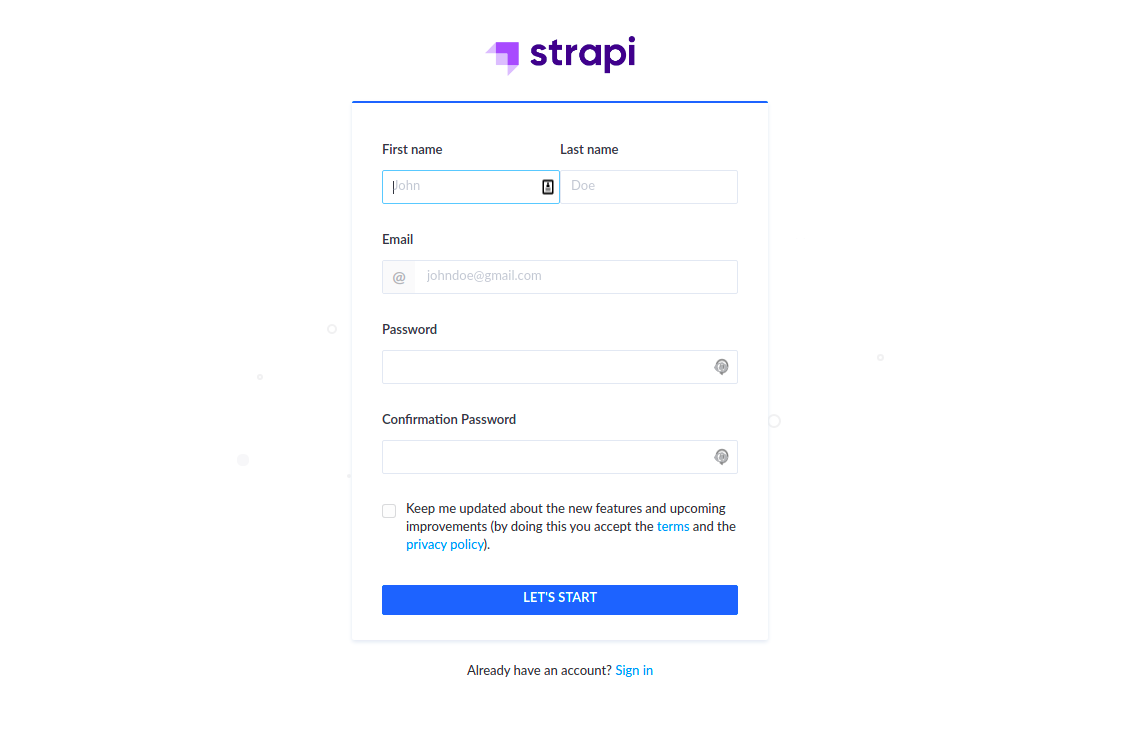
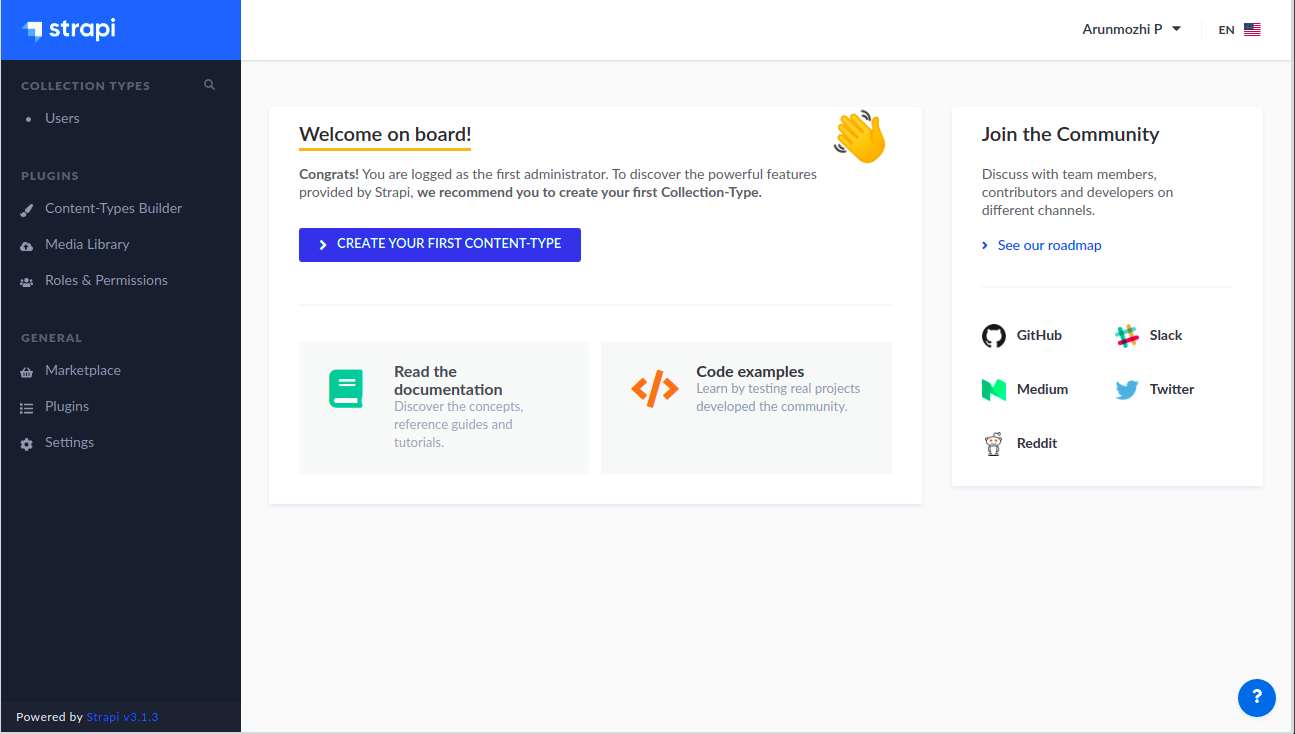
Fill in the information and create the admin account. This should log you in and show the Admin Homepage

strapi-admin-home

Creating the Models

Strapi employs the well known MVC (Model-View-Controller) pattern. So, the first step is to define the Models for the API. Models are called as “Content-Type” in Strapi due to the CMS nature of the application. Click the “Create Your First Content-Type” button on the home page to create our first model – Category.

strapi-category

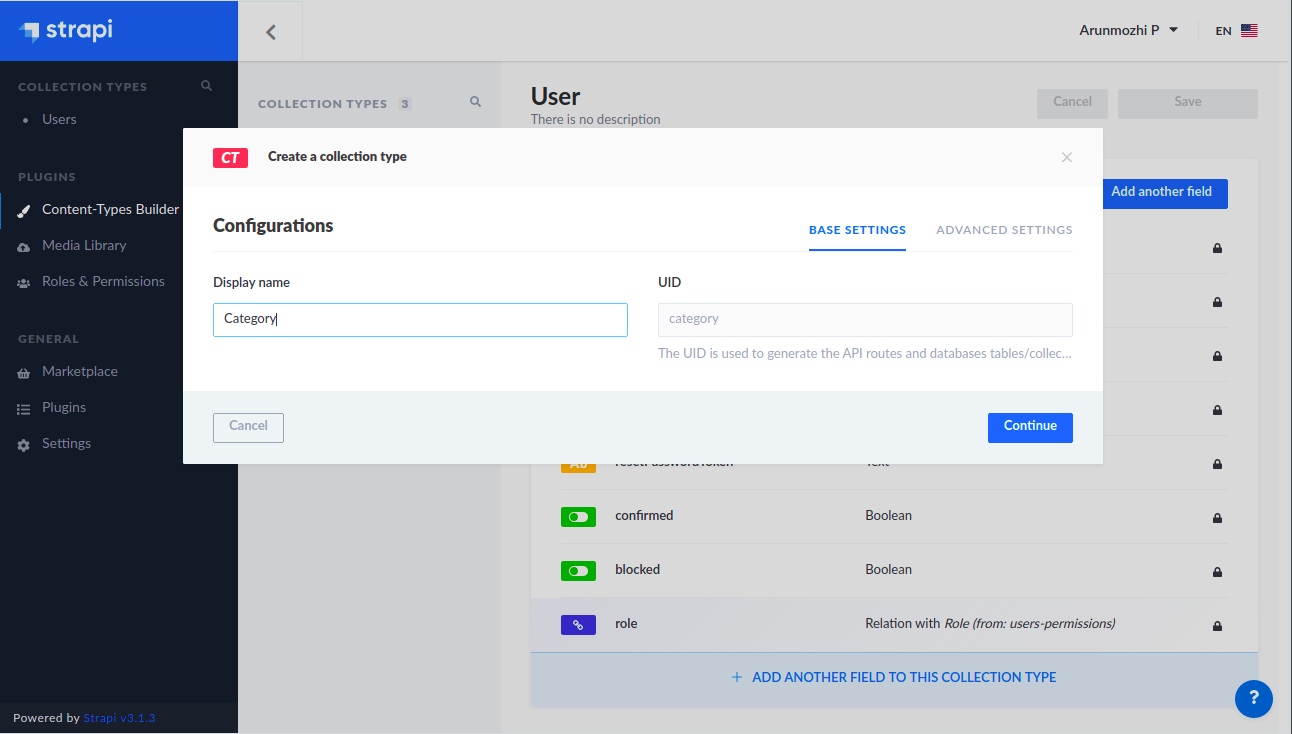
Click Continue, now we can add the fields for the model.

strapi-fields

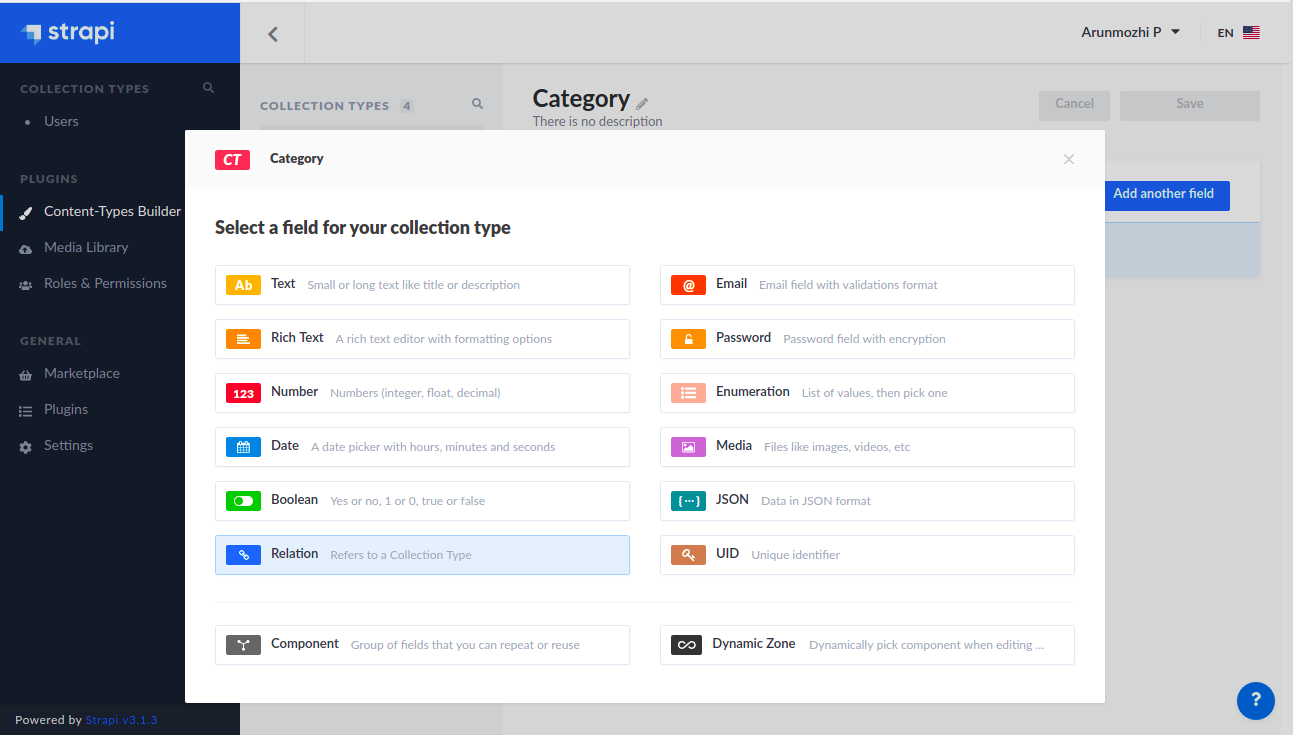
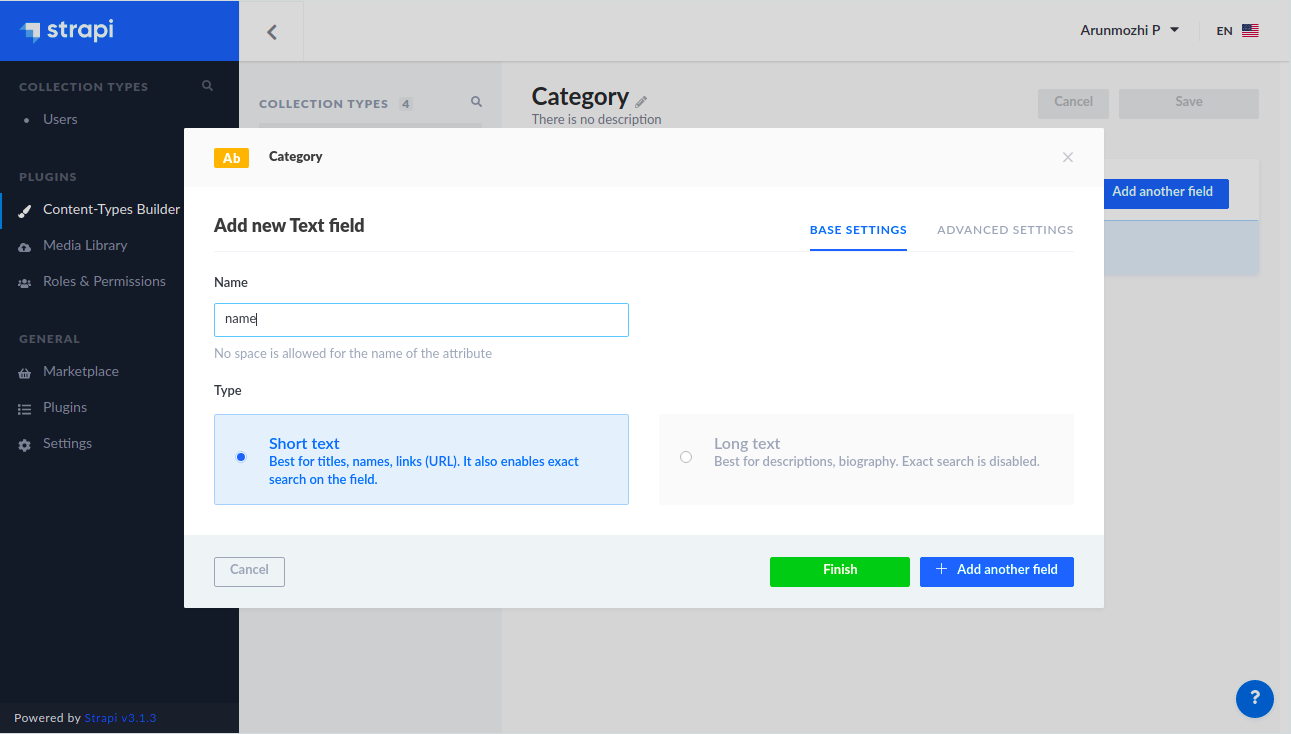
The category model is going to have two fields:

  1. name – a string – the name of the category
  2. color – a string – the hex code of the category color which be used for the frontend

Since both of them are strings, let’s click Text and create the fields

strapi-category-name

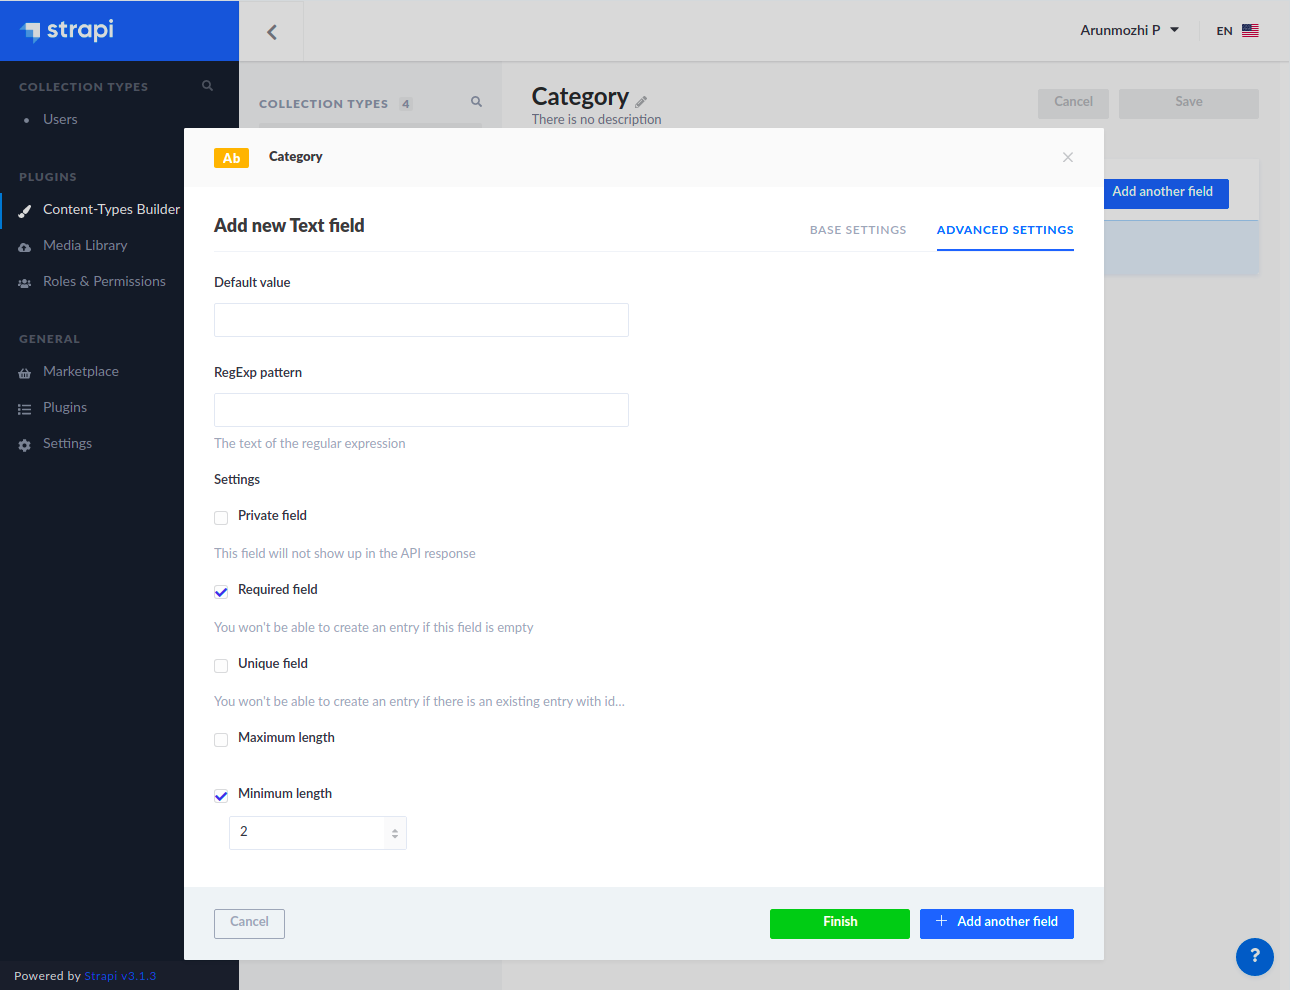
When we describe models in code, we usually have some constraints like primary key, unique, not-null ..etc., In this case we want the categories to have a name and have a minimum of 2 characters. We can specify that by switching to the Advanced Settings tab and setting the constraints.

strapi-text-advanced-settings

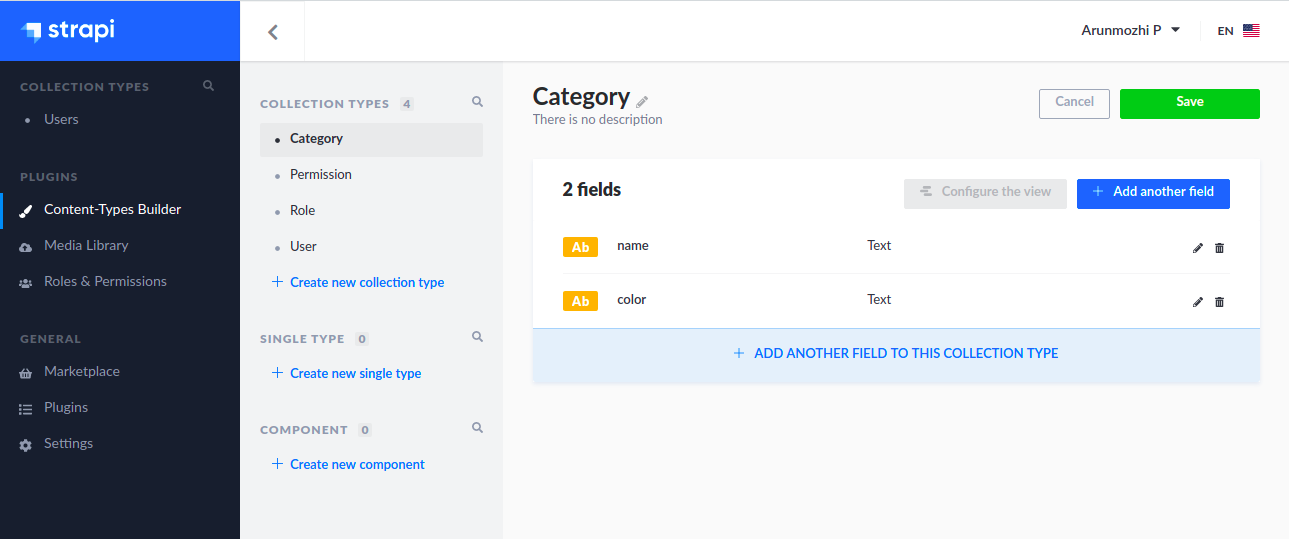
Click + Add another field and create another “Text” field for color. (I am leaving the screenshot out for that one)

Click finish after putting in the details for color field.

strapi-category-2

We want the Categories to be user specific. So we need to add a relationship between the User Model which is already there and between the Category model which we just created.

  • Click “Add another field” button again and select Relation.
  • On the relation dialog on the right side, click the dropdown next to Category and select User.
  • In the middle relationship buttons select the Many-to-One icon such that the description reads (User has many Categories)

strapi-category-user-relation

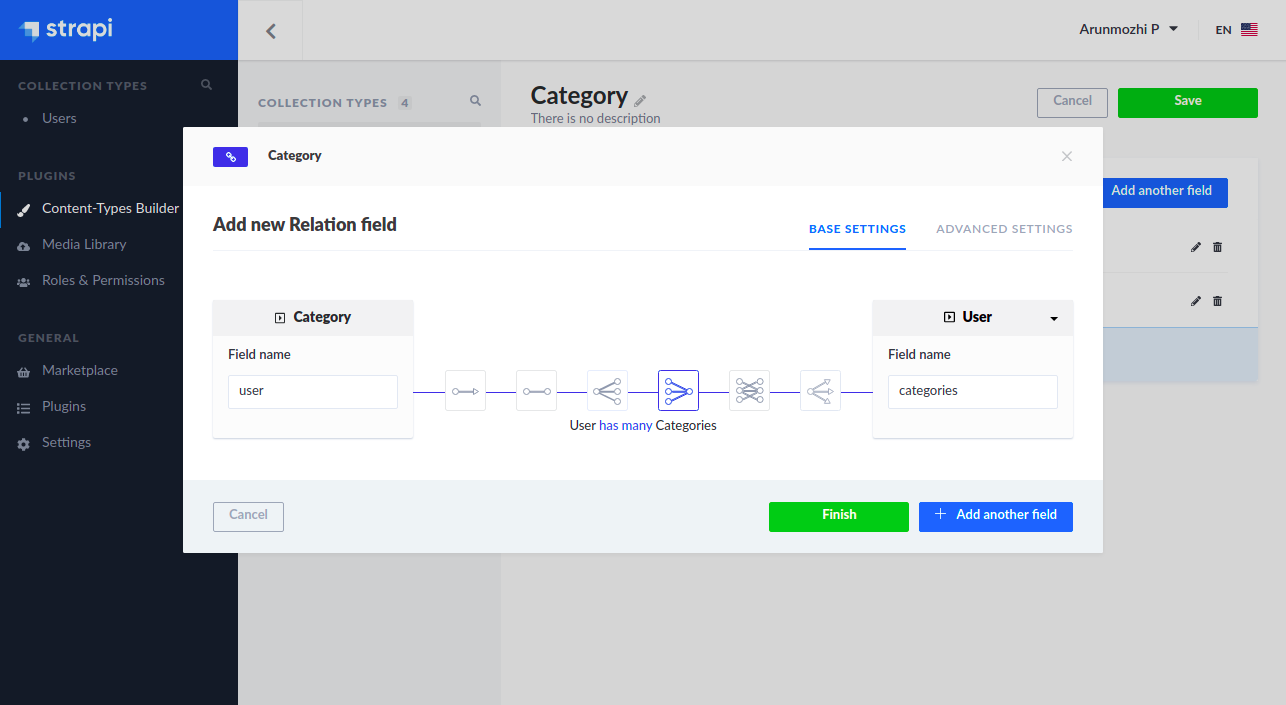
  • Click Finish and Click Save
  • Strapi will save this changes to the application and restart the application.
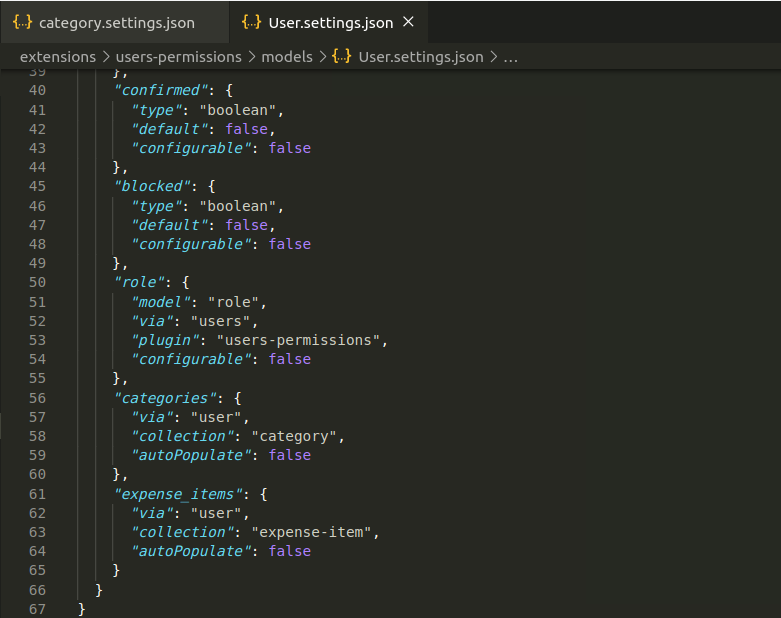
  • Now if you open the api folder and look at the contents you will see the files that Strapi created for the ‘Category’ Model
api
└── category
├── config
│   └── routes.json
├── controllers
│   └── category.js
├── models
│   ├── category.js
│   └── category.settings.json
└── services
└── category.js

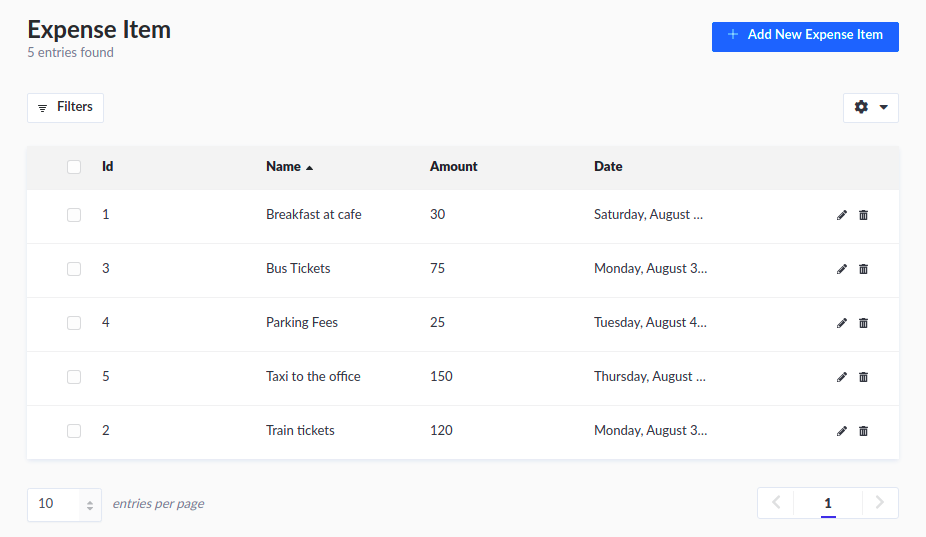
Exercise: Create the Expense Item model

Now that we know the steps to create a model visually, I am going to leave creating the Expense Item Model as an exercise. The model will have the following fields

  1. amount – Number – Floating point value to hold the expense amount
  2. name – Text – A short description of the expense
  3. date – Date – The date when the expense was made
  4. category – Relation – category of the expense (Category has many Expense Items)
  5. user – Relation – User the expense item belongs (User has many Expense Items)

strapi-expense-item

Testing the REST API

Now that our models and controllers are all in place, our API is ready. Let us try it out by visiting http://localhost:1337/categories

strapi-403

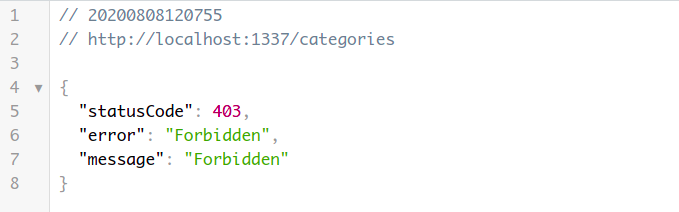
Oops, we don’t have access. While it is a disappointment, it is actually a good thing. By default Strapi doesn’t allow access to any resources. We need to configure access rules for the API to be usable. Let us do that by heading back to Strapi admin page.

Enable API Access

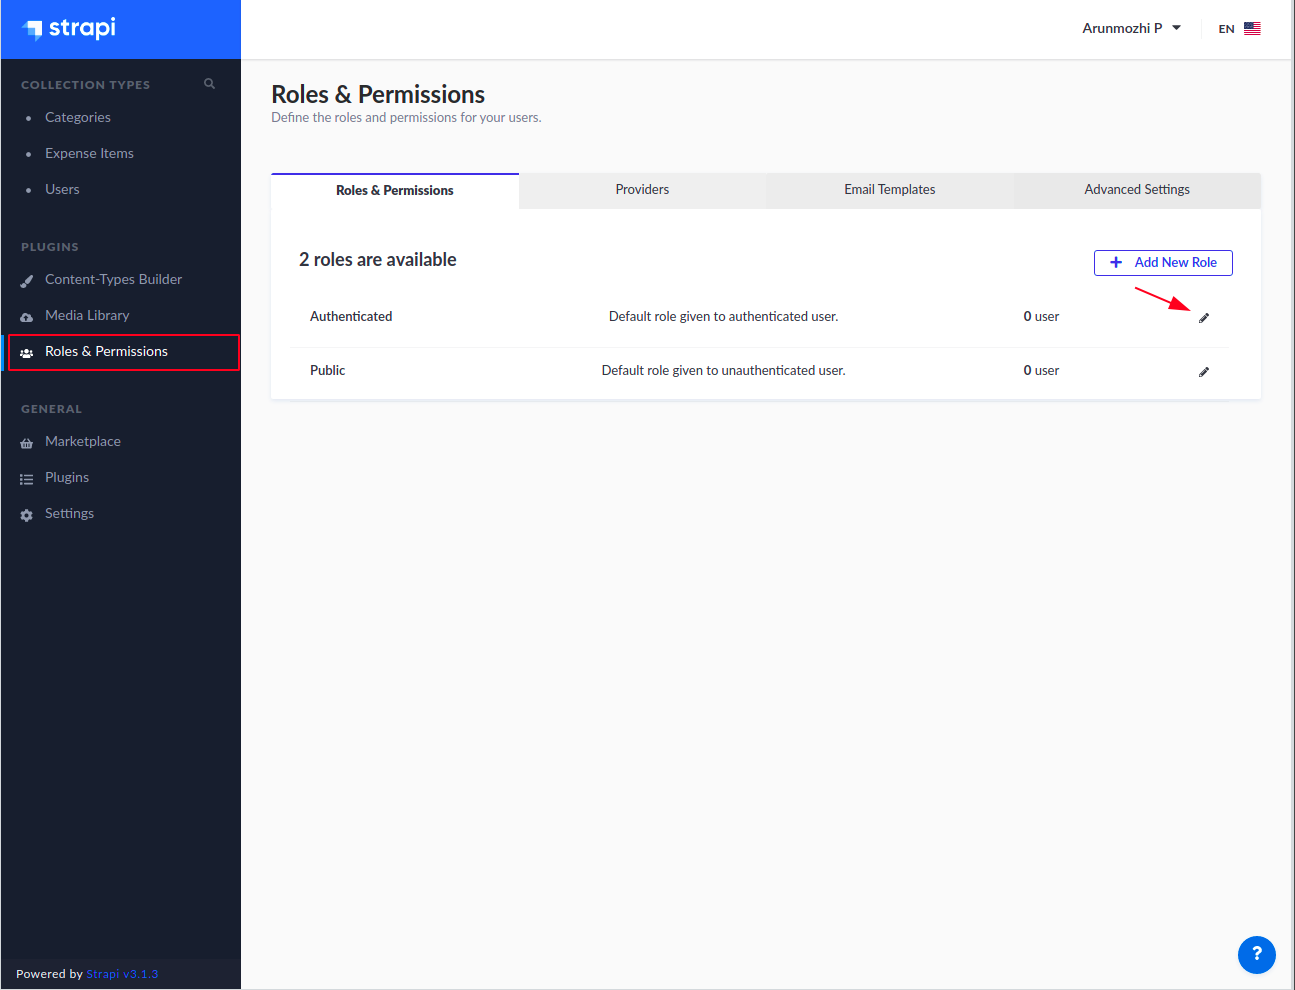
Go to the Strapi Admin page, click the Roles and Permissions on the sidebar and click on the edit button for Authenticate.

strapi-roles-permissions

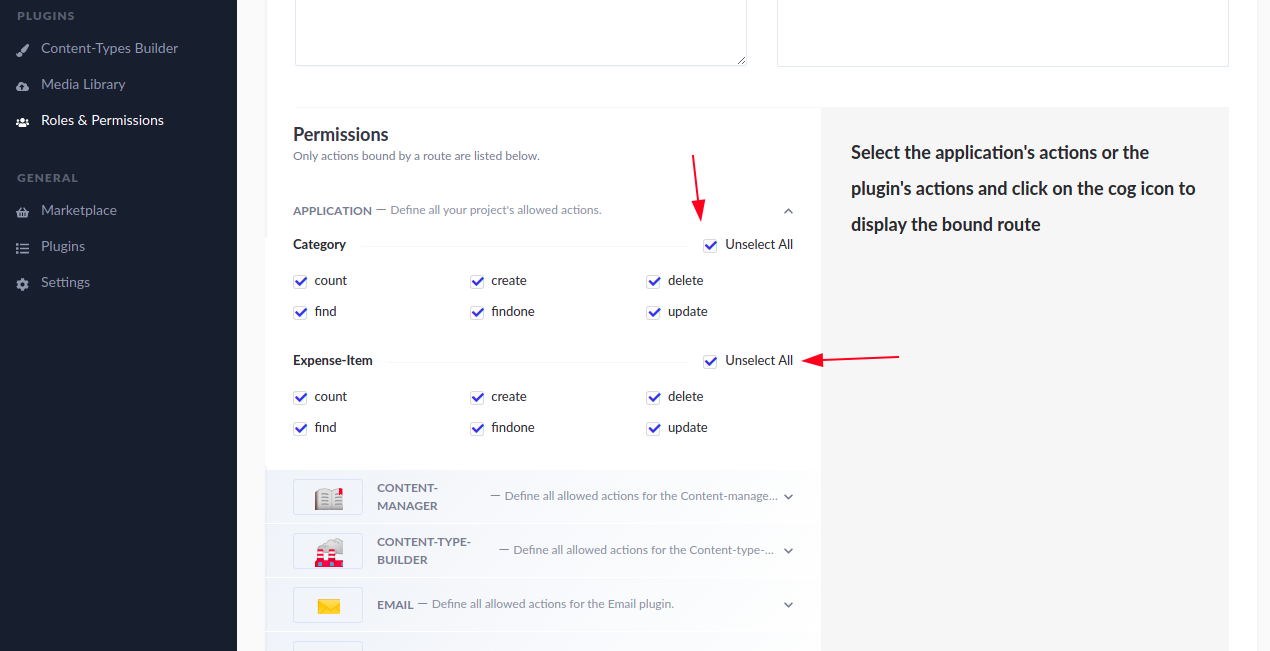
In the Permissions, click Select All for Category and Expense-Item and Save. This will allow any user who is logged into to perform all sorts of operations on the Category and Expense Item models.

strapi-select-all

Create a test user

It can be noticed that the Roles & Permissions page shows “0 User” for the Authenticated role despite us logged in as the admin. That’s because Strapi considers Super Admin users different from users created for the User content type. So, we will create a new user who will act as the test user.

  • On the sidebar click Users under Collection Types
  • Click “Add new user”
  • Input username, email and password
  • Set confirmed to ON (we are going to skip the whole email confirmation here)
  • Click Save

Now if you switch to the Roles & Permissions page, you should see it say “1 User” in the Authenticated row.

Testing the API as an authenticated user

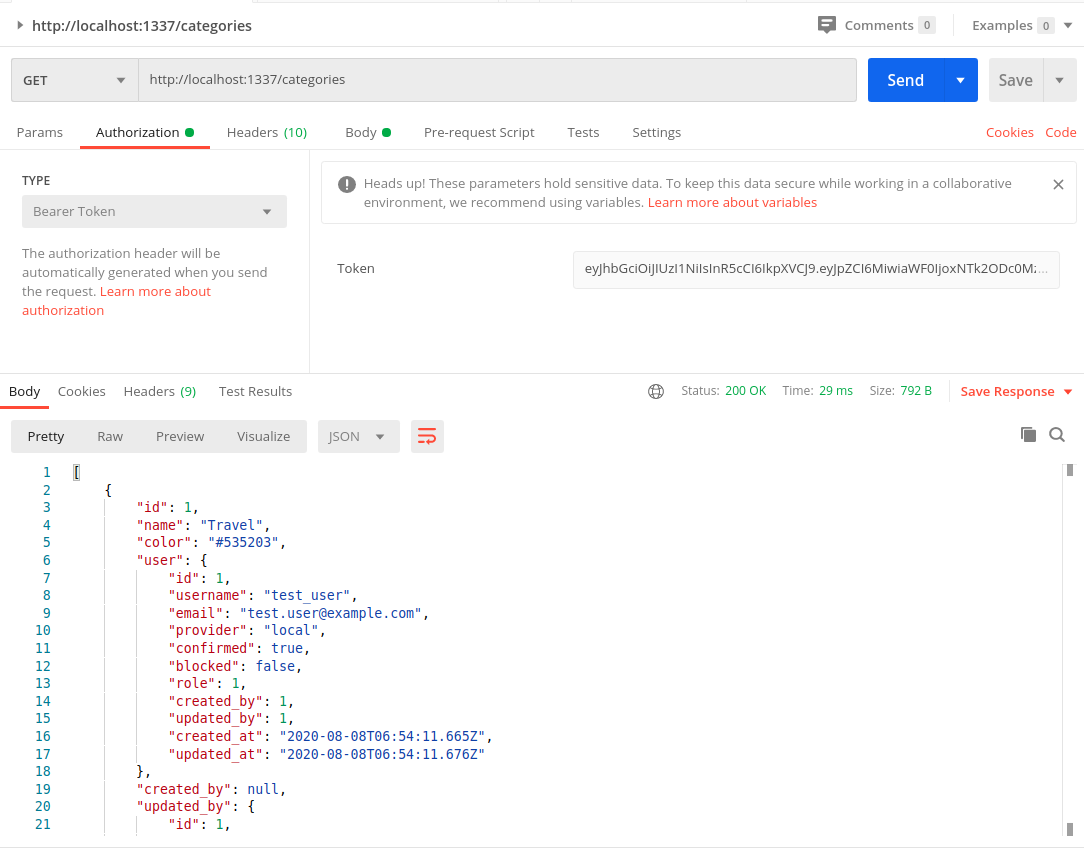
Side Note: I will use Postman to test the API. You can use whatever you are comfortable with using this as reference: Authenticated Request

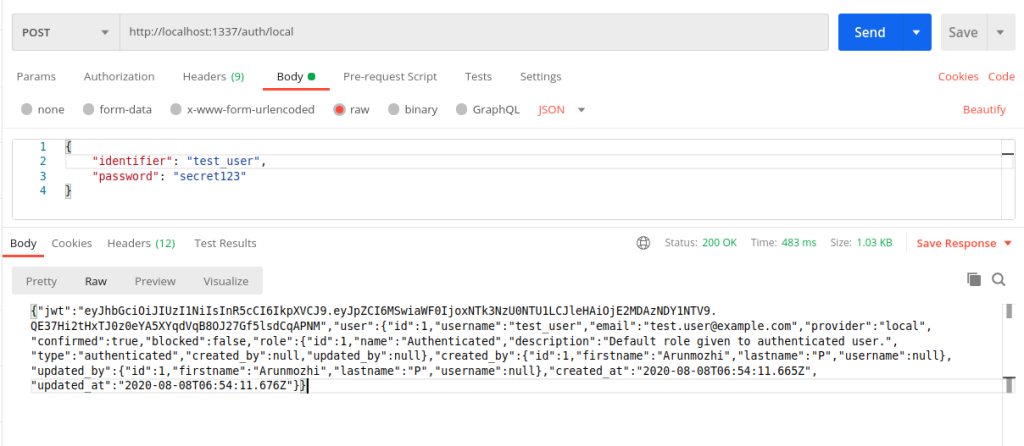
In order for the requests to be sent as an authenticated user, we need a use the JWT returned during login and use it as the Bearer Token. So, let us login at http://localhost:1337/auth/local

strapi-user-auth

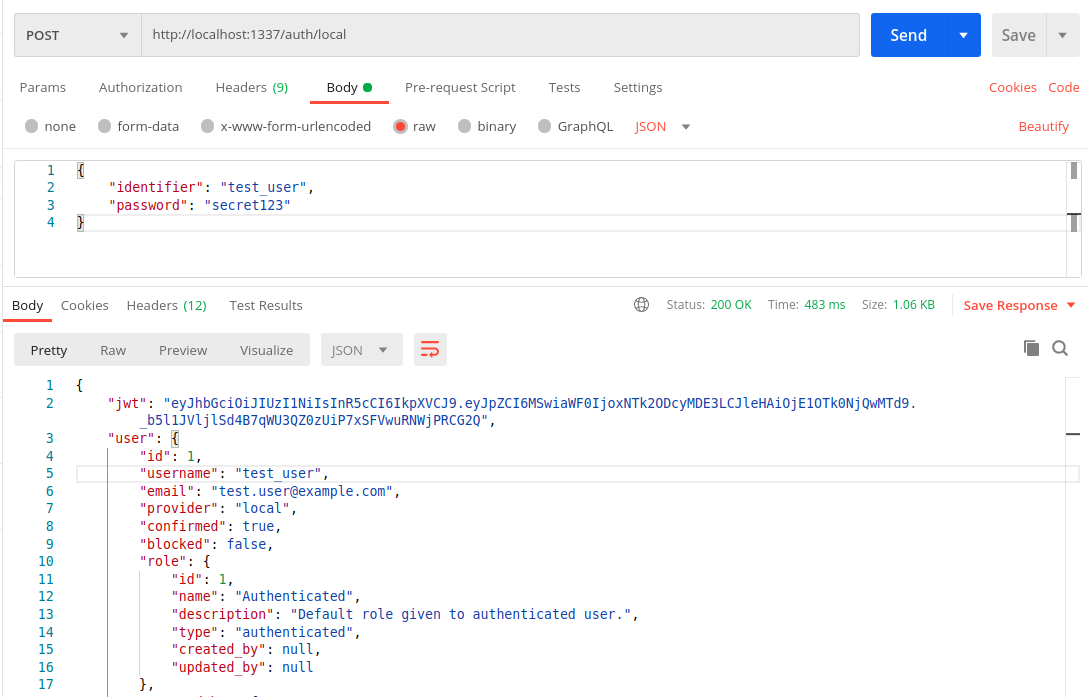
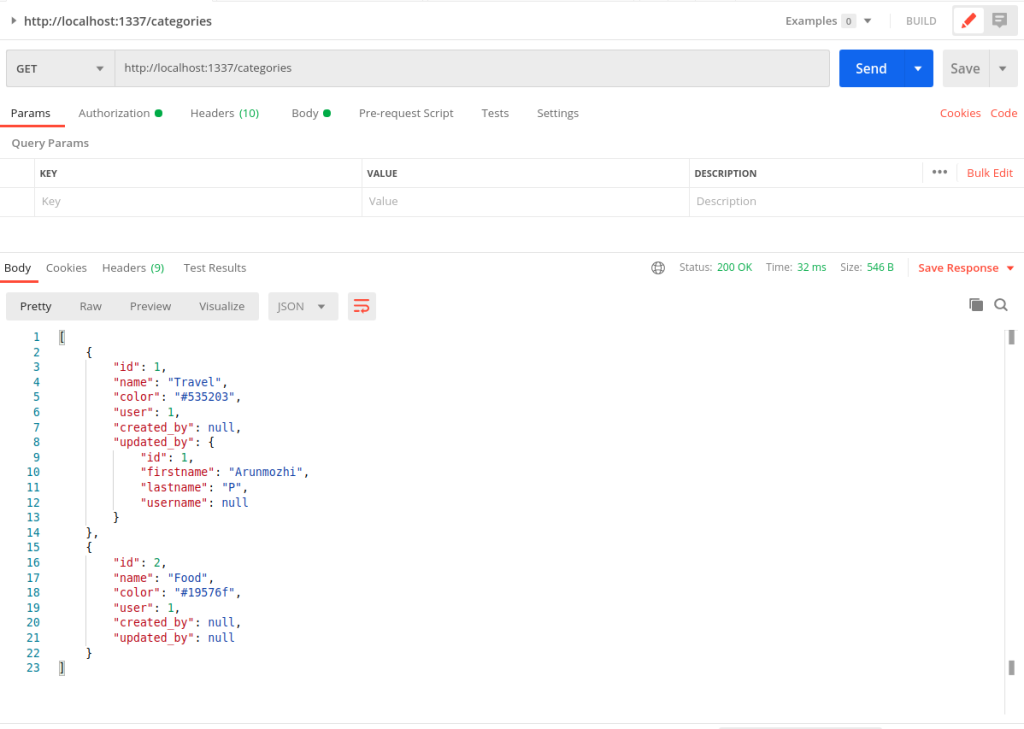
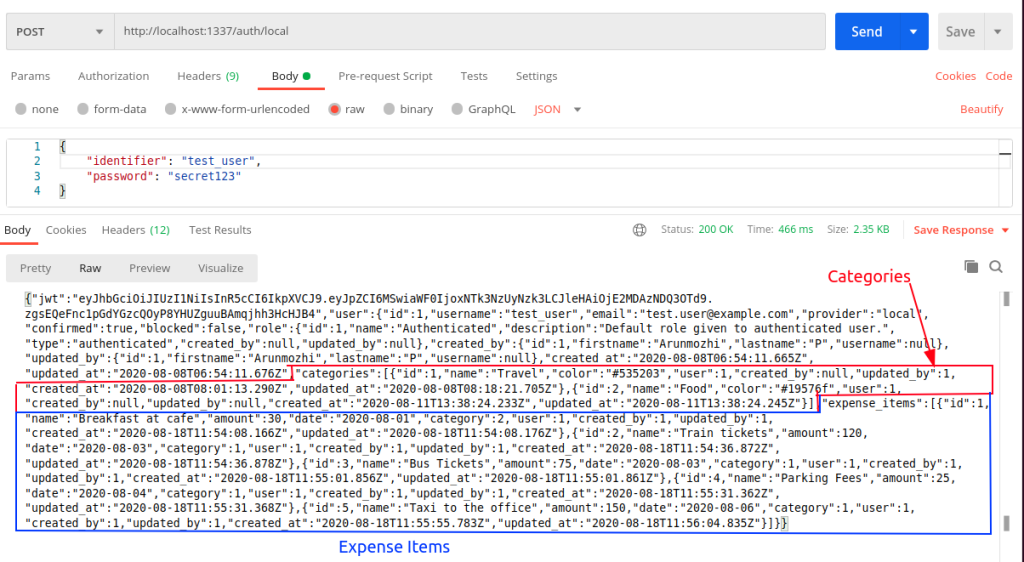
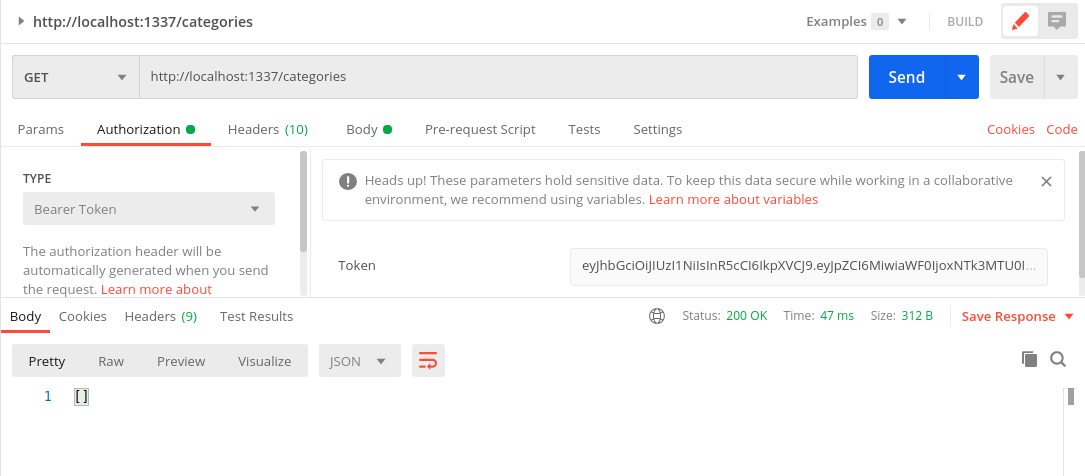
Let us copy that JWT token from the response and use it to test http://localhost:1337/categories

strapi-get-categories

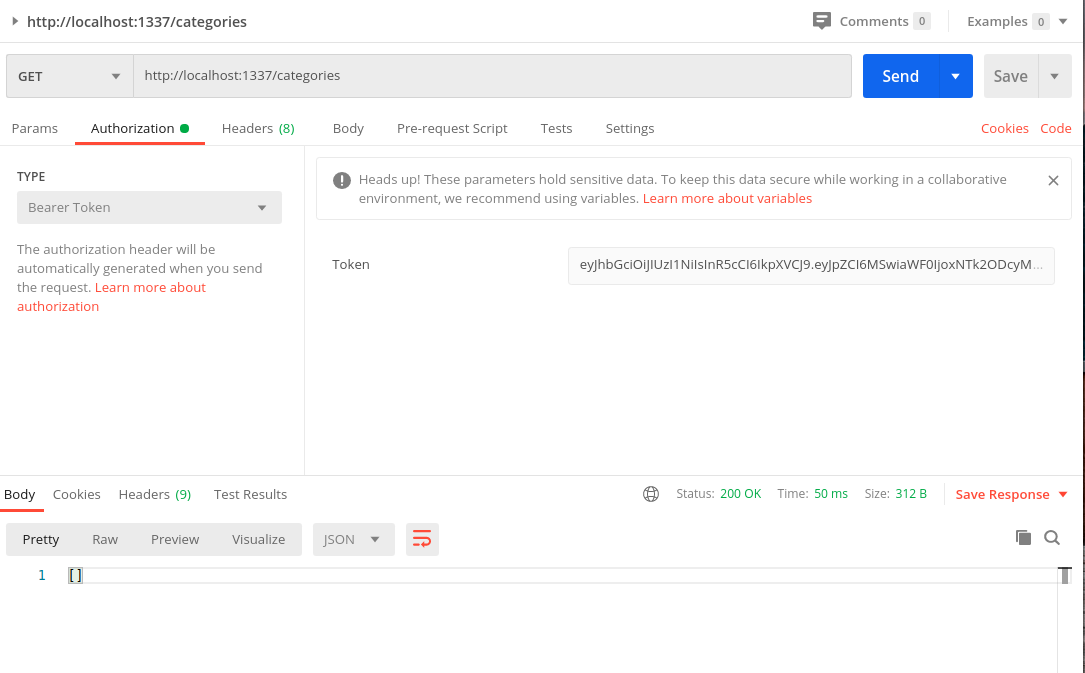
The 403 Forbidden error is gone and we have a 200 OK response with empty array []. Now let us create a Category using a POST request with the same request.

  • Set the method to POST
  • Switch to the Body Tab
  • Select raw and type JSON and
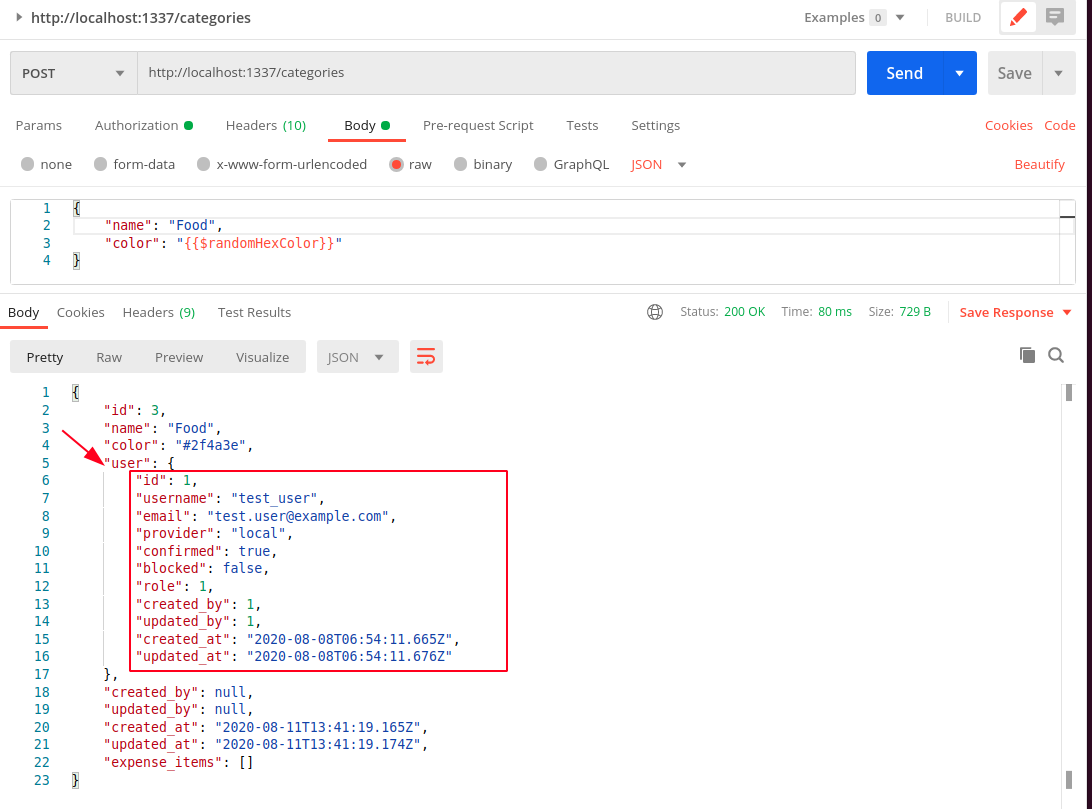
  • Enter the data as

{
“name”: “Travel”,
“color”: “{{$randomHexColor}}”
}

Side Note: I like how Postman provides functions to generate values like random colors.
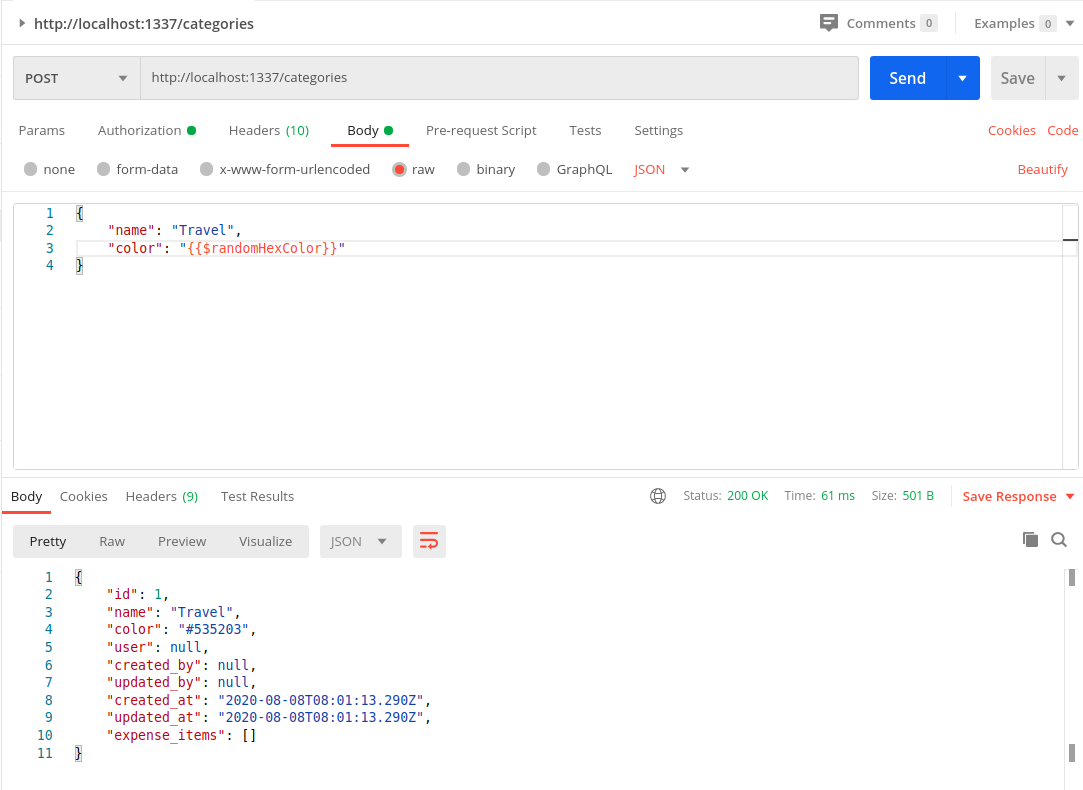
strapi-new-category

Response

{
“id”: 1,
“name”: “Travel”,
“color”: “#535203”,
“user”: null,
“created_by”: null,
“updated_by”: null,
“created_at”: “2020-08-08T08:01:13.290Z”,
“updated_at”: “2020-08-08T08:01:13.290Z”,
“expense_items”: []
}

A new category has been created with the with the ID 1. But notice that the user attribute is actually null. That is because we didn’t pass the “user” attribute in the POST request. We shouldn’t have to. That information is already available with Strapi in the form of JWT token we have sent with the request.

How do we make Strapi automatically populate the user field?

Before we answer that, let us test another thing related to this user issue.

Testing Access Control of Users

  1. Create another user in the Strapi Admin window, let us call the user intruder
  2. Now log in as the intruder user and get the JWT Token
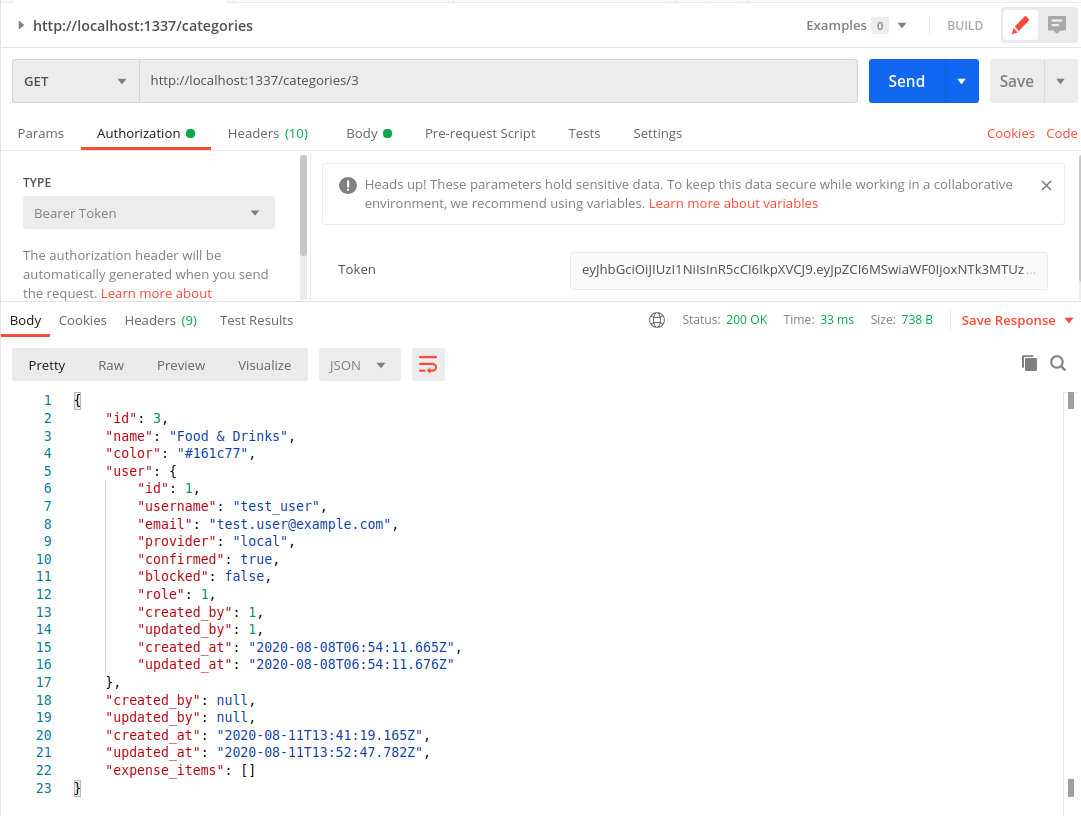
  3. Using 
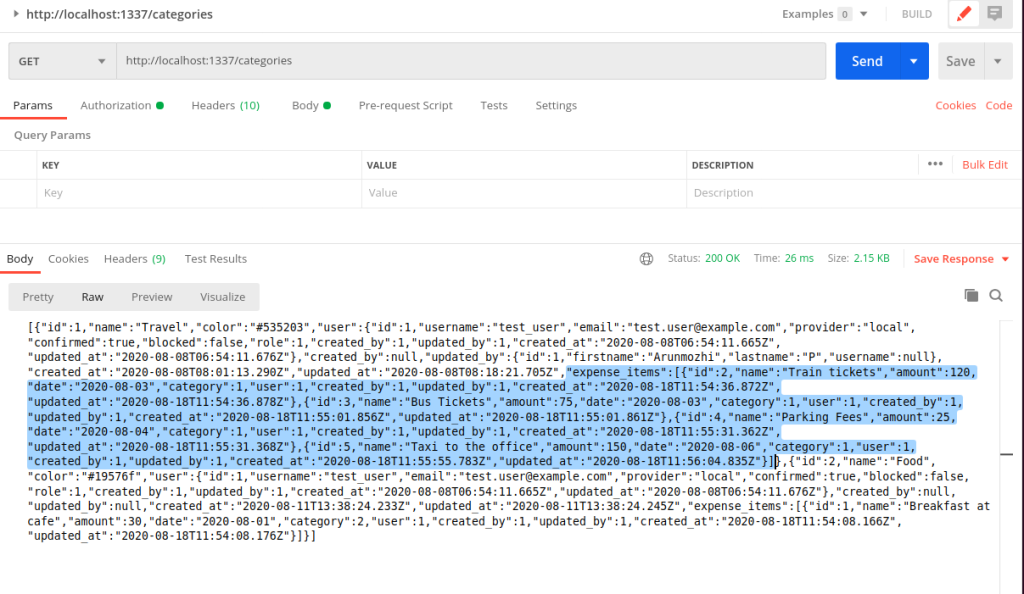
intruder‘s JWT token let us send a get request to the /categories

strapi-intruder-access

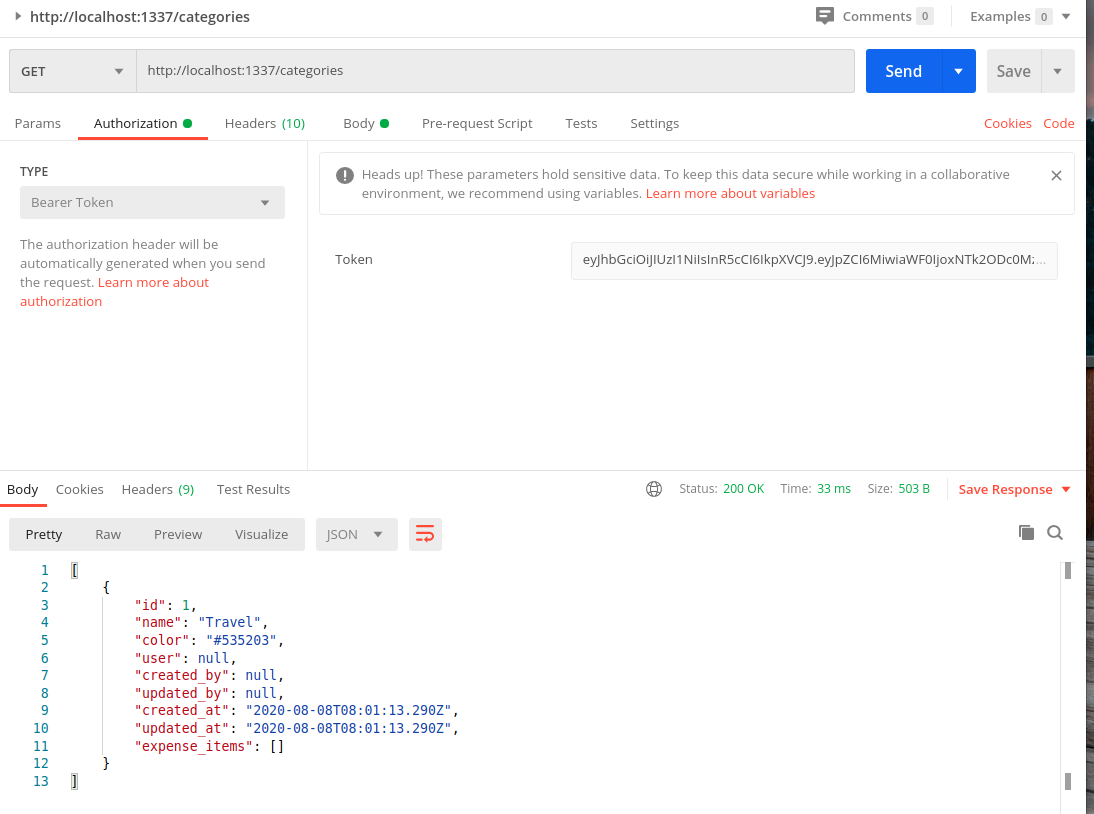
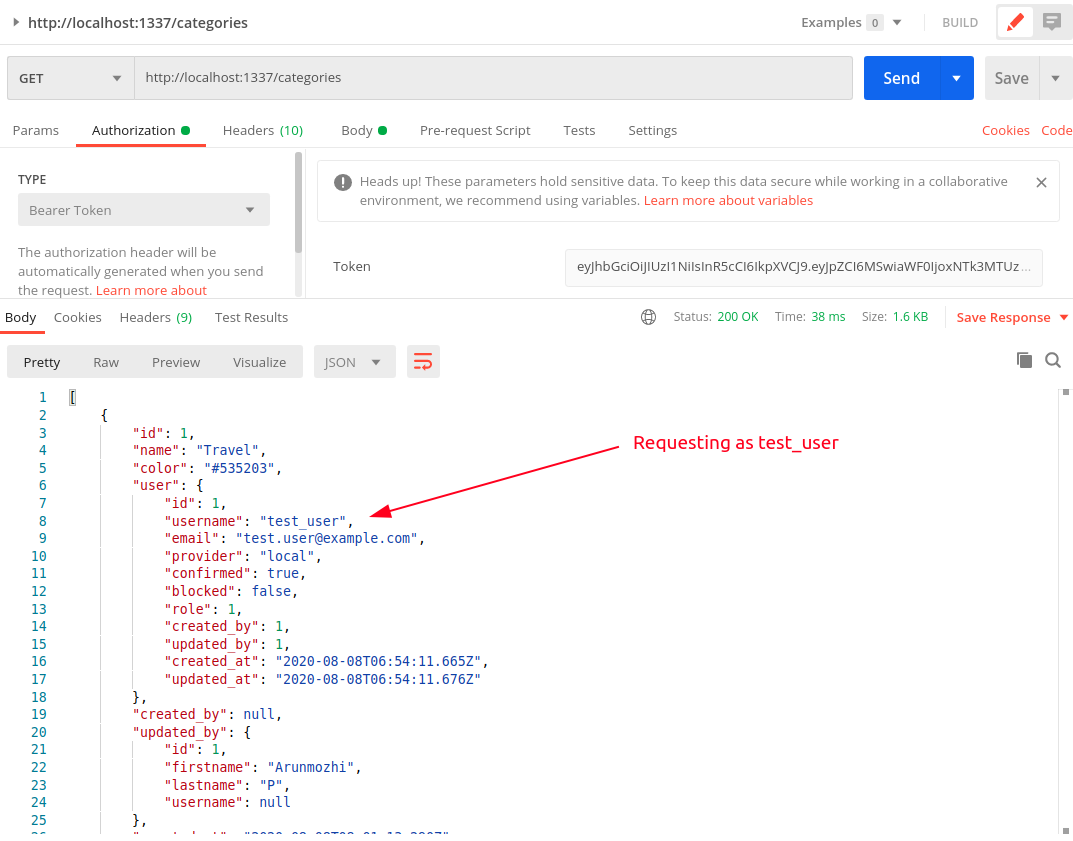
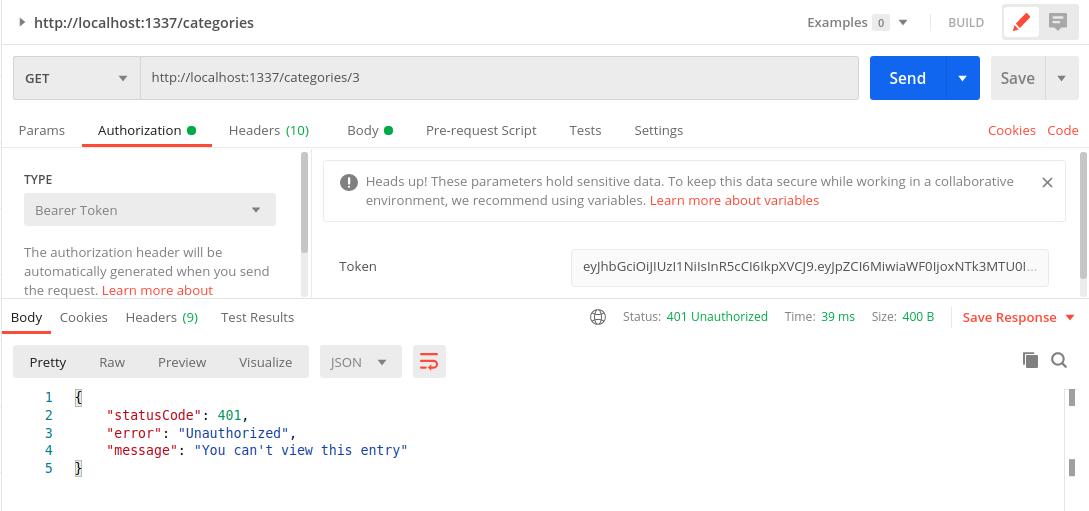
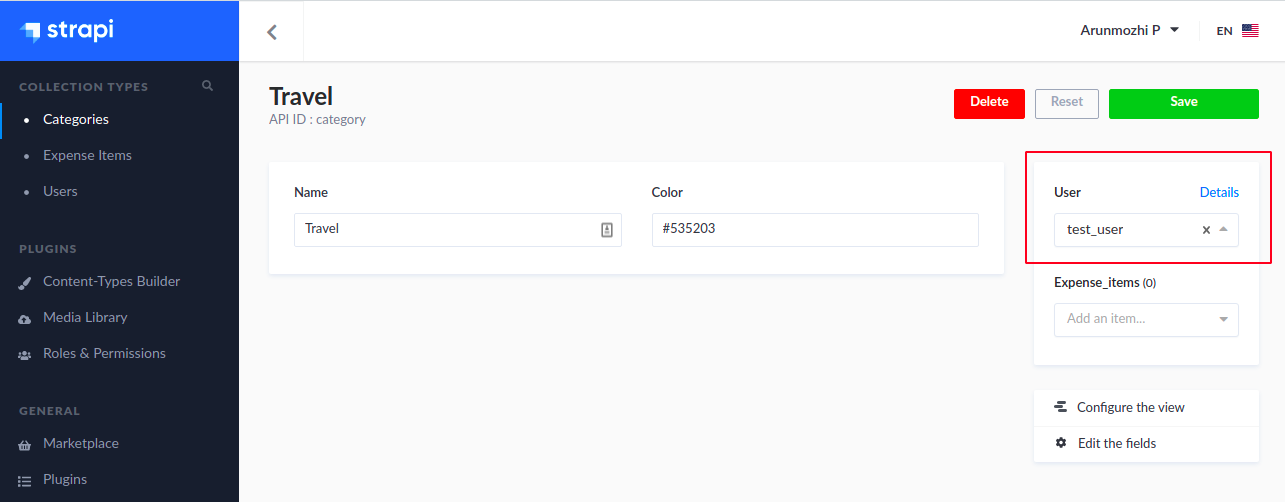
The intruder is able to access the category created by test_user. This will happen even if the user value is not null. For example, go to the Strapi Admin and set the user value of the “Travel” category to test_user

strapi-set-category-user

Now switch back to Postman, don’t change anything and rerun the GET /categories request again.

strapi-intruder-access-2

You will notice that we are still able to access test_user‘s information as intruder.

To summarise:

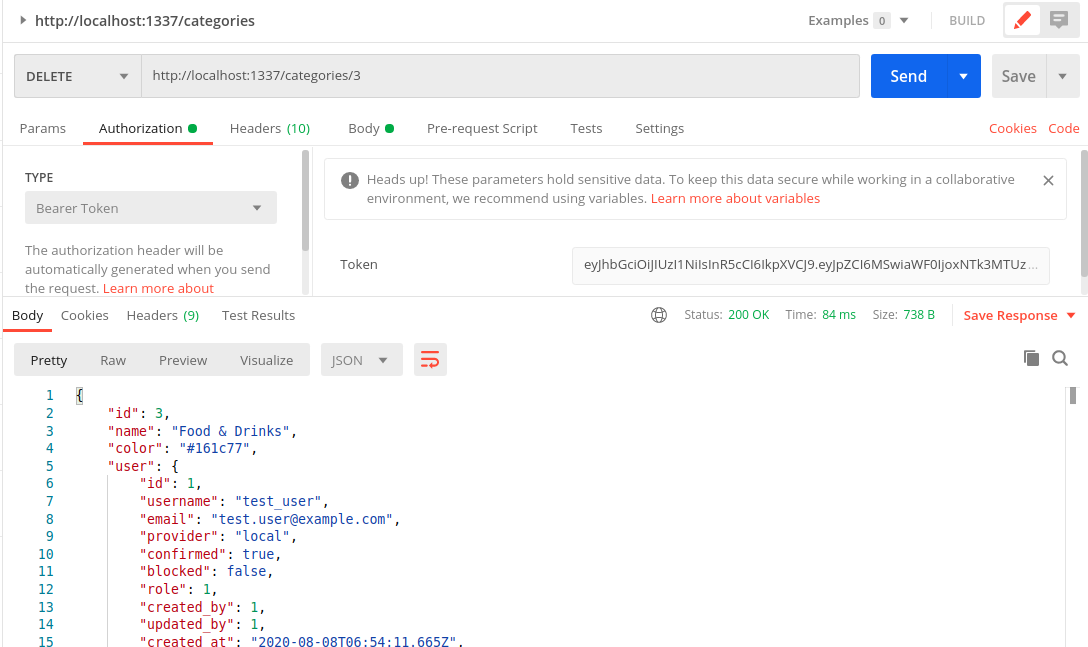
  1. We created the category as test_user
  2. We have set the category to belong to test_user
  3. We made request using intruder’s token
  4. And we are able to access test_user’s data

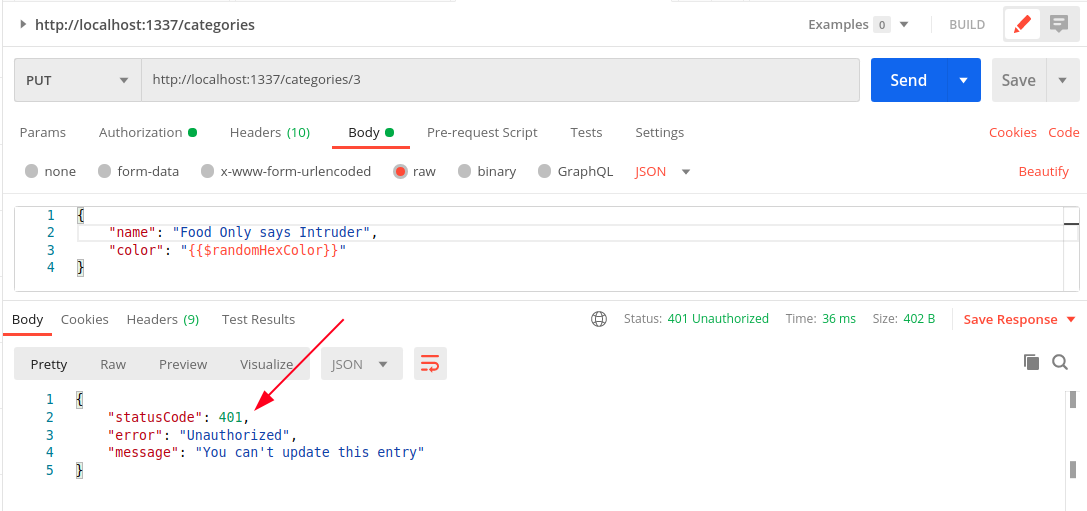
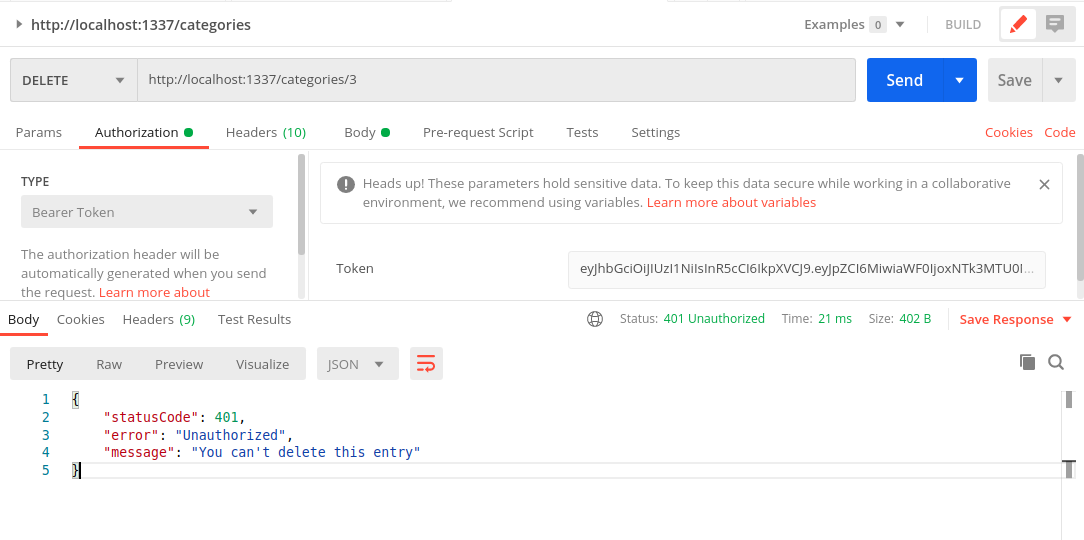
So, any authenticated user can read anyone’s data. Not just read, if you recall the settings from “Roles & Permission”, they can also change and delete anyone’s data. Effective making the entire API useless.

Restricting access to Owners

Now we have identified two issues:

  1. Automatically assigning ownership of a category to the user creating the category (discussed before)
  2. Restricting access to data owners only

Both of these can be solved by modifying the Controller logic of the models. We will deal with that in the next part.

So far…

The impressive thing about using Strapi for an API is the amount of stuff that comes out of the box.

  1. Setup the project structure with necessary libraries
  2. An nice Admin backend
  3. Create Models with relationships, constraints and validations
  4. Token based authentication for API access

All of this without writing a single line of code. If we have used a regular library, we would be swimming in configurations and routes by now.

Next

Strapi – Add Ownership and Control to API

Building a quick and dirty data collection app with React, Google Sheets and AWS S3

Covid-19 has created a number of challenges for the society that people are trying to solve with the tools they have. One such challenge was to create an app for data collection from volunteers for food supply requirements for their communities.

This needed a form with the following inputs:

  1. Some text inputs like the volunteer’s name, his vehicle number, address of delivery..etc.,
  2. The location in geographic coordinates so that the delivery person can launch google maps and drive to the place
  3. A couple of photos of the closest landmark and the building of delivery.

Multiple ready made solutions like Google Forms, Zoho Forms were attempted, but we hit a block when it came to having a map widget which would let the location to be picked manually, and uploading photos. After an insightful experience with CovidCrowd, we were no longer in a mood to build a CRUD app with Database, servers..etc., So the hunt for low to zero maintenance solution resulted in a collection of pieces that work together like an app.

Piece 1: Google Script Triggers

Someone has successfully converted a Google Sheet into a writable database (sort of) with some Google Script magic. This allows any form to be submitted to the Google Sheet and the information would be stored in the columns like in a Database. This solved two issues, no need to have a database or a back-end interface to access the data.

Piece 2: AWS S3 Uploads from Browser

The AWS JavaScript SDK allows direct upload of files into buckets from the browser using the Congnito Credentials and Pool ID. Now we can upload the images to the S3 bucket and send the URLs of the images to the Google Sheet.

Piece 3: HTML 5 Geolocation API and Leaflet JS

Almost 100% of this data collection is going to happen via a mobile phone, to we have a high chance of getting the location directly from the browser using the browser’s native Geolocation API. In a scenario where the device location is not available or user has denied location access, A LeafletJS widget is embedded in the form with a marker which the user can move to the right location manually. This is also sent to the Google Sheets as a Google Maps URL with the Lat-Long.

Piece 4: Tying it all together – React

All of this was tied together into a React app using React hook form with data validation and custom logic which orchestras the location, file upload ..etc., When the app it built it results in a index.html file and a bunch of static CSS and JS files which can be hosted freely as Github Pages or in an existing server as a subdirectory. Maybe even server over a CDN gzipped files, because there is nothing to be done on the server side.

We even added things like image preview in the form so the user can see the photos he is uploading on the form.

resource_form

Architecture Diagram

resource_form_architecture

Caveats

  1. Google Script Trigger Limits – There is a limit to how many times the Google Script can be triggered
  2. AWS Pool ID exposed – The Pool ID of with write capabilities is exposed to the world. If there is someone smart enough and your S3 bucket could become their free storage or if you have enabled DELETE access, then lose your data as well.
  3. DDOS and Spam – There are also other considerations like Spamming by watching the Google Script trigger or DDOS by triggering with random requests to the Google Script URL that you exhaust the limits.

All of these are overlooked for now as the volunteers involved are trusted and the URL is not publicly shared. Moreover the entire lifetime of this app might be just a couple of weeks. For now this zero maintenance architecture allows us to collect custom data the we want.

Conclusion

Building this solution showed me how problems can be solved without having to write a CRUD app with a admin dashboard every time. Sometimes a Google Sheet might be all that we need.

Source Code: https://github.com/tecoholic/ResourceForm

PS Do you know Covid19India.org is just a single Google Sheet and a collection of static files on Github Pages? It servers 150,000 to 300,000 visitors at any given time.

JSON.stringify – A versatile tool in your belt

A common scenario that we run into when writing JavaScript for the browser is showing a variable as text on the screen. JS has an inbuilt function to achieve that quite easily. Just us the toString() function. Here is an example:

var i = 10
i.toString()

"10"

Where this falls short is when the variable is an object. Trying the same:

var name = {"first": "Tom", "last": "Hardy"}
name.toString()

"[object Object]"

Here is where JSON.stringify comes in handy.

var name2 = {"first": "Tom", "last": "Hardy"}
JSON.stringify(name2)

"{"first":"Tom","last":"Hardy"}"

Two Days with Python & GraphQL

Background

An web application needed to be built. An external API will give me a list of information packets as JSON. The JSON has the information and the user object. The application’s job is to store this data in a local database and provide an user interface to sort and filter this data. Simple enough.

GraphQL kept coming up on on the internet. A number of tools were saying they support GraphQL in their home pages and was making me curious. The requirement also said:

use the technology of your choice REST/GraphQL to build the backend

Now, I had to see what’s it all about. So I sat down read the docs and got a basic understanding of it. It made total sense theoretically. It solved a major problem I face when building Single Page Applications and the Backed REST APIs independently. The opaqueness of incoming data and the right method to get them.

Common Scenario I run into

While building the frontend, we assume use the schema that the backend people give as the source of truth and build it based on that. But the schema becomes stale after a while and changes need to be made. There are many reasons to it:

  • adding/removal/renaming of an attribute
  • optimisations that come into play, which alter the structure
  • the backend API is a third party one and searching and sorting are involved
  • API version changes
  • access control which restricts the information contained..etc.,

And even when we have a stable API, there is the issue of information leak. When you working with user roles, it becomes very confusing very quickly because a request to /user/ returns different objects based on the role of the requester. Admin sees different set of information than a privileged user and a privileged user sees a different set of data than an unprivileged one.

And more often than not, there is a lot of unwanted information that get dumped by APIs on to the frontend than what is required, which sometimes even lead to security issues. If you want to see API response overload take a look under the hood of Twitter web app for example, the API responses have a lot more information than what we see on screen.

Twitter_API_Response

Enter GraphQL

GraphQL basically said to me, let’s streamline this process a little bit. First we will stop maintaining resource specific URLs, we are going to just send all our requests to /graphql and that’s it. We won’t be at the mercy of the backend developers whim’s and fancies about how to construct the URL. No more confusing between /course/course_id/lesson/lesson_id/assignments and /assignments?course=course_id&lesson=lesson_id. Next, no, we are not going to use HTTP verbs, everything is just a POST request. And finally no more information overload, you get only what you ask. If you want 3 attributes, then you ask 3, if you want 5 then you ask 5. Let us eliminate the ambiguity and describe what you want as a Graphql document and post it. I mean, I have been sick of seeing SomeObject.someAttribute is undefined errors. So I was willing to put in the effort to define my requests clearly even it meant a little book keeping. Now I will know the exact attributes that I am going to work with. I could filter, sort, paginate all just by defining a query.

It was a breath of fresh air for me. After some hands on experiments I was hooked. This simple app with two types of objects were the perfect candidate to get some experience on the subject.

Day/Iteration 1 – Getting the basic pipeline working

The first iteration went pretty smooth. I found a library called Graphene – Python that implemented GraphQL for Python with support for SQLAlchemy, I added it to Flask with Flask-GraphQL and in almost no time I had a API up and running that will get me the objects, and it came with sorting and pagination. It was wonderful. I was a little confused initially, because, Graphene implements the Relay spec. So my queries looked a little over defined with edges and nodes than plain ones. I just worked with it. I read a quick intro about Connections and realised I didn’t need to worry about it, as I was going to be just querying one object. Whatever implications it had, it was for complex relations.

For the frontend, I added Vue-Apollo the app and I wrote my basic query and the application was displaying data on the web page in no time. It has replaced both Vuex state management and Axios HTTP library in one swoop.

And to help with query designing, there was a helpful auto completing UI called GraphIQL, which was wonderful.

Day/Iteration 2 – Getting search working

Graphene came with sorting and filtering inbuilt. But the filtering is only available if you use Django as it uses django-filter underneath. For SQLAlchemy and Flask, it only offers some tips. Thankfully there was a library called Graphene-SQLAlchemy-Filter which solved this exact problem. I added that and voila, we have a searchable API.

When trying to implement searching in frontend is where things started going sideways. I have to query all the data when loading the page. So the query looked something like

query queryName {
  objectINeeded {
    edges {
      nodes {
        id
        attribute_1
        attribute_2
      }
    }
  }
}

And in order to search for something, I needed to do:

query queryName {
  objectINeeded(filters: { attribute_1: "filter_value" }) {
   ...
}

And to sort it would change to:

query queryName {
  objectINeeded(sort: ATTRIBUTE_1_ASC, filters: { attribute_1: "filter_value" }) {
   ...
}

That’s okay for predefined values of sorting and filtering, what if I wanted to do it based on the user input.

1. Sorting

If you notice closely, the sort is not exactly a string I could get from user as an input and frankly it is not even one that I could generate. It is Enum. So I will have to define an ENUM with all the supportable sorts and use that. How do I do that? I will have to define them in a separate GraphQL schema document. I tried doing that and configured webpack to build them and failed miserably. For one, I couldn’t get it to compile the .graphql files. The webloader kept throwing the errors and I lost interest after a while.

2. Searching

The filters is a complex JSON like object that could support OR, AND conditions and everything. I want the values to be based on user input. Apollo supports variables for that purpose. You can do something like this in the Vue script

apollo: {
  myObject: {
    gql: `query GetDataQuery($value1: String, $value2: Int) {
      objectINeed( filters: [{attr1: $value}, {attr2: $value2}] {
        ...
      }
    }`,
    variables() {
      return { value1: this.userInputValue1, value2: this.userInputValue2 }
    }

This is fine when I want to employ both the inputs for searching, what if I want to do only one? Well it turns out I have to define a different query altogether. There is no way to do an optional filter. See the docs on Reactive Queries.
Now that was a lot of Yak shaving I am not willing to do.

Even if I did the Yak Shaving, I ran into trouble on the backend with nested querying. For example what if I wanted to get the objects based on the associated user? Like my query is more like:

query getObjects {
  myObject {
    attr1
    attr2
    user(filters: {first_name: "adam"}) {
    }
  }
}

The Graphene SQLAlchemy documentation said I could do it, it even gave example documentation, but I couldn’t get it working. And when I wanted to implement it myself, the abstraction was too deep that I would have to spend too many hours just doing that.

3. The documentation

The most frustrating part through figuring out all this was the documentation. For some reason GraphQL docs think that if I used Apollo in the frontend, then I must be using Apollo Server in the backend. Turns out there is no strict definition on the semantics for searching/filtering, only on the definition of how to do it. So what the design on the backend should match the design on the frontend. (Now where have I heard that before?) And that’s the reason documentation usually shows both the client and server side implementations.

4. Managing state

An SPA has a state management library like Vuex, Redux to manage application state, but with GraphQL, local state is managed with a GraphQL cache. It improves efficiency by reducing the calls to the server. But here is the catch, you have to define the schema of the objects for that to work. That’s right, define the schema as in write the models in GraphQL documents. It is no big deal if your stack is fully NodeJS, you can just do it once and reference it in both places.

In my case, I will have defined my SQLAlchemy models in Python in the backend, and I will have to do it again in GQL for the frontend. So changes have to be synced between them if anything changes. And remember that each query is defined separately, so I will have to update any query that will be affected by the changes.

At this point I was crying. I has spent close to 8 hours figuring out all this.

I gave up and rewrote the entire freaking app using REST API and finished the project including the UI in the next 6-7 hours and went to bed at 4 in the morning.

Learning

  1. GraphQL is a complex solution for a complex problem. You can solve simple problems with it but the complexity will hit you at some point.
  2. It provides a level of clarity in querying data that REST API doesn’t, but it comes with a cost. It is cheap for cheap work and costly for larger requirements. Almost like how AWS bills raise.
  3. No it doesn’t provide the kind of independence between the backend and frontend as it seems like on the surface. This might by lack of understanding and not the goal of GraphQL at all, but if you like me made this assumption, then just know it is invalid.
  4. Use low-level libraries to implement GraphQL, and try to keep it NodeJS. At least for the sake of sharing the schema documents if not for anything. If I has implemented the actions myself instead of depending on Graphene and adding a filter library on top of that, I would have fared better.

Using React for parts of a Flask App

Background:

As a part of my work, I needed a console like viewer in a web application (like the one used in travis.ci). The frontend is simply Bootstrap 3 and some jQuery JavaScript. I have written a rudimentary one using Bootstrap’s Panel and List Groups and using the helper classes to style them. But the application has grown and it is time we got a really good log viewer.

Requirements:

  • The library should be easy to include in the project without requiring a complete overhaul of the frontend. (Things like Angular, Ember are out)
  • We might decouple the app into a REST API and frontend sometime in the future, so it needs to provide a upgrade path for the full frontend.
  • To me, a Python programmer, it should be easy to get started and start building, without enforcing specific new requirements.
    (e.g., Angular forces TypeScript, I am willing to learn, just not now, not for this one)

React with JSX syntax, the ability to just drop the the library and use it for only selective parts of the app seemed just right. After trying out the tic-tac-toe tutorial, I ventured to setup it for our project.

Setting up the development environment

JSX is not plain native Javascript. Even-though I could include the React and ReactDOM libraries using the script tags, I have to setup a node.js based environment to compile the JSX into JS.

Project file structure

The Flask app has a typical structure as show below

-- project/
    |-- flask_app/
    |   |-- static/
    |   |   |-- js/
    |   |   |-- css/
    |   |   |-- images/
    |   |-- tempaltes/
    |   |-- __init__.py
    |   |-- application.py
    |   |-- views.py
        ...
    |-- run.py
    |-- .gitgnore
    |-- README

Setting up React’s requirements

React’s Adding React to an Existing Application lists three requirements – a package manager, a bundler and a compiler. I used npm for package manager, Webpack for bundler and Babel for the compiler. Here are the steps for the setup:

  • Create the package.json file using npm init inside project directory.
  • Create a new directory named ui insdie the project to hold the React JSX files
  • Install the packages react, react-dom using npm install --save
  • Install the packages webpack, babel-core, babel-loader, babel-preset-env, babel-preset-react using npm install --save-dev
  • Add the line "build": "webpack --config webpack.config.js" to the scripts block of package.json
  • Create file .babelrc with a single line {"presets": ["react", "env"]}
  • Create file webpack.config.js with the contents
const path = require('path');

module.exports = {
    entry: './ui/logger.js',  // logger.js is where I plan to write the JSX code
    output: {
        path: path.resolve(__dirname, 'flask_app/static/js/'),
        filename: "logger.js"
    },
    module: {
        rules: [
            { test: /\.js$/, exclude: /node_modules/, loader: "babel-loader" }
        ]
    }
}

Here is what I have done so far:

  • I have initiaed the project with package.json to manage things like requirements for the JS files, run npm commands, …etc. I guess this is like the setup.py of Python world.
  • Added the required packages
  • Configured Babel compiler to use the presets required for React to compile
  • Configured Webpack to read the ui/logger.js file and compile it using Babel and put it the Flask app’s static/js/ folder so that it can be used in the Jinja templates using url_for('static', filename='logger.js')
  • Configured NPM so that npm run build would run webpack to compile and put the file in static folder.

New Project structure

After adding everything, this is how the project looks

-- project/
    |-- flask_app/
    |   |-- static/
    |   |   |-- js/
        ...
    |-- run.py
    |-- .gitgnore
    |-- README
    |-- node_modules/
    |-- ui/
    |   |-- logger.js
    |-- .babelrc
    |-- webpack.config.js
    |-- package.json

With the above setup, I am good to go. All I need to do is add a script tag with src pointed to the logger.js. With everything setup,

  • I added a small JSX snippet to ui/logger.js
  • ran npm run build (the file compiled and was put in the static/js/ folder)
  • started the Flask development server python run.py
  • loaded the app in the browser.

Everything worked as expected.

..except it didn’t the second time

Now I changed the code in ui/logger.js > ran npm run build > reloaded the page in browser. Nothing changed. Now we have a problem. It’s the browser caching the output static/js/logger.js file.

Solving Caching issue

While Caching is good from a client’s point of view, it is a little tricky in a development environment. If we were building a full blown React app using the react-cli, we won’t have this issue as the react-scripts would watch the file changes and reload the browser for us. In the current setup using Flask’s development server, however, we need to take care of it ourselves. Webpack to the rescue.

Webpack optimizations

I followed Webpack’s Caching guide and applied everything suggested. Now the webpack.config.js looks like this:

const webpack = require('webpack');
const path = require('path');
const CleanWebpackPlugin = require('clean-webpack-plugin');


module.exports = {
    entry: {
        main: './ui/logger.js',
        vendor: [
            'react', 'react-dom'
        ]
    },
    output: {
        path: path.resolve(__dirname, 'flask_app/static/build'),
        filename: "[name].[chunkhash].js"
    },
    module: {
        rules: [
            { test: /\.js$/, exclude: /node_modules/, loader: "babel-loader" }
        ]
    },
    plugins: [
        new CleanWebpackPlugin(['flask_app/static/build']),
        new webpack.optimize.CommonsChunkPlugin({
            name: 'vendor'
        }),
        new webpack.optimize.CommonsChunkPlugin({
            name: 'runtime'
        }),
    ]
}

This is what the updated webpack config does:
– instead of saving the generated Javascript as a single file called logger.js it splits the output into three files named
* main.[chunkhash].js which contains the compiled ui/logger.js
* vendor.[chunkhash].js which contains the libraries listed in entry.vendor
* runtime.[chunkhash].js which contains the Webpack’s runtime logic to load the files generated

Note: the chuckhash is a value that webpack substitutes when generating the files. This changes with the changes in entry files. So we have a different filename in the output with every build, thus avoiding the caching issue.

  • the CleanWebpackPlugin removes all the files in the output directory before generating new files so we don’t have outdated files like main.hash1.js, main.hash2.js.. etc.,
  • since static/js folder has other files like bootstrap, jquery ..etc., So the output.path is set to a new directory static/build, to prevent the Clean Webpack plugin from deleting them.

With the above config, we will have a different filename everytime we build using npm run build. Now the file cached by the web browser is not used as the new filename is different from the old one.

But how do we use the latest filenames in the “ tag in the Jinja templates?

There is a plugin to solve this issue called Flask-Webpack, but I felt it too be an overkill.

Flask Context Processor to get the hashed filename

Add the following context processor to the Flask app:

@app.context_processor
def hash_processor():
    def hashed_url(filepath):
        directory, filename = filepath.rsplit('/')
        name, extension = filename.rsplit(".")
        folder = os.path.join(app.root_path, 'static', directory)
        files = os.listdir(folder)
        for f in files:
            regex = name+"\.[a-z0-9]+\."+extension
            if re.match(regex, f):
                return os.path.join('/static', directory, f)
        return os.path.join('/static', filepath)
    return dict(hashed_url=hashed_url)

This provides a function called hashed_url which looks for the file and returns its hashed form. Now we can add the files using script tags as below:

<scrip.t src="{{ hashed_url('build/runtime.js')></script>
<scrip.t src="{{ hashed_url('build/vendor.js')></script>
<scrip.t src="{{ hashed_url('build/main.js')></script>

The hashed_url would match the filename passed to it with the the files in the directory and returns the hashed form. For e.g., hashed_url("build/main.js") returns /static/build/main.16f45d183a4c0f0b1b37.jss

Conclusion

The whole process of setting this up took multiple hours of research and testing. I could have used one of the available boilerplates to set this up, but I now have it in the form I want it and I understand what the different parts mean and do. It lets me use React for small components as required and grow as the project grows. It also creates no disruption in the workflow of other developers. Happy coding time ahead 🙂