Clean Python compiled files (.pyc) using py3clean

Recently ran into some issues with Python compiled files __pycache__ and *.pyc files not getting deleted when doing git checkout. The files have been created when I mounted the folder as a volume in a docker container and had different rights than the current user. So, I needed to use sudo to remove them recursively in the project.

That’s when I learnt of this cool new tool called py3clean. Simply run py3clean <folder> and it will remove all the Python compiled files recursively.

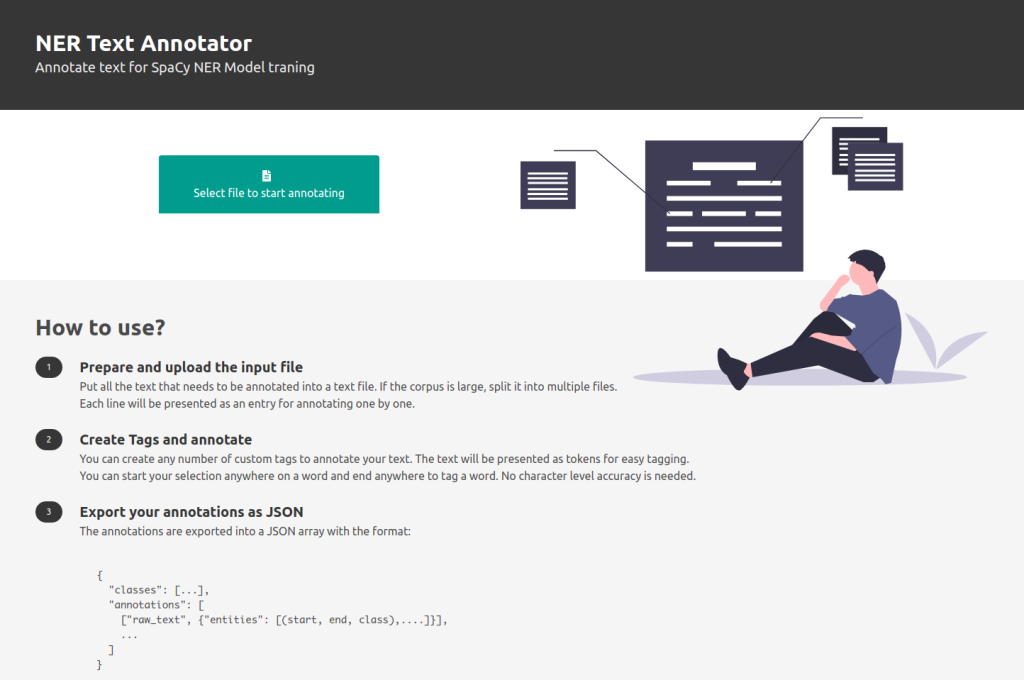
NER Annotator / NER Tagger for Spacy

NER Annotator is now available to use directly from the browser

https://tecoholic.github.io/ner-annotator/

Background

As with most things, this started with a problem. Dr. K. Mathan is an Epidemiologist tracking Covid-19. He wanted to automated extraction of details from government bulletins for data collection. It was a tedious manual process of reading the bulletins and entering the data by hand. Since the bulletins has paragraphs of text with text in them, I was looking to see if I can leverage any NLP (Natural Language Processing) tools to automate parts of it.

Named Entity Recognition

The search led to the discovery of Named Entity Recognition (NER) using spaCy and the simplicity of code required to tag the information and automate the extraction. It kind of blew away my worries of doing Parts of Speech (POS) tagging and then custom writing an extraction algorithm. So, copied some text from Tamil Nadu Government Covid Bulletins and set out test out the effectiveness of the solution. It worked pretty well for the small amount of training data (3 lines) vs extracted data (26 lines).

Trying out NER based extraction in Google Colab Notebook using spaCy

But it had one serious issue. Generating Training Data. Generating training data for NER Annotation is a pain. It is infact the most difficult task in the entire process. The library is so simple and friendly to use, it is generating the training data that is difficult.

Creating NER Annotator

NER Annotation is fairly a common use case and there are multiple tagging software available for that purpose. But the problem is they are either paid, too complex to setup, requires you to create an account or signup, and sometimes doesn’t generate the output in spaCy’s format. The one that seemed dead simple was Manivannan Murugavel’s spacy-ner-annotator. That’s what I used for generating test data for the above example. But it is kind of buggy, the indices were out of place and I had to manually change a number of them before I could successfully use it.

After a painfully long weekend, I decided, it is time to just build one of my own. Manivannan’s tagger just uses JavaScript to create the training data JSON and then requires a conversion using a Python Script before it can be used. I decided to make it a little more bug proof.

This version of NER Annotator would:

  1. Use a Python backend to tokenize and detokenize text for tagging and generating training data.
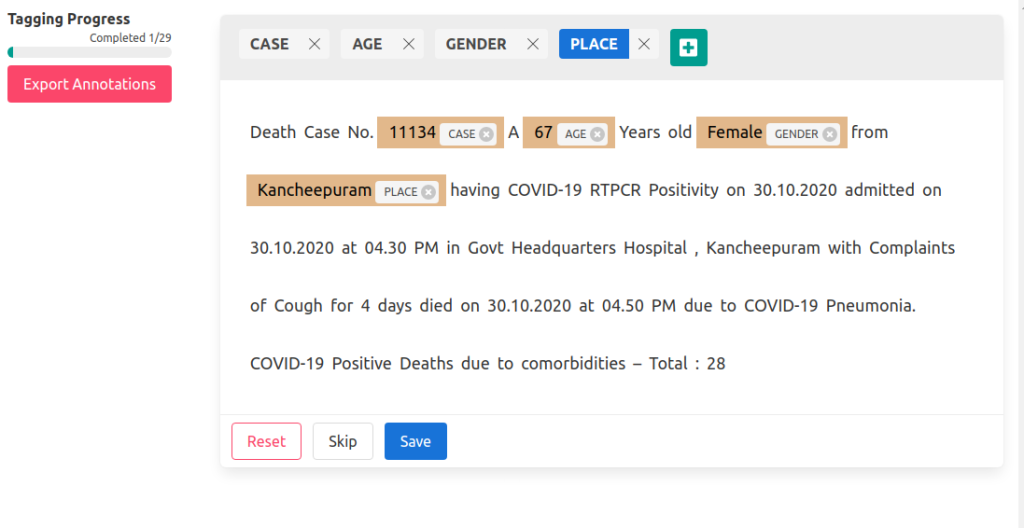
  2. The UI will let me select tokens (idea copied from Prodigy from the spaCy team), so I don’t have to be pixel perfect in my selections.
  3. Generate JSON which can be directly loaded instead of having to post-process it with Python script.

The Project

I created the NER with the above goals as a Free and Open Source project and released it under MIT License.

Github Link: https://github.com/tecoholic/ner-annotator

Credits

Thanks to Philip Vollet noticing it and sharing it on LinkedIn and Twitter, the project has gotten about 107 stars on Github and 14 forks, which is much more reach than I hoped for.

Thanks to @1littlecoder for making a YouTube video of the tool and showing the full process of tagging some text, training data and performing extractions.

text/plain MIME Type and Python

When you do echo "x" > my_file and then check its MIME type using file --mime-type my_file it would say text/plain. But, when you do the same in Python by

with open("my_file_2", "w") as fp:
fp.write("x")

and then check the MIME type it would say application/octet-stream. What’s the difference?

For the impatient

echo adds a new line to file which tells the file utility it is a text file.

For the curious

When I saw this question on StackOverflow, I was really stumped due to the following reasons:

  1. I didn’t know the file utility can be used to get the mime-type of the file. I thought MIME Type is only relevant in the context of web server and clients. After all, MIME stands for Multipurpose Internet Mail Extensions
  2. I thought operating systems usually use the file extension to decide the file type, by extension the mime type. Don’t the OSes warn when we touch the extension part of the files while renaming, all the time? So, how does file utility do this on a files without any extension?

Adding extensions

Lets try adding extensions:

$ echo "x" > some_file.txt
$ file --mime-type some_file.txt
some_file.txt: text/plain

Okay, that’s all good. Now to the Python side:

with open("some_file_2.txt", "w") as fp:
fp.write("x")
$ file --mime-type some_file_2.txt
some_file_2.txt: application/octet-stream

What? file doesn’t recognise file extensions?

The OS conspiracy theory

Maybe echo writes the mimetype as a metadata onto the disk because echo is a system utility and it knows to do that and in Python the user (me) doesn’t know how to? Clearly the operating system utilities are a cabal of some forbidden knowledge. And I am going to uncover that today, starting with the file utility which seems to have different answers to different programs.

How does ‘file’ determine MIME Type?

Answers to this question has some useful information:

How do you change the MIME type of a file from the terminal?

  1. MIME Type is a fictional value. There is no inherent metadata field that stores MIME Types of files.
  2. Each operating system uses a different technique to decide file type. Windows uses file extension, Mac OS uses type creator & type codes and Unix uses magic numbers.
  3. The file command guesses file type by reading the content and looking for magic numbers and strings.

Time to reveal the magic

Let us peer into the souls of these files in their purest forms where there is no magic but only 1s and 0s. So, I printed the binary representation of the two files.

$ xxd -b my_file
00000000: 01111000 00001010 x.

$ xxd -b my_file_2
00000000: 01111000 x

The file generated by echo has two bytes (notice the . after the x) whereas the file I created with Python only has one byte. What is that second byte?

>>> number = int('00001010', 2)
>>> chr(number)
'\n'

And it turns out like every movie on magic, there is no such thing as magic. Just clever people putting new lines to tell file it is a text file.

Creating a trick

Now that the trick is revealed, lets create our own magic trick

$ echo "<file></file>" > xml_file
$ file --mime-type xml_file
xml_file: text/plain

$ echo "<?xml version="1.0"?><file></file>" > xml_file
$ file --mime-type xml_file
xml_file: text/xml

Useful Links

  1. https://www.baeldung.com/linux/file-mime-types
  2. https://unix.stackexchange.com/questions/185216/file-command-apparently-returning-wrong-mime-type
  3. https://stackoverflow.com/questions/29017725/how-do-you-change-the-mime-type-of-a-file-from-the-terminal

Thinking about the next step as a Python Developer

Disclaimer: The analysis is not a bullet proof analysis. Despite writing code, and throwing around numbers, this might still be a random observation. Stack Overflow Job board is a not an indicator of everything. So take everything with a pinch of salt.

Python or Full Stack?

As someone who identifies as a Python Developer and uses Python as the primary language for programming, thinking about what to learn next is confusing. I primarily do “Full Stack development”, that is write backend API in Python Flask/Django and use modern JS (React/Vue) for the frontend. But recently I am seeing a disconnect between the idea of “Python Developer” and “Full Stack Developer” in the job postings. Full Stack development seems to be defined more or less synonymous to JS development. Python Job postings on the other hand are more closer to dev ops, systems development, data analytics and machine learning.

A simple experiment

So, I devised a simple experiment to verify what I seeing is in fact something of a trend and not a random observation. Look at the job postings on Stack Overflow for skill demand and use that as an indicator.

  • Go to Stack Overflow Jobs
  • Set the “Tech you like” to node.js139
  • Set the “Tech you like” to django + flask61
  • Set the “Tech you like” to python and “Tech you don’t like” to django+flask266

huh, what?

Web Development in NodeJS is more in demand than Web Development in Python and Python’s general purpose demand is way more higher than Python Web Development.

For the sake of simplicity, I have considered Django + Flask as the entire Python Web development.

Okay, so my observations and confusion about “Full Stack Development” becoming more and more Node.js development is in fact valid and I wasn’t imagining it.

What’s up with Python?

Now I was intrigued with finding out what’s happening to Python. What are those 266 other listings? Where is the demand for Python coming from? Also, I am getting a little worried about continuing as a Full Stack (Python) Developer. To get a better idea of the situation, I downloaded the RSS Feed of the Job postings for Python + NodeJS, extracted the categories for each posting and created a map of the 30 most mentioned categories.

Selection_022

Each Job posting is a row with the top 30 categories as columns. If a job positing falls under a category, it is marked 1, otherwise zero. Then I created a heatmap of the correlation matrix of the table, which will tell me how the technologies are related to each other.

heatmap

Anything that has a positive correlation has the value printed in green. Armed with this data, we can make a few observations:

  1. REST and API are not correlated to Python, but to NodeJS
  2. Event Flask and Django are not correlated to REST API
  3. Python is associated with system languages like C, C++, and Java more than web technologies.
  4. Flask is associated with more technologies than Django. Especially to Micro-Services technologies like Docker and Kubernetes.

Predictions

  1. General purpose Python web development will probably go the way of Ruby-on-Rails.
  2. Python Web development’s growth will increasingly come from micro-services and API systems which will sit on top of Machine Learning / AI based services.
  3. PHP, .Net, Java all have their own full-stack definitions and job postings, but I think NodeJS will continue dominate this term.

Final Thoughts

Identifying the next thing to learn for a Python Developer doing Full Stack Development means identifying the area of focus. Taking the time to retool in Node.JS might be as good a choice as learning micro services architecture with a bit of DevOps or learning Data Science and ML. Picking a path and moving ahead is looking more of a necessity at this point.

And I am left wondering which path to choose.

Jupyter – Finding the point when a line graph crosses the threshold

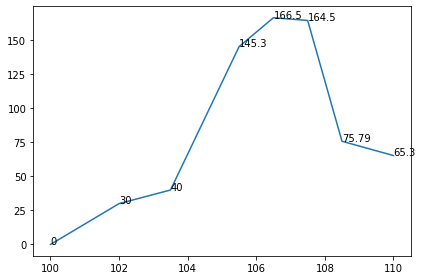
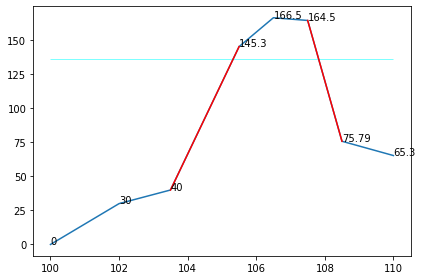
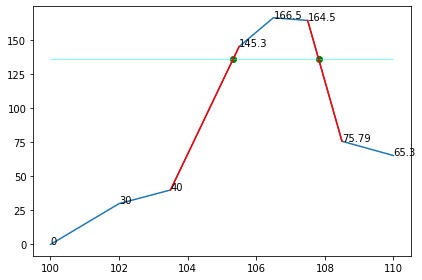
A friend of came up with the problem. There are a set of points [(x, y), (x1, y1), (x2, …]. He wanted to find the points at which this line would pass the value Z less than the peak. If the maximum value is 100 and Z = 20. He wanted to find the points where it would cross y = 80.

Now there are multiple ways to solve this problem. I attempted a simple linear interpolation solution.

I don’t the solution itself to be a big thing. What I am really impressed is, how neatly I was able to present the solution using Jupyter Notebook to him.

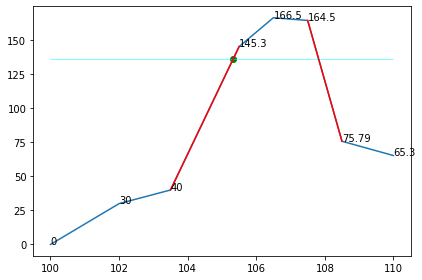
I was able to document the solution in a step by step fashion, with visual representation of how I solved it.

Take a look

from IPython.display import display
import matplotlib.pyplot as plt

f = [100, 102, 103.5, 105.5, 106.5, 107.5, 108.5, 110]
mag = [0, 30, 40, 145.3, 166.5, 164.5, 75.79, 65.3]

fig, ax = plt.subplots()
ax.plot(f, mag)

for x,y in zip(f, mag):
    label = ax.text(x, y, y)

fig.tight_layout()

inter_fig_1

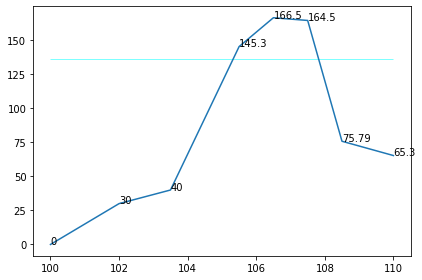
gap = 30

# 1. Find the maximum value
max_mag = max(mag)

# 2. Set the threshold value
y = max_mag - gap

ax.hlines(y, f[0], f[-1], linewidth=0.5, color="cyan")
display(fig)

inter_fig_2

max_idx = mag.index(max_mag)

# 4. Find the left and right values which are lower than the "y" you are looking for
left_start_idx = None
left_end_idx = max_idx
right_start_idx = max_idx
right_end_idx = None

for i in range(max_idx):
    left_idx = max_idx - i
    right_idx = max_idx + i

    # if left index is more than Zero (array left most is 0) and left is not yet set
    if left_idx >= 0 and not left_start_idx:
        value = mag[left_idx]
        # if the value is lower than our threshold then pickup the point
        # and the one next to it
        # that will form our segment to interoploate
        if value < y:  
            left_start_idx = left_idx
            left_end_idx = left_idx + 1


    # if the right index is less than our array size (0..N) and right is not yet set
    if right_idx < len(mag) and not right_end_idx:
        value = mag[right_idx]
        if value < y:
            right_end_idx = right_idx
            right_start_idx = right_idx - 1

if not right_end_idx:
    print("Cannot find point on the right lower than %d" % (y))

if not left_start_idx:
    print("Cannot find point on the left lower than %d" % (y))

# Plotting the lines we will be interpolating

if left_mag and right_mag:
    ax.plot(
        [f[left_start_idx], f[left_end_idx]],
        [mag[left_start_idx], mag[left_end_idx]],
        color='red'
    )
    ax.plot(
        [f[right_start_idx], f[right_end_idx]],
        [mag[right_start_idx], mag[right_end_idx]],
        color='red'
    )

display(fig)

inter_fg_3

Now Let us use the line equation

\frac{y - y1}{x - x1} = \frac{y2 - y1}{x2 - x1}

Solving for x we get

x = x1 + (x2 - x1) \frac{y - y1}{y2 - y1}

# Left point interpolation

y1 = mag[left_start_idx]
y2 = mag[left_end_idx]
x1 = f[left_start_idx]
x2 = f[left_end_idx]

x = x1 + (x2 - x1) * (y - y1) / (y2 - y1)

ax.scatter([x], [y], color="green")
display(fig)

inter_fig_4

# Right point interpolation

y1 = mag[right_start_idx]
y2 = mag[right_end_idx]
x1 = f[right_start_idx]
x2 = f[right_end_idx]

x = x1 + (x2 - x1) * (y - y1) / (y2 - y1)

ax.scatter([x], [y], color="green")
display(fig)

inter_fig_5

I was able to export the whole thing as a PDF and send it to him.

Simplifying a Factory Pattern function that has grown complex

This is a combination of the problem that I posted in Dev.to and StackExchange and the final solution that I adopted.

The Problem

I have a function which takes the incoming request, parses the data and performs an action and posts the results to a webhook. This is running as background as a Celery Task. This function is a common interface for about a dozen Processors, so can be said to follow the Factory Pattern. Here is the psuedo code:

processors = {
    "action_1": ProcessorClass1, 
    "action_2": ProcessorClass2,
    ...
}

def run_task(action, input_file, *args, **kwargs):
    # Get the input file from a URL
    log = create_logitem()
    try:
        file = get_input_file(input_file)
    except:
        log.status = "Failure"

    # process the input file
    try:
        processor = processors[action](file)
        results = processor.execute()
    except:
        log.status = "Failure"

    # upload the results to another location
    try:
        upload_result_file(results.file)
    except:
        log.status = "Failure"

    # Post the log about the entire process to a webhoook
    post_results_to_webhook(log)

This has been working well for most part as the the inputs were restricted to action and a single argument (input_file). As the software has grown, the processors have increased and the input arguments have started to vary. All the new arguments are passed as keyword arguments and the logic has become more like this.

try:
    input_file = get_input_file(input_file)
    if action == "action_2":
       input_file_2 = get_input_file(kwargs.get("input_file_2"))
except:
    log.status = "failure"


try:
    processor = processors[action](file)
    if action == "action_1":
        extra_argument = kwargs.get("extra_argument")
        results = processor.execute(extra_argument)
    elif action == "action_2":
        extra_1 = kwargs.get("extra_1")
        extra_2 = kwargs.get("extra_2")
        results = processor.execute(input_file_2, extra_1, extra_2)
    else:
        results = processor.execute()
except:
    log.status = "Failure"

Adding the if conditions for a couple of things didn’t make a difference, but now almost 6 of the 11 processors have extra inputs specific to them and the code is starting to look complex and I am not sure how to simplify it. Or if at all I should attempt at simplifying it.

Something I have considered:
1. Create a separate task for the processors with extra inputs – But this would mean, I will be repeating the file fetching, logging, result upload and webhook code in each task.
2. Moving the file download and argument parsing into the BaseProcessor – This is not possible as the processor is used in other contexts without the file download and webhooks as well.

The solution

I solved it by making two important changes:

  1. Normalised the processor’s by making the common arguments positional and everything else keyword based. This allows me to pass the kwargs as I receive them without unpacking. It is the processor’s job.
  2. For the extra files, make a copy of the kwargs and replace the remote file url with the local file location. This way, the extra files are a part of the kwargs dict itself.
def run_task(action, input_file, *args, **kwargs):

    params = kwargs.copy()

    # Get the input file from a URL
    log = create_logitem()
    try:
        file = get_input_file(input_file)
        if action == "action_2":
           params["extra_file"] = get_input_file(kwargs["extra_file"]  # update the files in params
    except:
        log.status = "Failure"

    # process the input file
    try:
        processor = processors[action](file)
        results = processor.execute(**params)   # Unpack and pass the params
    except:
        log.status = "Failure"

    # upload the results to another location
    try:
        upload_result_file(results.file)
    except:
        log.status = "Failure"

    # Post the log about the entire process to a webhoook
    post_results_to_webhook(log)

Now I have the same lean structure as I originally had. The only processor specific code is the file downloads which I think I can live with for now.

Credits

Kain0_0‘s answer pointed me in the right direction and helped me simplify it in a way that makes sense.

Two Days with Python & GraphQL

Background

An web application needed to be built. An external API will give me a list of information packets as JSON. The JSON has the information and the user object. The application’s job is to store this data in a local database and provide an user interface to sort and filter this data. Simple enough.

GraphQL kept coming up on on the internet. A number of tools were saying they support GraphQL in their home pages and was making me curious. The requirement also said:

use the technology of your choice REST/GraphQL to build the backend

Now, I had to see what’s it all about. So I sat down read the docs and got a basic understanding of it. It made total sense theoretically. It solved a major problem I face when building Single Page Applications and the Backed REST APIs independently. The opaqueness of incoming data and the right method to get them.

Common Scenario I run into

While building the frontend, we assume use the schema that the backend people give as the source of truth and build it based on that. But the schema becomes stale after a while and changes need to be made. There are many reasons to it:

  • adding/removal/renaming of an attribute
  • optimisations that come into play, which alter the structure
  • the backend API is a third party one and searching and sorting are involved
  • API version changes
  • access control which restricts the information contained..etc.,

And even when we have a stable API, there is the issue of information leak. When you working with user roles, it becomes very confusing very quickly because a request to /user/ returns different objects based on the role of the requester. Admin sees different set of information than a privileged user and a privileged user sees a different set of data than an unprivileged one.

And more often than not, there is a lot of unwanted information that get dumped by APIs on to the frontend than what is required, which sometimes even lead to security issues. If you want to see API response overload take a look under the hood of Twitter web app for example, the API responses have a lot more information than what we see on screen.
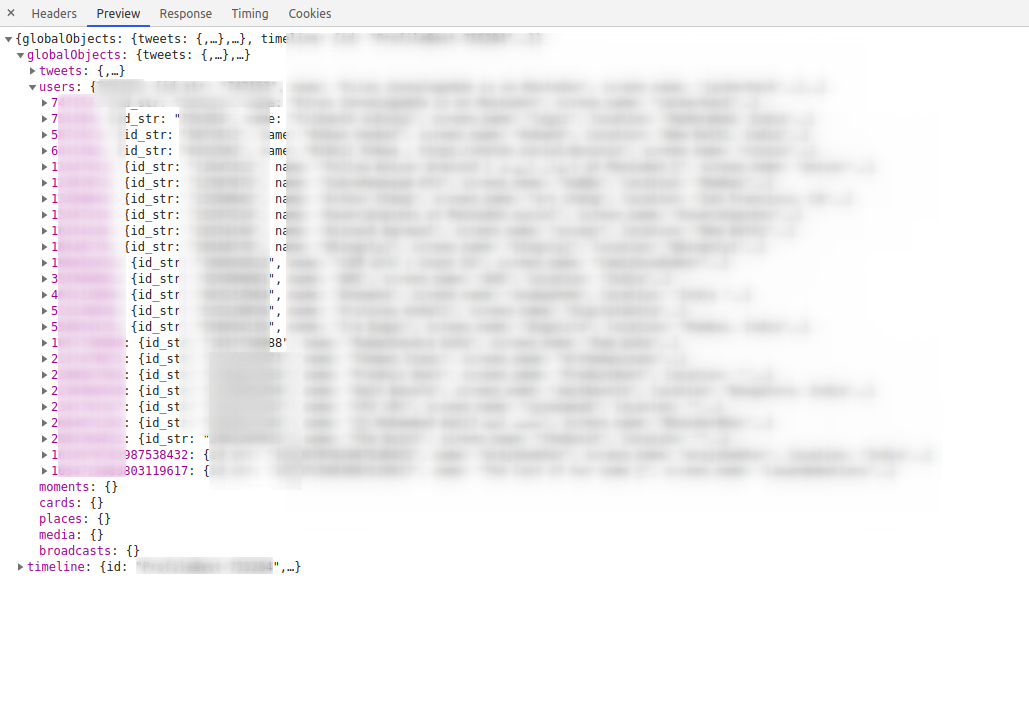
Twitter_API_Response

Enter GraphQL

GraphQL basically said to me, let’s streamline this process a little bit. First we will stop maintaining resource specific URLs, we are going to just send all our requests to /graphql and that’s it. We won’t be at the mercy of the backend developers whim’s and fancies about how to construct the URL. No more confusing between /course/course_id/lesson/lesson_id/assignments and /assignments?course=course_id&amp;lesson=lesson_id. Next, no, we are not going to use HTTP verbs, everything is just a POST request. And finally no more information overload, you get only what you ask. If you want 3 attributes, then you ask 3, if you want 5 then you ask 5. Let us eliminate the ambiguity and describe what you want as a Graphql document and post it. I mean, I have been sick of seeing SomeObject.someAttribute is undefined errors. So I was willing to put in the effort to define my requests clearly even it meant a little book keeping. Now I will know the exact attributes that I am going to work with. I could filter, sort, paginate all just by defining a query.

It was a breath of fresh air for me. After some hands on experiments I was hooked. This simple app with two types of objects were the perfect candidate to get some experience on the subject.

Day/Iteration 1 – Getting the basic pipeline working

The first iteration went pretty smooth. I found a library called Graphene – Python that implemented GraphQL for Python with support for SQLAlchemy, I added it to Flask with Flask-GraphQL and in almost no time I had a API up and running that will get me the objects, and it came with sorting and pagination. It was wonderful. I was a little confused initially, because, Graphene implements the Relay spec. So my queries looked a little over defined with edges and nodes than plain ones. I just worked with it. I read a quick intro about Connections and realised I didn’t need to worry about it, as I was going to be just querying one object. Whatever implications it had, it was for complex relations.

For the frontend, I added Vue-Apollo the app and I wrote my basic query and the application was displaying data on the web page in no time. It has replaced both Vuex state management and Axios HTTP library in one swoop.

And to help with query designing, there was a helpful auto completing UI called GraphIQL, which was wonderful.

Day/Iteration 2 – Getting search working

Graphene came with sorting and filtering inbuilt. But the filtering is only available if you use Django as it uses django-filter underneath. For SQLAlchemy and Flask, it only offers some tips. Thankfully there was a library called Graphene-SQLAlchemy-Filter which solved this exact problem. I added that and voila, we have a searchable API.

When trying to implement searching in frontend is where things started going sideways. I have to query all the data when loading the page. So the query looked something like

query queryName {
  objectINeeded {
    edges {
      nodes {
        id
        attribute_1
        attribute_2
      }
    }
  }
}

And in order to search for something, I needed to do:

query queryName {
  objectINeeded(filters: { attribute_1: "filter_value" }) {
   ...
}

And to sort it would change to:

query queryName {
  objectINeeded(sort: ATTRIBUTE_1_ASC, filters: { attribute_1: "filter_value" }) {
   ...
}

That’s okay for predefined values of sorting and filtering, what if I wanted to do it based on the user input.

1. Sorting

If you notice closely, the sort is not exactly a string I could get from user as an input and frankly it is not even one that I could generate. It is Enum. So I will have to define an ENUM with all the supportable sorts and use that. How do I do that? I will have to define them in a separate GraphQL schema document. I tried doing that and configured webpack to build them and failed miserably. For one, I couldn’t get it to compile the .graphql files. The webloader kept throwing the errors and I lost interest after a while.

2. Searching

The filters is a complex JSON like object that could support OR, AND conditions and everything. I want the values to be based on user input. Apollo supports variables for that purpose. You can do something like this in the Vue script

apollo: {
  myObject: {
    gql: `query GetDataQuery($value1: String, $value2: Int) {
      objectINeed( filters: [{attr1: $value}, {attr2: $value2}] {
        ...
      }
    }`,
    variables() {
      return { value1: this.userInputValue1, value2: this.userInputValue2 }
    }

This is fine when I want to employ both the inputs for searching, what if I want to do only one? Well it turns out I have to define a different query altogether. There is no way to do an optional filter. See the docs on Reactive Queries.
Now that was a lot of Yak shaving I am not willing to do.

Even if I did the Yak Shaving, I ran into trouble on the backend with nested querying. For example what if I wanted to get the objects based on the associated user? Like my query is more like:

query getObjects {
  myObject {
    attr1
    attr2
    user(filters: {first_name: "adam"}) {
    }
  }
}

The Graphene SQLAlchemy documentation said I could do it, it even gave example documentation, but I couldn’t get it working. And when I wanted to implement it myself, the abstraction was too deep that I would have to spend too many hours just doing that.

3. The documentation

The most frustrating part through figuring out all this was the documentation. For some reason GraphQL docs think that if I used Apollo in the frontend, then I must be using Apollo Server in the backend. Turns out there is no strict definition on the semantics for searching/filtering, only on the definition of how to do it. So what the design on the backend should match the design on the frontend. (Now where have I heard that before?) And that’s the reason documentation usually shows both the client and server side implementations.

4. Managing state

An SPA has a state management library like Vuex, Redux to manage application state, but with GraphQL, local state is managed with a GraphQL cache. It improves efficiency by reducing the calls to the server. But here is the catch, you have to define the schema of the objects for that to work. That’s right, define the schema as in write the models in GraphQL documents. It is no big deal if your stack is fully NodeJS, you can just do it once and reference it in both places.

In my case, I will have defined my SQLAlchemy models in Python in the backend, and I will have to do it again in GQL for the frontend. So changes have to be synced between them if anything changes. And remember that each query is defined separately, so I will have to update any query that will be affected by the changes.

At this point I was crying. I has spent close to 8 hours figuring out all this.

I gave up and rewrote the entire freaking app using REST API and finished the project including the UI in the next 6-7 hours and went to bed at 4 in the morning.

Learning

  1. GraphQL is a complex solution for a complex problem. You can solve simple problems with it but the complexity will hit you at some point.
  2. It provides a level of clarity in querying data that REST API doesn’t, but it comes with a cost. It is cheap for cheap work and costly for larger requirements. Almost like how AWS bills raise.
  3. No it doesn’t provide the kind of independence between the backend and frontend as it seems like on the surface. This might by lack of understanding and not the goal of GraphQL at all, but if you like me made this assumption, then just know it is invalid.
  4. Use low-level libraries to implement GraphQL, and try to keep it NodeJS. At least for the sake of sharing the schema documents if not for anything. If I has implemented the actions myself instead of depending on Graphene and adding a filter library on top of that, I would have fared better.
NiftyBot

The Mastodon ecosystem is really nice. The concept of Fediverse bringing in decentralized social network is a breath of fresh air. I created NiftyBot account in botsin.space – a dedicated server for Mastodon Bots.

What is NiftyBot?

  • It is a Mastodon Bot Account

What does it do?

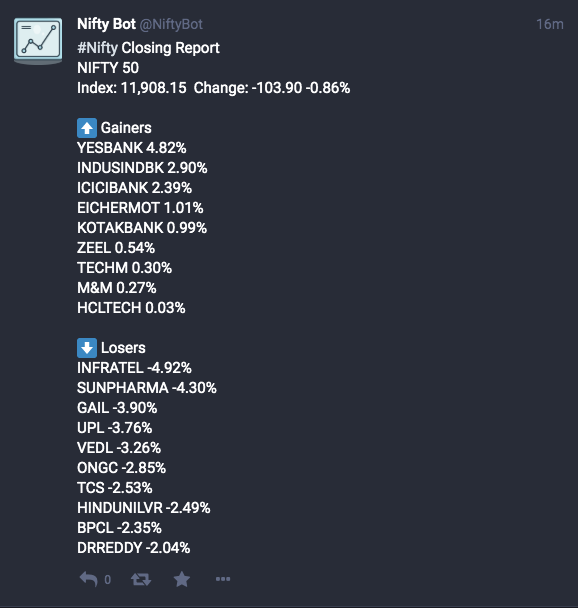
  • It posts updates about Indian Markets
  • Currently it posts NSE closing report at 4.01 PM everyday. Sample post below

niftybot-sample

How does it work?

It is a Python script running in AWS Lambda.

lambda-niftybot

A scheduler tiggers the Lambda Function at 4.01 every Monday – Friday. The lambda function is a Python Script that fetches the necessary details from NSE’s output data and posts to Mastodon.

Source Code:

https://gist.github.com/tecoholic/ca4f9933335b34388375bceb213a5801.js

Some asked about if this bot is open source. Obviously, you see the source right here. 🙂 Still I will add the license here.

The above source code is released into the Public Domain. You can do what ever you want with it.

How much does it cost to run this Bot?

Nothing.

Numbers Please:

The AWS Lambda Free tier comes with 1 Million requests and 400,000 GBSec, which is a combination of how much memory we use and the time taken by our process. Since I have used the CloudWatch Scheduler Event as the trigger, I am using 20-22 requests, the Python function takes about 60 MB to run so running at the lowest memory of 128MB block, and usually completes in around 2600-2700 msec. The metrics says my worst billed event so far is about 0.3375 GBSec. With about 20-22 trading days in a month, I might use a total of 8-10 GBSeconds, leaving enough room to run many more bots like this one 🙂

Python Flask என்றால் என்ன?

Python Flask என்பது ஒரு இணைய மென்பொருள்க் குறுங்கட்டமைப்பு.

இணைய மென்பொருள்க் குறுங்கட்டமைப்பா – என்ன சொல்றீங்க?

Flask ஒரு micro web framework. அது ஒரு web application (இணைய செயலி) எழுதத் தேவையான எல்லா வரைமுறைகளையும் நமக்கு வகுத்துத் தருகிறது. அதே சமயம், அப்படி எழுதப்படும் செயலிகள் எல்லாவற்றிலும் எல்லா செயல்பாடுகளும் உள்ளடங்க வேண்டும் என்ற கட்டாயம் இல்லை. நாம் ஒரே ஒரு கோப்பு (file) கொண்டும் ஒரு முழு செயலியை உருவாக்கலாம், அல்லது ஓராயிரம் கோப்புகள் கொண்டும் உருவாக்காலாம். அது முழுக்க முழுக்க நம் தேவையைப் பொருத்தது.

எடுத்துக்காட்டாக, இந்த 👇 நாங்கே வரிகளில் ஒரு முழு செயலியை உருவாக்கிவிட முடியும்.

from flask import Flask

app = Flask(__name__)

@app.route("/")
def home:
    return "Hello World!"

மேலே உள்ள நிரலை ஒரு கோப்பில் போட்டு நாம் ஒரு webserver-இல் நிறுவி, அதற்கு http://www.sample-flask-application.com என்ற ஒரு முகவரியையும் கொடுத்துவிட்டோம் என்றால், நாம் எப்பொழுதெல்லாம் அந்த இணைய முகவரிக்குப் போகிறோமோ அப்பொழுதெல்லாம் நமக்கு Hello World! என்னும் செய்தி காத்திருக்கும்.

அனால் இணையத்தின் மொழி HTML அல்லவா?

என்னது இது? இணைத்தின் பக்கங்கள் HTML-உம் JavaScript, CSS ஆகிய மொழிகளிலும்தானே எழுதப்படும், இவன் என்ன Pythonஐக் கொண்டு வந்து வைத்துக்கொண்டு பிதற்றுகிறான் என்று நீங்கள் யோசிப்பது எனக்குக் கேட்கிறது. நீங்கள் கூறும் மொழிகள் எல்லாம் இணையப்பக்கங்களின் மொழிகள், அதாவது Client Side. நாம் நம் browserஇல் இணையத்தில் இருக்கும் பக்கங்களைப் பார்க்கப் பயன்படும் மொழிகள். இங்கு நாம் பேசிக்கொண்டு இருக்கும் Python என்பது Server Side மொழி. அதாவது client side வரக்கூடிய பக்கங்களை உருவாக்கித்தரும் செயலியை நாம் எழுத Pythonஐப் பயன்படுத்துகிறோம்.

slice1

Python Flaskஐக் கொண்டு, நாம் HTMLஆல் ஆன பக்கங்களை உருவக்க முடியும். அதை எப்படி செய்வது என்பதை அடுத்து அடுத்து வரும் கட்டுரைகளில் பார்க்கலாம். நன்றி.

Creative Commons Licence
This work is licensed under a Creative Commons Attribution-NonCommercial 4.0 International License.

Flask Marshmallow – has no attribute data

TL,DR-

Remove .data after the schema.dump() calls in the code. Marshmallow 3 supplies the data directly.

The Issue

If you use Flask-Marshmallow in your Flask application for serialisation of models, then there are chances that you will run into this error when you upgrade dependencies. The reason for this issue is Flask Marshmallow has added support for Marshmallow 3 when moving from version 0.10.0 to 0.10.1. And Marshmallow 3 returns the data directly when the dump function is called instead of creating an object with the .data attribute.

The solution

This is a breaking change and requires the codebase to be updated. Remove all .data accessors from the dump() outputs. For example:

users = user_schema.dump(query_result, many=True).data

# Will become

users = user_schema.dump(query_result, many=True)

Some thoughts

I don’t know why such a big support change is released as a bug fix version 0.10.0 to 0.10.1. It at least should be released as 0.11 in my opinion. If I could go further I would say wrappers for libraries or software in general should always follow the parent’s version number to the minor version. If Marshmallow is in 3.2.x then it makes sense for Flask-Marshmallow to be in 3.2.x. That provides a better idea of what we are using and what are the changes we need to account for.