I have so far written about:
- the hardware and the OS and
- how I handle the networking
and this post is about how I use Nomad to deploy software.
But before that…
I have some updates in the networking department. I had mentioned in Part 2 that, I use Nginx as a reverse proxy to route traffic from the internet into my public apps like Misskey.
By picking up the cues from Nemo’s setup, I experimented with Traefik and replace Nginx with Traefik. It was made easier by the fact that Traefik fully supports Nomad service discovery. That means, I don’t have to run something like Consul just to handle the service to Traefik Proxy mapping.
Running Traefik
I was running Nginx as a Systemd service in the OCI virtual machine and Nomad was limited to running services in my Intel NUC. While moving to Traefik, I configured the OCI VM as a Nomad client and attached it to the Nomad “Cluster”. Since Nomad is running on the Tailscale network, I didn’t have to fiddle with any of the networking/firewall stuff in the OCI VM, making the setup simple.

Traefik is run as a Docker container in the VM with the “host” network mode so that it listens to the VM ports 80/443, which are open to the outside internet. I have specifically mapped the Traefik dashboard to the “tailscale” network, allowing me to access the dashboard via SSH tunneling without have to have the 8080 port open to the rest of the world.
// Nomad configuration

    network {
      port  "http" {
        static = 80
      }
      port "https" {
        static = 443
      }

      port "admin" {
        static = 8080
        host_network = "tailscale"
      }
    }

    task "server" {
      driver = "docker"
      config {
        image = "traefik:2.9"
        ports = ["admin", "http", "https"]
        network_mode = "host"
        volumes = [
          "local/traefik.toml:/etc/traefik/traefik.toml",
          "local/ssl/cert.pem:/etc/ssl/cert.pem",
          "local/ssl/private.key:/etc/ssl/private.key",
        ]
      }
    }
Deploying Applications
All the services are written as Nomad Job specifications, with a specific network config, and service definition. Then I deploy the software from my laptop to my homeserver by running Terraform.
Ideally, I should be creating the Oracle VM using Terraform as well. But the entire journey has been a series of trail and error experiments, that I haven’t done that. I think I will migrate to a Terrform defined/created VM once I figure out how to get Nomad installed and setup without manually SSHing into the VM.
Typical Setup Workflow

Since, most of what we are dealing with are web services, I haven’t run into a situation where I had to deal with a non-docker deployment yet. But I rest easy knowing that when the day comes, I can rely on the “exec” and “raw_exec” drivers of Nomad to run them using pretty much the same workflow.
Dealing with Secrets
One of the biggest concerns about all of this is dealing with secrets like, DB credentials, API Keys, ..etc., For example, how do I supply the DB Username and Password to the Nomad Job running my application without storing them in the Job configuration files which I have on version control?
There are many ways to do it, from defining them as Terraform variables and storing it as git-ignored file withing the repo to deploying Hashicorp Vault and using the Vault – Nomad integration (which I tried and found to be an overkill).
I have chosen the simpler solution of storing them as Nomad Variables. I create them by hand using the Nomad UI, and they are defined with specific task access.
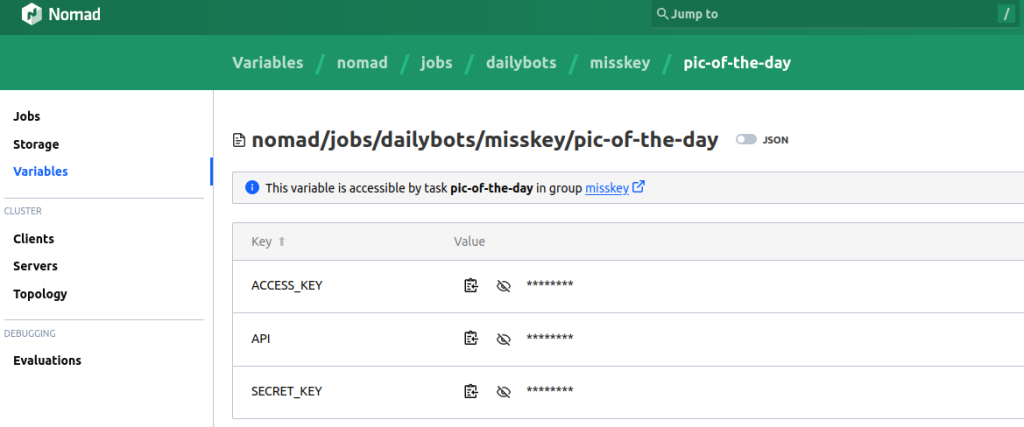
These are then injected into the service’s container as environment variables using the template block with nomadVars.
// Nomad config for getting secrets from Nomad Variables

      template {
        data = <<EOH
{{ with nomadVar "nomad/jobs/owncloud/owncloud/owncloud" }}
OWNCLOUD_DB_NAME={{.db_name}}
OWNCLOUD_DB_USERNAME={{.db_username}}
OWNCLOUD_DB_PASSWORD={{.db_password}}
OWNCLOUD_ADMIN_USERNAME={{.admin_username}}
OWNCLOUD_ADMIN_PASSWORD={{.admin_password}}
{{ end }}

{{ range nomadService "db" }}
OWNCLOUD_DB_HOST={{.Address}}
{{ end }}

{{ range nomadService "redis" }}
OWNCLOUD_REDIS_HOST={{.Address}}
{{ end }}
EOH
        env = true
        destination = "local/env"
      }
Accessing Private Services
While this entire project began with trying to self host a Misskey instance as my personal Mastodon alternate, I have started using the setup to run some private services as well – like Node RED, that runs automation like my RSS-to-ActivityPub bots.
I don’t expose these to the internet, or even the Tailscale network at the moment. They are run on my home local network on a dynamic port assigned to by Nomad. I just access it through the IP:PORT generated by Nomad.

I will probably migrate these to the Tailscale Network, if I start traveling and would still want to have access to them. But for now, they are just restricted to my home network.
Conclusion
It has been a wonderful journey figuring all of this out over the last couple of weeks and running the home-server has been a great source of satisfaction . With Docker and Nomad, it has been really easy to try out new services, and set them up quickly.
I woke up on a Sunday and wanted to setup Pihole for blocking ads. I had the house running via Pi-hole in 30 mins. I have found a new kind freedom with this setup. I see this as a small digital balcony garden on the internet.

References
- Understanding Networking in Nomad by Karan Sharma
- Translating Docker Compose & Kubernetes to Nomad by Luiz Aoqui
- Nomad Past Present and Future by Luiz Aoqui
