Blog

NiftyBot

The Mastodon ecosystem is really nice. The concept of Fediverse bringing in decentralized social network is a breath of fresh air. I created NiftyBot account in botsin.space – a dedicated server for Mastodon Bots.

What is NiftyBot?

  • It is a Mastodon Bot Account

What does it do?

  • It posts updates about Indian Markets
  • Currently it posts NSE closing report at 4.01 PM everyday. Sample post below

niftybot-sample

How does it work?

It is a Python script running in AWS Lambda.

lambda-niftybot

A scheduler tiggers the Lambda Function at 4.01 every Monday – Friday. The lambda function is a Python Script that fetches the necessary details from NSE’s output data and posts to Mastodon.

Source Code:

https://gist.github.com/tecoholic/ca4f9933335b34388375bceb213a5801.js

Some asked about if this bot is open source. Obviously, you see the source right here. 🙂 Still I will add the license here.

The above source code is released into the Public Domain. You can do what ever you want with it.

How much does it cost to run this Bot?

Nothing.

Numbers Please:

The AWS Lambda Free tier comes with 1 Million requests and 400,000 GBSec, which is a combination of how much memory we use and the time taken by our process. Since I have used the CloudWatch Scheduler Event as the trigger, I am using 20-22 requests, the Python function takes about 60 MB to run so running at the lowest memory of 128MB block, and usually completes in around 2600-2700 msec. The metrics says my worst billed event so far is about 0.3375 GBSec. With about 20-22 trading days in a month, I might use a total of 8-10 GBSeconds, leaving enough room to run many more bots like this one 🙂

Investment Strategy: SIP vs SMA 50

Update: Big one. Scroll to the bottom to see it.

I tend to believe investment is a long term activity. It is something I will be engaged in till my end. So the money is going to be invested for about 40 – 50 years. With that long an outlook, a low cost Index fund in Equity is as good as anything. I set out to see if there is a better strategy to be executed than doing a monthly cost averaging or Systematic Investment Plan (SIP).

SIP

The idea behind a SIP is simple, every month on a given date you buy the same thing for a given amount. But one thing bugs me, the most optimal time to buy in that month is not always the date the SIP purchase happens. So I set out to see if I can use the Simple Moving Average (SMA 50) technical indicator to find the BUY signals for investing.

SMA based Strategy

The strategy is

Whenever the PRICE closes below the 50 DAY SMA, we buy. If it doesn’t cross for X number of months, then the money just accumulates and sits idle.

The strategy tries to optimize the buying price to stay below the average price – a pseudo fair price.

So here is what I did, I used Streak to create a strategy and generated all the signals for the SBI Nifty 50 ETF

streak

I set the stoploss at 15% and a profit booking at 5%. The higher stoploss and lower profit limit are to maximize the number of BUY signals. As the idea is NOT to trade, but to invest. I am only interested in the BUY signals, ideally I won’t sell it for 20-30 years.

A good trading strategy?

Interestingly, it seems like a pretty good positional trading strategy with Zero loss trades and generating 16+% CAGR. Impressive. Maybe some trader can tell me it this is worth it after all the taxes and brokerage 🙂

Total Units

Anyway, getting back to my analysis – I downloaded the strategy with dates and prices at which the trades happened. From them, I calculated the number of units I could have bought, if I put aside 1000 rupees every month and bought only on the BUY signals from January 01, 2016 to October 31, 2019 (46 months)

NSE_SETFNIF50

It comes to around 410 Units

SIP

Now I wanted to know how many units could I have bought if I did a regular SIP for the same period with the same amount of money for the same time period. Using Moneycontrol SIP calculator, I got

NIFTY_SIP.png

I would have bought 468 Units. Yup, an extra 58 units over the SMA 50 Strategy.

Conclusion

The probable cause for the underperformance of the SMA 50 strategy is that, the money sits ideally for 7 or 8 months at certain times when the index is trending up and and SMA hasn’t caught up to it. This loss of time results in the poor performance of this strategy. Time is literally money. So time lost is money lost.

Update

After some tweets from @IndiaEtfs, I came with an SMA 50 augmented SIP strategy, which tries to catch the SMA crossing down every month, if it doesn’t occur, just invest it on 1st of the following month. This way, we are not letting the money sit idle and are using the opportunity of paying lower prices when it happens.

The result wasn’t that surprising. The returns were almost the same as that of the SIP.

Augumented-SIP

The difference is merely 1 unit which I assume is nothing when you round off when buying whole units on the market. So unless someone devises a method to find out the market bottom, we investors are better off just doing SIPs consistently.

Pop-Out a box effect in DaVinci Resolve 16

1508177128_1366318 I have been working on some video editing using DaVinci Resolve 16 for the Tutorial videos I have been posting on YouTube. One of the most used effect in tutorial videos is the pop-out effect (I don’t really know the exact name) where a portion of the screen is cut and enlarged while the rest of the screen is darkened to bring the focus to that particular area of the frame.

chosen-areaenlarged

This is really useful to bring the attention of the user to a particular area on the screen. I have searched the internet and haven’t found the right tutorial to do it. Finally after much trial and error I figure out a Fusion graph that will get it done.

fusion-map.png

Workflow

  1. Go to the start of the clip
  2. Add a rectangle node (or any shape for that matter)
  3. Create a keyframe. Adjust the rectangle to the area to popout
  4. Add a transform node between the MediaIn and MediaOut
  5. Add a keyframe with default values on the first frame
  6. Connect the rectangle as the mask for the Transform Node
  7. Add a Color Gain node after the transform and add a keyframe, set Lock the RGB values and set the gain to 0.5
  8. Connect the rectangle to the Color Gain and Use the Apply Inverted Mask option on the mask tab in inspector
  9. Move to the end of the effect (something like frame 30)
  10. Adjust the transform size and position
  11. Match the size and position of the rectangle
  12. Play, test and adjust for any artifacts.

PyCharmஇல் Flask செயலி உருவாக்குவது எப்படி?

PyCharm என்பது ஒரு ஒருங்கினைந்த நிரலாக்க மென்பொருள். ஆங்கிலத்தில் Integrated Development Environment (IDE) என செல்லும் ஒரு நிரலாக்கக் கருவி. நாம் செய்யும் வேலையின் தரம் நாம் பயன்படுத்தும் கருவிகளைக்கொண்டே இருக்கிறது. ஒரு சிற்பிக்கு அது நன்றாகத் தெரியும். மென்பொருள் உருவாக்கம் சிலை செதுக்குவதைக் காட்டிலும் கடினமான விடயமா என்று தெரியாது, உறுதியாகச் சிக்கலான ஒன்று என்றே நான் கூறுவேன். எனவே நாம் பயன்படுத்தும் கருவிகளும் அதற்கு நிகரானதாக இருக்கு வேண்டும். Notepad, Notedpad++, Emacs, Eclipse, VIM, Atom, VS Code என பலவற்றில் நிரல் எழுதி இப்பொழுது கடைசி 3 ஆண்டுகளாக வருடம் 7-8ஆயிரம் செலவழித்து Professional Edition வாங்கிப் பயன்படுத்தும் அளவிற்கு உடன் நிற்பது PyCharmதான்.

இனி Python Flask தொடரில் வரும் கட்டுரைகள் எல்லாம் நான் அதிலேயெ எழுதப்போகிறேன். நீங்களும் பயன்படுத்துமாறு கேட்டுக்கொள்கிறேன். (உங்க Mind voice கேக்குது. இல்லை. எனக்கு இதில் எந்த ஆதாயமும் இல்லை)

Flask தொடரில் இதற்கு முன் வந்த கட்டுரைகள்:
1. Python Flask என்றால் என்ன?
2. Python Flaskஐ நிறுவுவது எப்படி?
3. Flaskஇல் நம் முதல் செயலி

என்னாது? 7-8 ஆயிரம் செலவழிக்கனுமா?

இல்லை.

PyCharm இல் இரண்டு பதிப்புகள் உள்ளன. ஒன்று காசு கொடுத்து வாங்க வேண்டிய Professional Edition, மற்றொன்று இலவசமாகக் கிடைக்கும் Community Edition. இந்த தொடரில் நான் பயன்படுத்தப்போவது எல்லாமே Community Edition தான். இன்னும் ஏன் யோசனை? https://www.jetbrains.com/pycharm/download/

PyCharm இல்லாமல் இந்தத் தொடரை மேலும் படிக்க முடியாதா?

கண்டிப்பாக முடியும். உங்களுக்கு PyCharm வேண்டாம் என்றால், தாராலமாக உங்களுக்கு பிடித்த கருவிகளைப் பயன்படுத்தாலாம். நாம் Flask கற்றுக்கொள்ள PyCharm அவசியம் கிடையாது. ஆங்காங்கே நான் இடும் படங்கள் PyCharm இன் படங்களாக இருக்க வாய்ப்பு உள்ளது, அதற்கு நிகரான விசயங்களை உங்களுடைய கருவியிலும் பார்த்துக்கொள்ளவும்.

Flask Project உருவாக்கம்

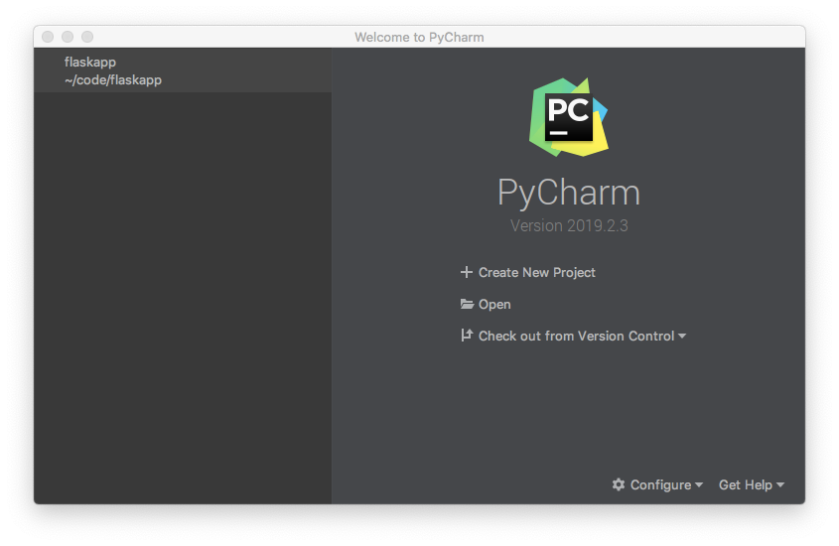
PyCharmஐ திறந்து கொள்ளவும்.

launch-window.png

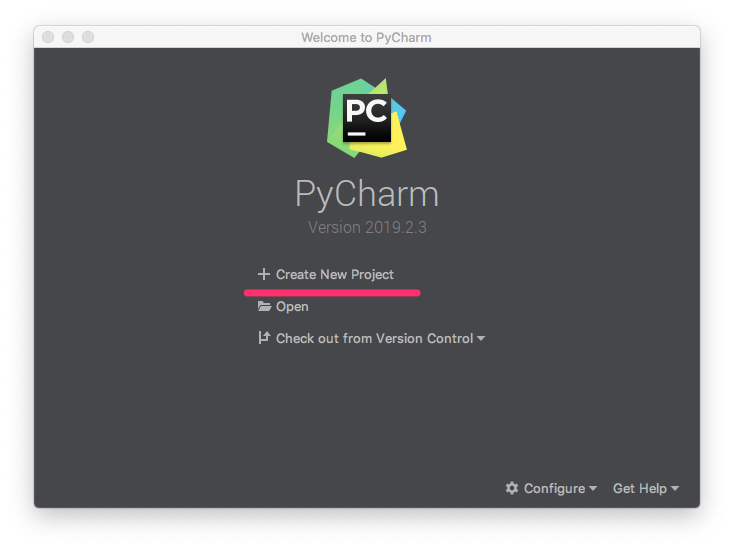
அதில் Create New Project-ஐச் சொடுக்கவும்.

create-project.png

வரும் பெட்டியில் நாம் கொடுக்க வேண்டியது இரண்டு விசயங்கள்:

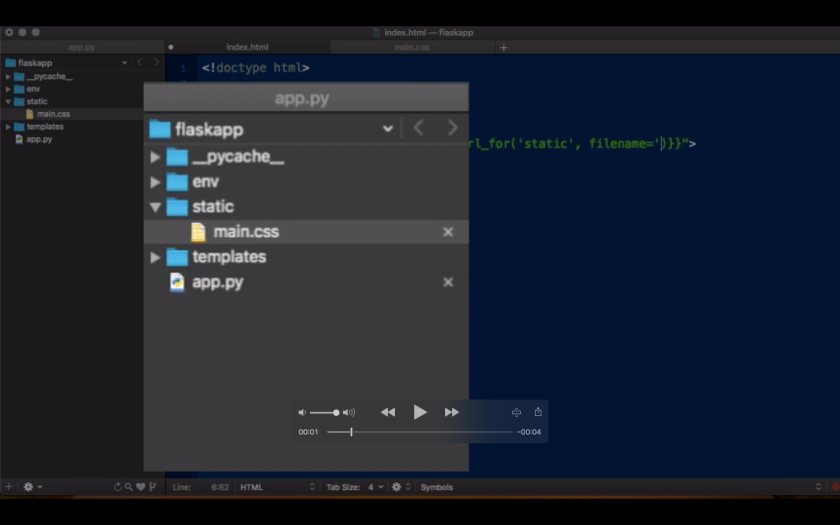
  1. நம் Project-ஐ எங்கு சேமிக்கப்போகிறோம். உங்களுக்கு பிடித்தமான இடத்தை அங்கு கடைசியில் இருக்கு “Browse” பொத்தானை அமுக்கி தேர்வு செய்து கொள்ளவும். புதிதாக ஒரு folder உருவாக்க வேண்டும் எனில் அதை கடைசியில் டைப் செய்து விடுங்கள். எ.கா. என் கணினியில் நான் code எனும் folderஇல் எல்லா projectகளையும் சேர்த்து வைத்து உள்ளேன். அதனால் code எனும் போல்டரை தேர்வு செய்துவிட்டு, /flaskapp என்பதை தட்டச்சு செய்துவிட்டேன்.
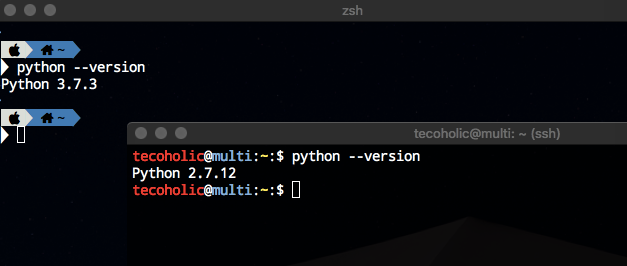
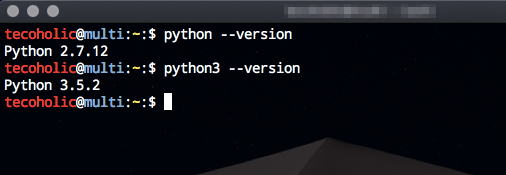
  2. நாம் எந்த Python version ஐப் பயன்படுத்தப்போகிறோம். உங்கள் கணினியில் ஒரே ஒரு Python மட்டும் இருக்கலாம், அல்லாது பலவையும் இருக்கலாம். எனது கணினியைப் பாருங்கள்

python-interpreters.png

இதில் நாம் எதை நம் செயலி உருவாக்கத்திற்கு பயம்படுத்தப் போகிறோமோ அதைத் தேர்வு செய்ய வேண்டும். நாம் Python 3யைத்தான் இக்கட்டுரைத் தொடரில் பயன்படுத்தவிருக்கிறோம். எனவே Python 3ஐ தேர்வு செய்து கொள்ளுங்கள்.

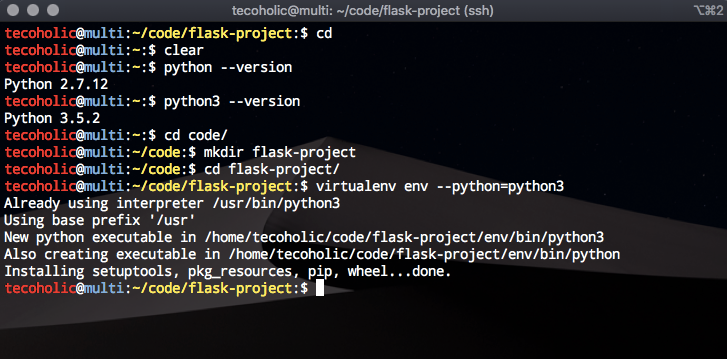
தேர்வு செய்தவுடன் Create பொத்தானை சொடுக்கவும். இப்பொழுது PyCharm நமக்கான project folderஐ உருவாக்கி அதனுள் ஒரு virutal environmentஐ நமக்கு உருவாக்கித் தந்துவிடும். அது முடிந்தவுடன், PyCharmஇன் project/editor window திறந்து விடும்.

project-window.png

இதில் நாம் தெரிந்துகொள்ள வேண்டிய இடங்கள் 5.

  1. இங்குதான் நாம் நம் தரவுகளை எழுதுவோம்
  2. இது நம் projectஇல் உள்ள கோப்புகளை பார்வையிட மற்றும் மாற்றங்கள் செய்ய உதவும் Project Tree
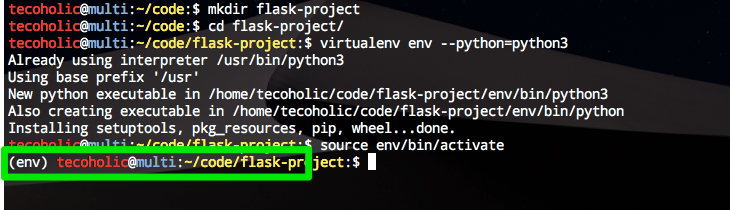
  3. நம் project folderக்குள் எதேனும் கட்டளைகள் இட விரும்பினால் அதற்கு தேவையான Terminal. இதின் சிறப்பு என்னவென்றால், நாம் source env/bin/activate என்று நமது environmentஐ நாம் activate செய்யத்தேவையில்லை. அது தானாகவே activate ஆகிவிடும். நாம் நேராக நமது வேலையை செய்யலாம்.
  4. Python Console – இது உங்களுக்கு எதாவது சிறு சிறு Python வரிகளை சோதித்துப்பாக்க பயன்படும்.
  5. Configuration Manager – இங்கு நாம் நமது செயலியை இயக்கிப் பார்க்கத் தேவையானவற்றை பதிவு செய்து, இயக்கி, பிழைகளை கண்டறியும் இடம்.

Flask செயலி எழுதுதல்

கீழே உள்ள terminalஐத் திறந்து, Flaskஐ நிறுவும் கட்டளையை இடவும்

pip install flask

install-flask.png

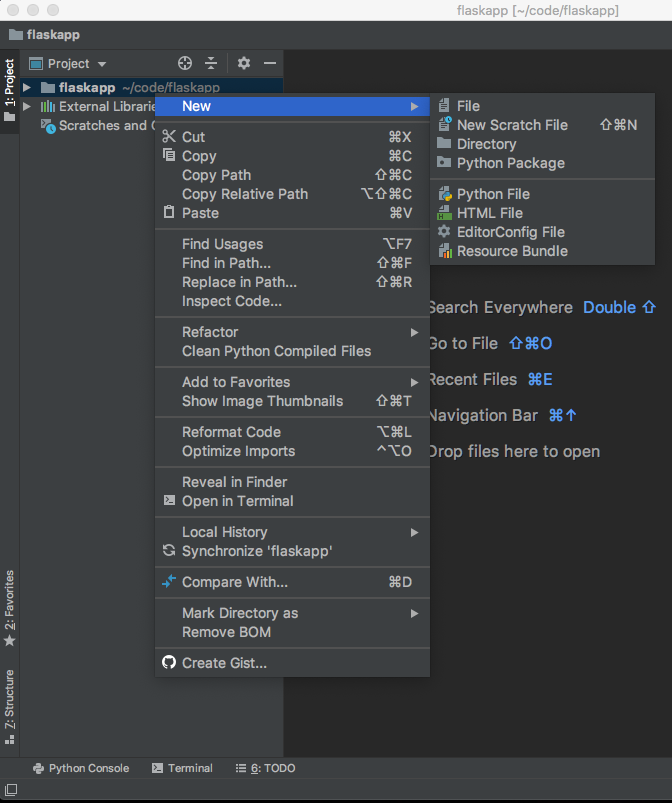
அது முடிந்ததும், project treeஇல் உங்கள் project folderஇன் மேல் வலது-“க்ளிக்” செய்து ஒரு புது Python கோப்பை உருவாக்கவும். அதற்கு app.py என்று பெயரிடுங்கள்.

new-file-creation.png

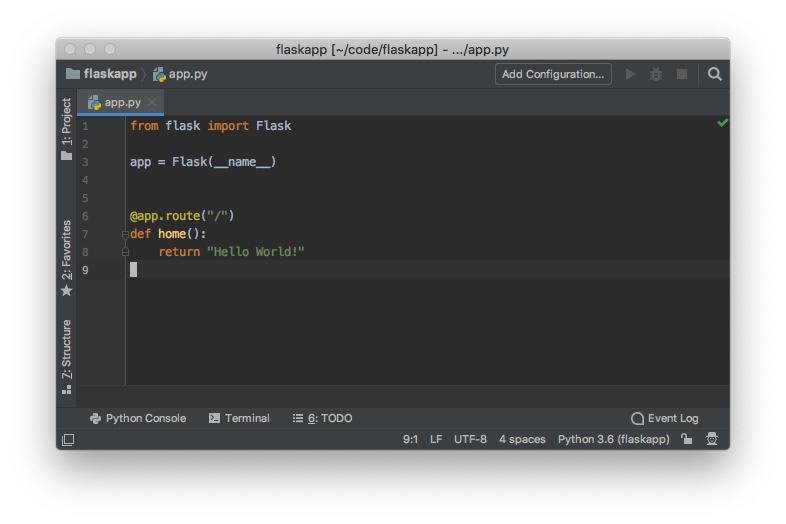
இப்பொழுது திறந்து இருக்கும் அந்த கோப்பில் நம் முதல் செயலிக்கான தரவைப் தட்டச்சு செய்து கொள்ளுங்கள்.

from flask import Flask

app = Flask(__name__)


@app.route("/")
def home():
    return "Hello World!"

நீங்கள் தட்டச்சு செய்யும் பொழுதே PyCharm உங்களுக்கு உதவ ஆரம்பிப்பதைக் காணலாம்.

type-suggestions.png

முழு தரவையும் தட்டச்சு செய்தவுடன் “Save” செய்து கோப்பை பத்திரப்படுத்திவிடவும்.

hello-world.png

செயலியை இயக்கி சோதிப்பது

வலதுபுறம் மேலே உள்ள “Add Configuration” பொத்தானை சொடுக்கவும். உடனே அது ஒரு New Configuration பெட்டியத் திறக்கும்.

new-configuration.png

இதில் உள்ள + குறியை சொடுக்கி ஒரு Python configurationஐ உருவாக்கவும்.

new-config-create-menu.png

அங்கு நிங்கள் செய்ய வேண்டியவை 4

filled-config.png

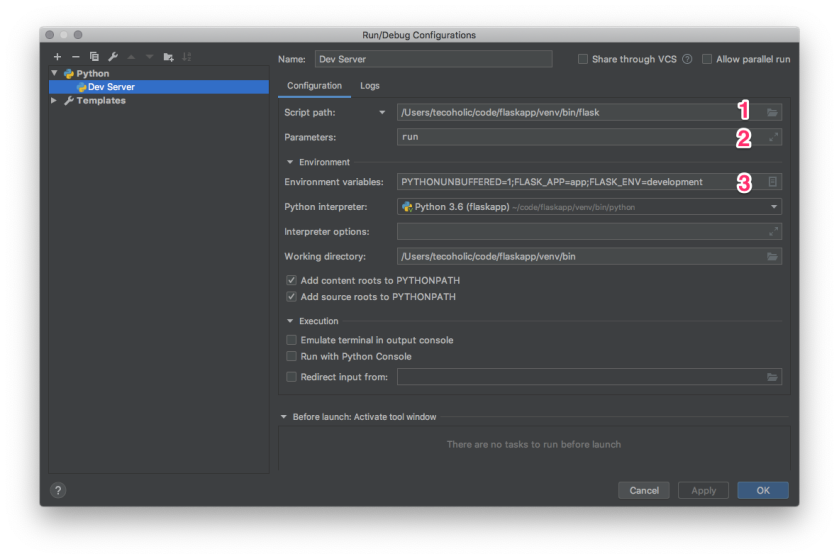
  1. Script Pathஇல் உள்ள folder பொத்தானை சொடுக்கி உங்கள் projectக்குள் இருக்கும் virtual environment (venv)க்குள் bin -> flask என்பதைத் தேர்வு செய்து கொள்ளவும்.
  2. Parametersஇல் run எனத் தட்டச்சு செய்யவும்.
  3. Environment Variablesஇல் FLASK_APP=app;FLASK_ENV=development; என்பதைச் சேர்க்கவும்.
  4. Nameஇல் “Dev Server” என்று கொடுக்கவும்

அதை OK கொடுத்து மூடி விடவும். இப்பொழுது Dev Sever என்று ஒரு Configuration உங்களுக்கு உருவாகி இருக்கும். அதன் அருகில் உள்ள run பொத்தானை அமுக்கினால், நம்முடைய Flask server வேலை செய்ய ஆரம்பிப்பதைக் காணலாம்.

run-button.png

run-window.png

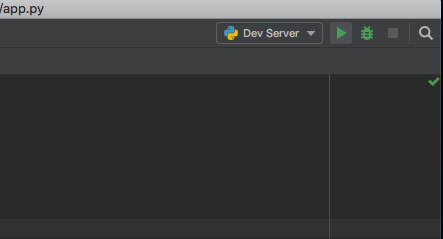
இதில் Flaskஇன் server ஆரம்பமாகி, நம்முடைய செயலியை நாம் பார்க்க செல்ல வேண்டிய முகவரி இருக்கும். அந்த முகவரியை சொடுக்கினால், சென்ற கட்டுரையைப் போலவே நமக்கு Hello World எனும் செய்தி காத்திருக்கும்.

முடிவுரை

ஒரு terminalஐயும் text editorஐயும் வைத்து செய்த வேலையை இப்படி என்ன என்னமோ configuration எல்லாம் செய்து பயன்படுத்த வேண்டுமா என்று நினைத்தால், கவலைப்படாதீர்கள். இந்த ஒரு முறை இதை செய்து விட்டோம் என்றால் அடுத்த முறை நாம் எதுவும் செய்ய வேண்டியது இல்லை.

relaunch.png

திறந்தவுடன் நமக்கு நம்முடைய project காட்டும். சோதித்துப்பார்க்க நாம் நேரடியாக Dev sever ஐ ஆரம்பிக்காலாம். வேலை முடிந்ததும் மூடி விடலாம். Text Editor, terminal, virtual environment activate செய்வது, Flask app பதிவிட்டு பிறகு run செய்வது என பல விசயங்களில் கவனம் சிதறவிடத் தேவையில்லை.

உங்களுக்கு இதில் எதேனும் ஐயங்கள் இருந்தால் கீழ பதிவிடவும். நன்றி.

Creative Commons Licence
This work is licensed under a Creative Commons Attribution-NonCommercial 4.0 International License.

Flaskஇல் நம் முதல் செயலி

சென்ற கட்டுரையில் Flask-ஐ நிறுவுவது எப்படி என்று பார்த்தோம். இந்தக்கட்டுரையில் Flaskஇல் ஒரு இணைய செயலியை (Web application) உருவாக்குவது பற்றி பார்ப்போம்.

முந்தைய கட்டுரையில், இப்படி virtual environmentஐ activate செய்து வைத்து இருப்போம்.

 virtual-env-activate.png

அதை அப்படியே விட்டுவிட்டு, அந்த folderக்குள் app.py என்று ஒரு கோப்பை உருவாக்கிக் கொள்ளுங்கள். இப்பொழுது அந்த கோப்பை உங்களுக்கு பிடித்தமான Text Editorஇல் திறந்து அதில் கீழ் கொடுக்கப்பட்டுள்ள நிரலை பதிவிடுங்கள்.

from flask import Flask

app = Flask(__name__)

@app.route("/")
def home():
    return "Hello World!"

அவ்வளவுதான். நாம் நம்முடையா முதல் Flask செயலியை உருவாக்கிவிட்டோம். என்ன நம்பவில்லையா? சரி அப்படியே திறந்து வைத்து இருக்கும் terminalக்கு சென்று கீழே கொடுக்கப்பட்டுள்ளதை செய்யவும்.

குறிப்பு: ஒரு வேலை அந்த terminal-ஐ நீங்கள் மூடி இருந்தால். புதிதாக ஒன்றைத் திறந்து அதில் உங்கள் project directoryக்கு சென்று source env/bin/activate என்று உள்ளிட்டு நம் projectஇன் virtual environmentஐ மறுபடியும் activate செய்து வைத்துக்கொள்ளவும்.

export FLASK_APP=app
export FLASK_ENV=development
flask run

இப்பொழுது உங்கள் கணினியில் ஒரு server ஓட ஆரம்பித்து இருக்கும்

server running

இதில் நாம் முக்கியமாக கவனிக்க வேண்டியது இதுதான்

* Running on http://127.0.0.1:5000/ (Press CTRL+C to quit)

இது நாம் நம்முடைய செயலி எந்த முகவரியில் இயங்குகிறது என்பதையும், இந்த serverஐ நம் வேலை முடிந்தவுடன் எப்படி நிறுத்துவது என்பதையும் சொல்கிறது. இந்த சுட்டியை சொடுக்கிப்பாருங்கள் http://127.0.0.1:5000/ உங்களுக்கு உங்கள் செயலி “Hello world!” எனத் தனது பிறந்தநாள் செய்தியை சொல்லிக்கொண்டு இருக்கும்.

hello-world.png

இப்ப இங்க என்ன நடந்துது?

எது எதையோ அங்கும் இங்கும் செய்து இப்பொழுது Hello World! என்பதை காட்டி விட்டீர்கள், ஆனால் இதெல்லாம் எதற்கு செய்தோம், அதன் அர்த்தம் என்ன? – என்று நீங்கள் யோசிக்கக்கூடும். வாங்க பார்க்கலாம்.

from flask import Flask

இந்த வரியில் flask எனும் packageஇல் இருந்து, Flask எனும் classஐ நாம் நமது கோப்புக்கு கொண்டு வருகிறோம்.

app = Flask(__name__)

அந்த Flaskஐ வைத்து, நம் ஒரு appஐ உருவக்குகிறோம். அதற்கு பெயரிட வேண்டும். அதை நாம் வெளிப்படையாகச் சொல்லாமல் __name__ என்பதன் மூலம், அந்த கோப்பின் பெயரையே எடுத்துக்கொள்ளச் சொல்லிவிடுகிறோம்.

நீங்கள் இணையத்தில் உலாவும் பொழுது இணை முகவரிகளைப் பார்த்து இருப்பீர்கள் அவைகளில் / பரவலாகப் பயண்படுத்தப்படும் ஒன்று. ஒரு இணையதளத்தில் பல பக்கங்கள் இருந்தால் அதை / குறிக்கு பிறகு சேர்த்து விடுவது வழக்கம். எ.கா என்னுடையா contact பக்கத்தின் முகவரி https://arunmozhi.in/contact/.

நம் செயலியில் இப்பொழுது இருப்பது ஒரே ஒரு பக்கம்தான்.

@app.route("/")
def home():
    return "Hello World!"

இங்கு, முதல் வரியில், செயலியை எப்பொழுது எல்லாம் முகப்பு பக்கம் தேவைப்படுகிறதோ (“/”) அப்பொழுது எல்லாம் home() எனும் பங்சனை இயக்கச்சொல்லுகிறோம். அந்த பங்சன் என்ன செய்ய வேண்டும் என்றால் Hello World! எனும் வாசகத்தை முகப்பு பக்கமாகத்தர வேண்டும் என்று சொல்லி விடுகிறோம். அவ்வளவுதான், இந்த செயலியை நாம் ஒரு சர்வரில் இணையதளமாக நிறுவினோம் என்றால், எப்பொழுது எல்லாம் ஒருவர் அந்த இணைதளத்திற்கு வருகிறாரோ அப்பொழுது எல்லாம் Hello World எனும் வாசகத்தைப் பார்ப்பார்.

அதற்காக நாம் இணையதளம் எல்லாம் நிறுவ வேண்டுமா? ஒவ்வொரும் முறையும் மாற்றங்கள் செய்தாலோ, அல்லது செயலியை உருவாக்கும் பொழுது எதேனும் பிழைகள் இருந்தாலோ எப்படி அதனை சோதித்துப் பார்ப்பது? அதற்கு Flaskஏ நமக்கு வழிமுறை செய்து தருகிறது. அதைத்தான் நாம் terminalஇல் flask run எனும் கட்டளையின் மூலம் செய்தோம். முதலில் Flaskக்கிற்கு நமது செயலியின் பெயரை சொல்கிறோம், அதுதான்

export FLASK_APP=app
export FLASK_ENV=development

பின்பு, நாம் நமது செயலி உருவாக்க நிலையில் (developmentஇல்) உள்ளது என்பதை பதிவிடுகிறோம். இது நம் செயலியின் இயக்கத்தின் பொழுது எதேனும் பிழைகள் எழுந்தால் அதனை நமக்கு நம் இணைய உலாவியிலேயே (browser) காட்ட உதவும். இதை செய்யாவிடில், பிழைகள் terminal-ஓடு தங்கிவிடும்.
கடைசியாக flask run என்பது நமது செயலியை ஒரு இணைதளத்தைப் போல பார்வையிட ஒரு serverஆ ஆரம்பித்துக் கொடுக்கிறது. நாமும் அது கொடுக்கும் முகவரிக்குச் சென்று பார்க்கிறோம்.

இத்துடன் இக்கட்டுரை முற்றும். என்னது இது, வெறும் இரண்டு வார்த்தைகளை காட்டி முடித்துவிட்டீர்கள்? வண்ண வண்ணமாக நான் HTML பக்கங்களை எப்படி உருவாக்குவது? அடுத்து வரும் கட்டுரைகளில் பார்ப்போம்.

உங்களுக்கு இதில் எதேனும் ஐயங்கள் இருந்தால் கீழ பதிவிடவும். நன்றி.

இலவச இணைப்பு

http://127.0.0.1:5000/who-are-you/ எனும் முகவரிக்குச் சென்றால் “I am a Python Developer” என்று வரும்படி ஒரு புது routeஐ உருவாக்குங்கள் பார்க்கலாம்.

Creative Commons Licence
This work is licensed under a Creative Commons Attribution-NonCommercial 4.0 International License.

Python Flaskஐ நிறுவுவது எப்படி?

இந்தக்கட்டுரை நீங்கள் ஏற்கனவே உங்கள் கணினியில் Python install செய்து வைத்துள்ளீர்கள் எனும் கோணத்தில் இருந்து எழுத்தப்பட்டது. Python உங்கள் கணினியில் இல்லை என்றால், https://www.python.org/downloads/ சென்று, பதிவிறக்கி உங்கள் கணினியில் நிறுவிக்கொள்ளவும்.

1. Python 3

நீங்கள் MacOS அல்லது Linux பயன்படுத்துபவராக இருந்தால் 90% உங்கள் கணினியில் Python 2 இருக்கும். நீங்கள் Python 3-ஐ நிறுவிக்கொள்ளுதல் சிறப்பு.

ℹ️ அனைத்து விதாமன Operating System-க்கும் Python 3 நிறுவுவது பற்றிய தகவலுக்கு https://realpython.com/installing-python/

உங்கள் கணினியில் உள்ள “Command Line” அல்லது “Terminal” செயலியைத் திறந்து கீழே கொடுக்கப்பட்டுள்ளவற்றை செய்யவும்.

சிறுகுறிப்பு: நான் MacOS பயன்படுத்துகிறேன், எனவே என்னுடைய Commandகள், MacOSக்கும், Linuxக்கும் சரியாகப்பொருந்தும். Windows பயன்படுத்துபவர்களுக்கு ஒரு சிலவை வேறு படலாம், கவனத்தில் கொள்ளவும்.

python --version

இது உங்கள் கணினியில் உள்ள கணினியில் இருக்கும் Pythonனின் பதிப்பைக்காட்டும். என்னுடைய இரண்டு கணினிகளின் வெளியீடு இதோ.

Python Version Check

ஒன்றில் Python 2 இருப்பதைக்காணலாம். நீங்கள் Python 3 நிறுவினாலும், ஒரு சில சமயம் Python 2வே பிரதானமாக இருக்கும். அப்படி இருந்தால் கவலைப்படத் தேவையில்லை. python3 --version என்று அடித்துப்பார்த்து Python 3 இருக்கிறதா என்று சோதித்துக்கொள்ளவும்.

python3-version.png

2. Virtual Environment

Flask நிறுவுவதில் முதல் வேலை, அதற்கென தனி ஒரு virtual environemnt-ஐ உருவாக்குவது. இது நம்முடைய project சம்பந்தமான மற்றும் தேவையான விசயங்களை மட்டும் ஒரு இடத்தில் வைத்துக்கொள்ள உதவும். இன்னும் விளக்கமாக்ச்சொன்னால், இன்று நாம் ஒரு இணைய செயலியை எழுத முனைகிறோம், எனவே நாம் Flask நிறுவுகிறோம். நாளை நாம் PyQt துணைகொண்டு ஒரு desktop செயலியை உருவாக்க முயலும் பொழுது அதை நிறுவ வேண்டும். இரண்டுக்கும் சம்பந்தம் கிடையாது, எனவே அவைகளை system Python இல் நிறுவுவதைவிட, நாம் அவைகளுக்கு எனத் தனியாக ஒரு environmentஐ உருவாக்கி அவைகளை தனித்தனியே நிறுவி வைத்துவிட்டோம் என்றால், நாளை எந்த ஒரு மாற்றம் செய்தாலும், அது அந்த ஒரு projectஐ மட்டுமே பாதிக்குமோ தவிற நமதுக் கணினியில் இருக்கும் எல்லாவற்றையும் பாதிக்காது.

என்னடா இவன் “environment” உருவாக்கு என்கிறானே, இதுவே ஒரு பெரிய வேலையாக இருக்கும் போல இருக்கே என்று நீங்கள் பயப்பட வேண்டாம். அதற்கு Python நிறுவும் பொழுது கூடவே வந்த virtualenv என்ற கருவியைப் பயண்படுத்திக்கொள்ளலாம். Command line சென்று, நம் projectக்கு ஒரு directoryயை உருவாக்கி, அதில் ஒரு virtual environment ஐ உருவாக்குங்கள்.

mkdir flask-project
cd flask-project
virtualenv env --python=python3

create-virtualenv.png

இப்பொழுது நீங்கள் ls என்று உள்ளிட்டுப் பார்த்தீர்களேயானால், அங்கு env என்று ஒரு folder இருப்பதைப் பார்க்களாம். இதுவே உங்கள் projectஇன் virtual environment.

3. Flask

இப்பொழுது நாம் உருவாக்கிய virtual environmentக்குள் Flaskஐ நிறுவலாம். முதலில் அதனை activate செய்ய வேண்டும். அப்படி செய்யத்தவறினால், நாம் செய்யும் மாற்றங்கள் எல்லாம் கணினியின் system librariesஐப் பாதிக்கும்.

source env/bin/activate

venv-ectivated.png

Activate ஆனவுடன், நம்முடை environmentஇன் பெயர் command lineஇல் முன்னே சேர்ந்து கொண்டதைக்காணலாம். இது நமக்கு நாம் எந்த environmentஇல் வேலை செய்யப்போகிறோம் என்பதைக் காட்டும். இப்பொழுது Flaskஐ நிறுவலாம்.

pip install Flask

flask_installed.png

Flask நிறுவியாயிற்று. அதைக்கொண்டு செயலிகளை எப்படி உருவாக்குவது என்பதை அடுத்து வரும் கட்டுரைகளில் பார்ப்போம்.

உங்களுக்கு இதில் எதேனும் ஐயங்கள் இருந்தால் கீழ பதிவிடவும். நன்றி.

Creative Commons Licence
This work is licensed under a Creative Commons Attribution-NonCommercial 4.0 International License.

Python Flask என்றால் என்ன?

Python Flask என்பது ஒரு இணைய மென்பொருள்க் குறுங்கட்டமைப்பு.

இணைய மென்பொருள்க் குறுங்கட்டமைப்பா – என்ன சொல்றீங்க?

Flask ஒரு micro web framework. அது ஒரு web application (இணைய செயலி) எழுதத் தேவையான எல்லா வரைமுறைகளையும் நமக்கு வகுத்துத் தருகிறது. அதே சமயம், அப்படி எழுதப்படும் செயலிகள் எல்லாவற்றிலும் எல்லா செயல்பாடுகளும் உள்ளடங்க வேண்டும் என்ற கட்டாயம் இல்லை. நாம் ஒரே ஒரு கோப்பு (file) கொண்டும் ஒரு முழு செயலியை உருவாக்கலாம், அல்லது ஓராயிரம் கோப்புகள் கொண்டும் உருவாக்காலாம். அது முழுக்க முழுக்க நம் தேவையைப் பொருத்தது.

எடுத்துக்காட்டாக, இந்த 👇 நாங்கே வரிகளில் ஒரு முழு செயலியை உருவாக்கிவிட முடியும்.

from flask import Flask

app = Flask(__name__)

@app.route("/")
def home:
    return "Hello World!"

மேலே உள்ள நிரலை ஒரு கோப்பில் போட்டு நாம் ஒரு webserver-இல் நிறுவி, அதற்கு http://www.sample-flask-application.com என்ற ஒரு முகவரியையும் கொடுத்துவிட்டோம் என்றால், நாம் எப்பொழுதெல்லாம் அந்த இணைய முகவரிக்குப் போகிறோமோ அப்பொழுதெல்லாம் நமக்கு Hello World! என்னும் செய்தி காத்திருக்கும்.

அனால் இணையத்தின் மொழி HTML அல்லவா?

என்னது இது? இணைத்தின் பக்கங்கள் HTML-உம் JavaScript, CSS ஆகிய மொழிகளிலும்தானே எழுதப்படும், இவன் என்ன Pythonஐக் கொண்டு வந்து வைத்துக்கொண்டு பிதற்றுகிறான் என்று நீங்கள் யோசிப்பது எனக்குக் கேட்கிறது. நீங்கள் கூறும் மொழிகள் எல்லாம் இணையப்பக்கங்களின் மொழிகள், அதாவது Client Side. நாம் நம் browserஇல் இணையத்தில் இருக்கும் பக்கங்களைப் பார்க்கப் பயன்படும் மொழிகள். இங்கு நாம் பேசிக்கொண்டு இருக்கும் Python என்பது Server Side மொழி. அதாவது client side வரக்கூடிய பக்கங்களை உருவாக்கித்தரும் செயலியை நாம் எழுத Pythonஐப் பயன்படுத்துகிறோம்.

slice1

Python Flaskஐக் கொண்டு, நாம் HTMLஆல் ஆன பக்கங்களை உருவக்க முடியும். அதை எப்படி செய்வது என்பதை அடுத்து அடுத்து வரும் கட்டுரைகளில் பார்க்கலாம். நன்றி.

Creative Commons Licence
This work is licensed under a Creative Commons Attribution-NonCommercial 4.0 International License.

Beautiful and clean diagrams with Keynote

Look at this flow chart like diagram. It is a really nice representation for explaining the concepts of Iterators and Generators.

Relationships
By Vincent Driessen

If you use git, then there is a big chance you might have come across this article A successful Git branching model by the same author. There are more pretty diagrams in that post as well. For a very long time I have wondered how those diagrams are made. I decided to find out today and it turns out it was done with: Keynote – the powerpoint equivalent in Mac.

Keynote.png

Pretty good.

Flask Marshmallow – has no attribute data

TL,DR-

Remove .data after the schema.dump() calls in the code. Marshmallow 3 supplies the data directly.

The Issue

If you use Flask-Marshmallow in your Flask application for serialisation of models, then there are chances that you will run into this error when you upgrade dependencies. The reason for this issue is Flask Marshmallow has added support for Marshmallow 3 when moving from version 0.10.0 to 0.10.1. And Marshmallow 3 returns the data directly when the dump function is called instead of creating an object with the .data attribute.

The solution

This is a breaking change and requires the codebase to be updated. Remove all .data accessors from the dump() outputs. For example:

users = user_schema.dump(query_result, many=True).data

# Will become

users = user_schema.dump(query_result, many=True)

Some thoughts

I don’t know why such a big support change is released as a bug fix version 0.10.0 to 0.10.1. It at least should be released as 0.11 in my opinion. If I could go further I would say wrappers for libraries or software in general should always follow the parent’s version number to the minor version. If Marshmallow is in 3.2.x then it makes sense for Flask-Marshmallow to be in 3.2.x. That provides a better idea of what we are using and what are the changes we need to account for.