Blog

Parsing & Validating JSON in Flask Requests

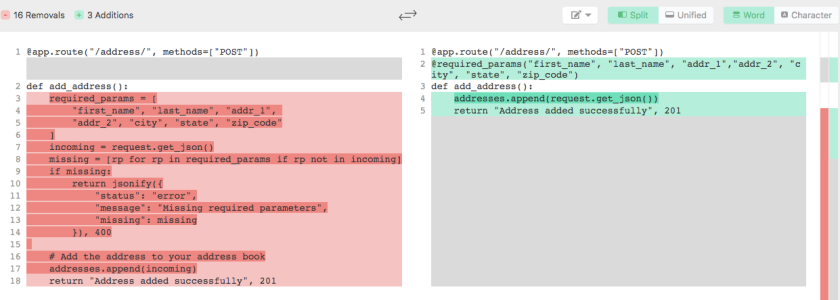
This is a follow up to the previous article: Simplifying JSON parsing in Flask routes using decorators

In the previous article we focused on simplifying the JSON parsing using decorators. The aim was to not repeat the same logic in every route adhering to the DRY principle. I will focus on what goes on inside the decorator in this article.

I ended the last article with the following decorator (kindly see the implementation of @required_params in the previous article)

@route(...)
@required_params({"name": str, "age": int, "married": bool})
def ...

where we pass the incoming parameters and their data types and perform their type validation.

Using an external library for validation

The decorator implemented above is suitable for simple use cases. Now, consider the following advanced use cases

  • What if we need more complex validations like Email or Date validation?
  • What if we need to restrict a field to certain values? Say role should be restricted to (teacher, student, admin)?
  • What if need to have custom error messages for each field?
  • What if the value of a parameter is an object with its own set of validation rules?

Solution for neither one of them is going to be trivial enough to be implemented in a single & simple decorator function. This is when the external libraries come to our rescue. Libraries like jsonschema, schematics, Marshmallow ..etc., not only provide functionality, they would also bring more clarity to the codebase, provide modularity and improve the readability.

Note: If you are already using a serialisation library like marshmallow in your project to handle your database Models, you probably knew all this. If you don’t use a serialisation library in your project and instead have something like to_json() or to_dict() function in your models, then you SHOULD consider removing those functions and use a serialisation library.

Example application

Let me layout an example use case which we use to explore this. Here we have a simple app that has two routes which accepts JSON payload. The expected JSON data is described in the decorator @required_params(...) and the validation is carried out inside the decorator function.

from flask import Flask, request, jsonify
from functools import wraps
app = Flask(__name__)
users = []
def required_params(required):
def decorator(fn):
@wraps(fn)
def wrapper(*args, **kwargs):
_json = request.get_json()
missing = [r for r in required.keys()
if r not in _json]
if missing:
response = {
"status": "error",
"message": "Request JSON is missing some required params",
"missing": missing
}
return jsonify(response), 400
wrong_types = [r for r in required.keys()
if not isinstance(_json[r], required[r])]
if wrong_types:
response = {
"status": "error",
"message": "Data types in the request JSON doesn't match the required format",
"param_types": {k: str(v) for k, v in required.items()}
}
return jsonify(response), 400
return fn(*args, **kwargs)
return wrapper
return decorator
@app.route('/')
def hello_world():
return 'Hello World!'
@app.route("/user/", methods=["POST"])
@required_params({"first_name": str, "last_name": str, "age": int, "married": bool})
def add_user():
# here a simple list is used in place of a DB
users.append(request.get_json())
return "OK", 201
if __name__ == '__main__':
app.run()
view raw app.py hosted with ❤ by GitHub

Requests and responses

Now let us sent an actual request to this application.

decorator_correct_request

Now that is really nice, we have got a “201 Created” response. Let us now try with a wrong input. I am setting the married field to twice instead of true or false, the expected boolean values.

decorator_wrong_request

That returns a 400 Bad request as expected. The decorator has tried validating the types of the input and has found that one of the values is not in the expected format. But the error message itself is kind of crude:

  1. It doesn’t actually tell us which parameter is wrong. In a complex object this might lead to wasting a lot of time jumping between the docs and the input to guess and find the wrong parameter.
  2. The data types are represented as Python class types like class 'int'. While this might convey the intended meaning, it is still far better to say something decent like integer instead.

Using Marshmallow for validation

Using the marshmallow we can define the schema of our expected JSON.

from marshmallow import Schema, fields, ValidationError

class UserSchema(Schema):
    first_name = fields.String(required=True)
    last_name = fields.String(required=True)
    age = fields.Integer(required=True)
    married = fields.Boolean(required=True)

Now that the marshmallow will take care of the validation, we can update our decorator too:

def required_params(schema):
    def decorator(fn):

        @wraps(fn)
        def wrapper(*args, **kwargs):
            try:
                schema.load(request.get_json())
            except ValidationError as err:
                error = {
                    "status": "error",
                    "messages": err.messages
                }
                return jsonify(error), 400
            return fn(*args, **kwargs)

        return wrapper
    return decorator

And finally we pass an object of the UserSchema instead of a list of params in the decorator:

@app.route("/user/", methods=["POST"])
@required_params(UserSchema(strict=True))
def add_user():
    # here a simple list is used in place of a DB
    users.append(request.get_json())
    return "OK", 201

Note: I have passed the strict=True so that Marshmallow will raise a ValidationError. By default marshmallow 2 doesn’t raise an error, however, it should be happening in version 3. Check your version to see if the strict parameter is necessary.

With the app updated, now let us send a request and test it.

marshmallow_error_1.png

Good. We get the “not a boolean” validation error. Now what if we have multiple errors?

marshmallow_error_2

Sweet, we get parameter specific error messages even for multiple errors. If you remember our original implementation, only one error could be returned at a time because the first exception would return a response. Using the library provides a good upgrade from that.

By defining multiple schemas for the various data models that we expect as an input, we could perform complex validations independent of our view function. This gives us clean view functions that handle just the business logic.

Conclusion

This post only exposes the basic implementation of using the libraries and simplifying parsing and validation of incoming JSON. The marshmallow library offers a lot more like: complex validators like Email and Date, parsing subset of a schema by using only, custom validators (age between 30-35 for example), loading the data directly into SQLAlchemy models (check out Flask-marshmallow)..etc., These can really make app development easier, safer and faster.

Schematic is another library offering similar functionalities that focuses on ORM integration.

Simplifying JSON parsing in Flask routes using decorators

Flask is simple and effective when it comes to reading input parameters from the URL. For example, take a look at this simple route.

@app.route("/todo/<int:id>/")
def task(id):
    return jsonify({"id": id, "task": "Write code"})

You specify a parameter called id and set its type as int, Flask automatically parses the value from the URL converts it to an integer and makes it available as a parameter in the task function.

But it becomes harder when we start working with JSON being passed on as inputs when we build APIs.

@app.route("/todo/", methods=["POST"])
def create_task():
    incoming = request.get_json()
    if "task" not in incoming:
        return jsonify({"status": "error", "message": "Missing parameter 'task'"}), 400

    tasks.append(incoming["task"])
    return "Task added successfully", 201

The above method requires the JSON input to contain task parameter in order to create a new task. So it has to check if that parameter is send during the request before it can add the task to the task list. This is simple to implement for just a few parameters. In the real world the APIs aren’t always simple. For example, if you envision an address book API, you probably have multiple fields like first name, last name, address line 1, address line 2, city, state, zip code…etc., and writing something like

if "first_name" not in incoming:
    ...
if "last_name" not in incoming:
    ...

is going to be tedious. We can perhaps take a more pythonic approach and write the logic as:

@app.route("/address/", methods=["POST"])
def add_address():
    required_params = [
        "first_name", "last_name", "addr_1", 
        "addr_2", "city", "state", "zip_code"
    ]
    incoming = request.get_json()
    missing = [rp for rp in required_params if rp not in incoming]
    if missing:
        return jsonify({
            "status": "error",
            "message": "Missing required parameters",
            "missing": missing
        }), 400

    # Add the address to your address book
    addresses.append(incoming)
    return "Address added successfully", 201

As you write more routes, you will start to notice that the missing and if missing logic repeating itself in all the places where we are expecting JSON data. Instead of repeating the logic over and over, we can simplify it by putting it in a decorator like this:

def required_params(*args):
    """Decorator factory to check request data for POST requests and return
    an error if required parameters are missing."""
    required = list(args)

    def decorator(fn):
        """Decorator that checks for the required parameters"""

        @wraps(fn)
        def wrapper(*args, **kwargs):
            missing = [r for r in required if r not in request.get_json()]
            if missing:
                response = {
                    "status": "error",
                    "message": "Request JSON is missing some required params",
                    "missing": missing
                }
                return jsonify(response), 400
            return fn(*args, **kwargs)
        return wrapper
    return decorator

Now we can write the same add_address route like this:

@app.route("/address/", methods=["POST"])
@required_params("first_name", "last_name", "addr_1","addr_2", "city", "state", "zip_code")
def add_address():
    addresses.append(request.get_json())
    return "Address added successfully", 201

Here is how it has changed

json_decorator_diff

The required_params decorator will do the job of checking for the presence of parameters and returning an error. We can add the decorator to any routes that requires JSON parameter validation.

If we put in some more work, we can even expand the logic by specifying the datatypes of those parameters pass a dictionary like this:

@route(...)
@required_params({"name": str, "age": int, "married": bool})
def ...

and in the decorator perform the validations

def required_params(required):
    def decorator(fn):
        """Decorator that checks for the required parameters"""

        @wraps(fn)
        def wrapper(*args, **kwargs):
            _json = request.get_json()
            missing = [r for r in required.keys()
                       if r not in _json]
            if missing:
                response = {
                    "status": "error",
                    "message": "Request JSON is missing some required params",
                    "missing": missing
                }
                return jsonify(response), 400
            wrong_types = [r for r in required.keys()
                           if not isinstance(_json[r], required[r])]
            if wrong_types:
                response = {
                    "status": "error",
                    "message": "Data types in the request JSON doesn't match the required format",
                    "param_types": {k: str(v) for k, v in required.items()}
                }
                return jsonify(response), 400
            return fn(*args, **kwargs)
        return wrapper
    return decorator

With this if a JSON field is sent with the wrong datatype an appropriate response will be returned as well.

PS: I found this full blown decorator function with custom error messages and validations after I wrote this post. Check it out if you want even more functionality.

OSM Mapping with AI from Facebook

Facebook and HOT OSM have come together to use machine learning to make maps better. It looks like a mutually beneficial collaboration that will help OSM

“AI is supercharging the creation of maps around the world” is a very interesting development in OSM mapping. It perhaps will reduce the number of hours required to map areas by at least a couple of orders of magnitude.

Automatic feature extraction is nothing new of course. People have been doing it for decades. I should know, I spent two years mastering (supposedly) on Remote Sensing, the domain that deals with capturing information about the earth using satellites and extracting useful information from the captured data. The traditional remote sensing workflow uses techniques like Supervised Classification and Unsupervised Classification for feature extraction. The beauty of machine learning algorithms is that models can be built which can merge these two classification techniques and automate the process.

OSM community AFAIK stayed away from automated data generation mostly because the work involved in cleaning up bad data is more difficult and tedious than in creating new data. It looks like the collaboration from HOT OSM and the development of RapID (enhanced ID), the process put in place ensures that only quality data goes into the system preventing the issues of bad data from happening.

While it is all colourful for the OSM community, the question with profit seekers like Facebook is always what’s the catch? I tend to think there is no catch for the OSM community and that FB has decided to invest some money in the OSM so that they can use the fruits of community work for their benefits. It looks like a mutually beneficial arrangement. The community gets the resources from FB to create a better dataset and FB gets the data for its usage. I am sure FB will extract more value out of their investment in the long run and reap more benefits than the community. They will obviously have their own data layers on top of the OSM data, they will overlay all sorts of tracking data and enhance their capabilities as a surveillance machine. But all that is left to them and their corporate interests.

For now this is a good thing and doesn’t seem to do any harm to OSM.

Districts of Tamil Nadu – Hexagonal Maps

Hexagonal maps are useful for creating data visualisations of data points that are a representation of quantities that require equal sized polygons. For example Election Maps. While geographic map of the assembly and parliamentary constituencies might be used for visualising election results, it is a false one. The constituencies are created based on the number of people in a region under the principal of a representative for every X number of people. In such a scenario, using a geographic representation for a place like Chennai, which is made of 3 parliamentary constituencies, doesn’t give us the same perception as the 3 constituencies Kanniyakumari, Thoothukudi, and Thirunelveli put together. But in reality that’s what it actually means.

hex_comparison

  • Geographic Representation – Skewed representation of the base data. Unequal real estate for equal (approx) number of people
  • Hexagonal Representation – Correct representation of the base data. Equal real estate for equal number of people.

Now that we have the Parliamentary constituencies in Hex Map form, why not have the Districts as well.

TN_hexTN_2019

If you need the base data to create your own maps. The GeoJSON files for the same are available here https://github.com/tecoholic/Geographic-Data

Adding Unique Constraints After the Fact in SQLAlchemy [Copy]

This post is originally from https://skien.cc/blog/2014/01/31/adding-unique-contraints-after-the-fact-in-sqlalchemy/. But the URL is throwing a 404 and I could access the page only from the Google cache. I am copying it here in case it goes missing in the future.

Update:

Do Government Teachers Deserve Better Pay Than Private Teachers in Tamilnadu?

Recently Tamilnadu’s government teachers went on a strike and captured the attention of everyone in the state. There were emotions flying from everyone. Around 5 out their 9 demands revolved around money: pay, pension and arrears. An argument which could be heard around was:

Private school teachers do much more work for much less pay, so government school teachers shouldn’t be greedy

Is it really that way? I decided to investigate with whatever little data I could. One key factor that could be used to quantify the workload of teachers is Student-to-Teacher ratio, simply stated, the number of children each teacher is responsible for. Higher the number, more the workload, more notebooks to correct, more exam papers to evaluate, longer queues to handle … you get the idea.

With that in mind, let us put data to work.

Data Used

Calculations

With the above sources giving a neat count of schools, students and teachers based on the management type of the school, it was just a matter of selecting the right columns and dividing one by the other.

Student-to-teacher Ratio = No.of Students / No.of Teachers

I uploaded the dataset to Kaggle and wrote a kernel script to perform the above calculation for each type of schools: Government, Government-Aided, and Private schools.

Observations

Here is the heatmap of the Student to teacher ratios.

student_teacher_ratios_table

There is a clear pattern that can be observed. The government aided school teachers have in some cases twice as much workload as their peers in govt or private schools. Aided school teachers do the work of all the govt. teachers like Census data, Electoral rolls, Election booth staff..etc., too.

Here is graph to give a sense of how far removed are the aided school teachers from their peers.

student_teacher_ratio_plot

Conclusion

To answer the question asked in the title. I am not sure about government school teachers, but it certainly looks like the govt. aided school teachers deserve better.

Replacing image in a PDF with Python

Being a freelancer is an interesting role. You come across a variety of projects. I recently worked on a project involving replacing images in a PDF which taught me a couple of things.

  1. While there are a number of tools to deal with PDF in Python, the general purpose tools can only do so much because… reason 2
  2. PDF is a dump of instructions to put things in specific places. There is no logical way it is done that make general purposes tools manipulate the PDF in a consistent way.
  3. Not everything is bad. Almost all positive changes like adding text or image and whole page changes like rotating, cropping are usually possible and so are all read operations like text, image extraction ..etc.,
  4. The issue is when you want to delete something and replace it with something else.

With that learnt, I set out to achieve the goal anyway.

Step 1 – Understanding the format

Humans invented the PDF format, which means they used words to describe things in the file, which means we can read them. So opening a PDF file in a text editor like VIM will show something like this.

PDF in VIM

Without getting into the entirety of the PDF spec, let us see what this means. PDF is a collection of objects. There is usually an identifier like int int obj followed by some metadata and then a stream of binary information starting with stream and ends with endstream and endobj. A image in our case would be represented as

16 0 obj
<< /Length 17 0 R /Type /XObject /Subtype /Image /Width 242 /Height 291 /Interpolate
true /ColorSpace 7 0 R /Intent /Perceptual /BitsPerComponent 8 /Filter /DCTDecode
>>
stream
Image binary data here like ÿØÿá^@VExif^@^@MM^@*^@^@^@^H^@^D^A^Z^@^E^@^@
endstream
endobj

So to successfully replace an image we will have to replace the image binary data and the metadata like width and height.

Step 2 – Uncompressing the PDF and extracting the images

Use a PDF manipulation called toolkit called PDFtk.

pdftk sample.pdf output uncompressed.pdf uncompress

What this command does is, it uncompresses the file and makes it easier to read and manipulate. Let us open the uncompressed.pdf in VIM to see the difference.

uncompressed pdf

Step 3 – Identifying the image to replace

PDF is essentially a collection of objects and a PDF file might contain multiple images, there is no way to identify a particular image in the binary data of the PDF file (unless you are from Matrix). We will have to first extract the images from the PDF and match the PDF object to the image using its metadata like height and width. To do that install pdfimages command-line tool (part of poppler-utils) and run pdfimages -list uncompressed.pdf. This will list all the images in the PDF with their metadata.

page   num  type   width height color comp bpc  enc interp  object ID x-ppi y-ppi size ratio
--------------------------------------------------------------------------------------------
   1     0 image     277   185  icc     3   8  jpeg   yes       11  0   113   113 69.2K  46%
   1     1 image     277   185  icc     3   8  jpeg   yes       10  0   113   113 31.9K  21%
   1     2 image     242   291  icc     3   8  jpeg   yes       12  0   112   112 55.2K  27%

Next extract all the images in their original formats using

pdfimages -all uncompressed.pdf image

That extracts the files and names them after the prefix we provided like this image-000.jpg image-001.jpg image-002.jpg.

Now open your images check their file’s height, width and file size and mark the details for the one to replace. In my case the file details were:

  • height – 185
  • width – 277
  • size – 70836

There are two images which matches the height and width, thankfully they have different file sizes.

Step 4 – Identifying the object in PDF that represents the image

I opened the uncompressed.pdf in VIM and searched for the most unique value I have found for the image – its size.

identifying the image object

Now we can identify the object identifier, in this case it is 11 0 obj.

Step 5 – Replacing the image with another image

Now the job is to switch the object 11’s image data with our image’s data. You can use the following Python script to achieve that.


import sys
import os
from PIL import Image
# Include the \n to ensure extact match and avoid partials from 111, 211…
OBJECT_ID = "\n11 0 obj"
def replace_image(filepath, new_image):
f = open(filepath, "r")
contents = f.read()
f.close()
image = Image.open(new_image)
width, height = image.size
length = os.path.getsize(new_image)
start = contents.find(OBJECT_ID)
stream = contents.find("stream", start)
image_beginning = stream + 7
# Process the metadata and update with new image's details
meta = contents[start: image_beginning]
meta = meta.split("\n")
new_meta = []
for item in meta:
if "/Width" in item:
new_meta.append("/Width {0}".format(width))
elif "/Height" in item:
new_meta.append("/Height {0}".format(height))
elif "/Length" in item:
new_meta.append("/Length {0}".format(length))
else:
new_meta.append(item)
new_meta = "\n".join(new_meta)
# Find the end location
image_end = contents.find("endstream", stream) – 1
# read the image
f = open(new_image, "r")
new_image_data = f.read()
f.close()
# recreate the PDF file with the new_sign
with open(filepath, "wb") as f:
f.write(contents[:start])
f.write("\n")
f.write(new_meta)
f.write(new_image_data)
f.write(contents[image_end:])
if __name__ == "__main__":
if len(sys.argv) == 3:
replace_image(sys.argv[1], sys.argv[2])
else:
print("Usage: python process.py <pdfile> <new_image>")

view raw

process.py

hosted with ❤ by GitHub

Download the file, change the OBJECT_ID value, save the file and run:

python process.py <your pdf> <new image>

I just used the one of the extracted images to replace another one. So here are the before and after images.

image replaced pdf

Step 6 – Compressing the file back (OPTIONAL)

Do this only if you really need to do it for some reason. It is usually cool to just use the uncompressed file.

pdftk uncompressed.pdf output replaced.pdf compress

Map of PM Modi’s Domestic Visits

PM Modi visited Tamil Nadu on 27th January 2019 for the AIIMS Hospital ground breaking ceremony. Twitter was trending with #GoBackModi and #TNWelcomesModi and I was curious about the number of times has PM Modi visited Tamil Nadu before.

The PM India site has a neat list of all the visits http://www.pmindia.gov.in/en/pm-visits/?visittype=domestic_visit

So, I created a map out of it.

Visits_by_PM_Modi.png

Update:

This map was replaced after some errors were discovered in the base data.